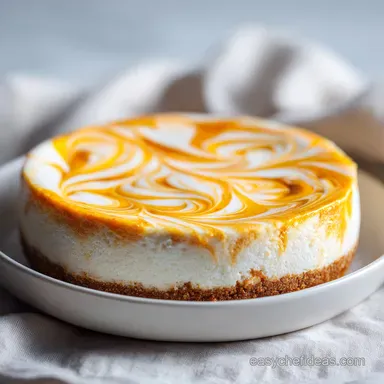
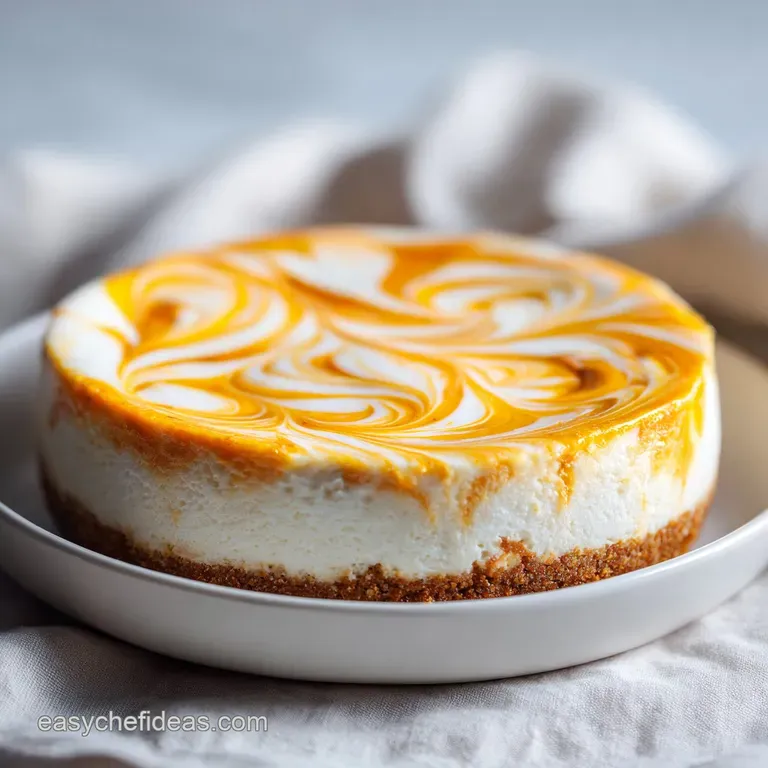
Creamy Pumpkin Swirl Cheesecake: Silky and Marbled
- Time: 30 min active + 60 min cook + 6 hours chilling = Total 7 hours 30 mins
- Flavor/Texture Hook: Shatter crisp gingersnap crust with a silky, marbled filling
- Perfect for: Thanksgiving centerpieces or autumn dinner parties
The smell of cinnamon and toasted ginger hitting the air is basically my signal that autumn has officially arrived. Last November, I hosted my entire extended family, and the kitchen was a chaotic mess of roasting turkeys and peeling potatoes.
In the middle of that madness, I slid this cake into the oven, and the aroma alone managed to calm everyone down. It’s that specific scent, a mix of warm maple and tangy cream cheese, that makes a house feel like a home.
I used to struggle with cheesecakes splitting right down the middle, which is just heartbreaking when you've spent all afternoon on it. But once I stopped rushing the temperature of my ingredients and started using a water bath, everything changed.
This particular version is a showstopper because of the marbled look, and it’s far more interesting than a standard pumpkin pie.
You can expect a dessert that feels dense yet airy, with a sharp contrast between the spicy gingersnap base and the mellow vanilla bean notes. Making a creamy pumpkin swirl cheesecake isn't about being a professional; it's about patience and following a few simple rules about heat.
Trust me, once you see those orange swirls against the pale vanilla, you'll never go back to a plain cheesecake again.
Making a Creamy Pumpkin Swirl Cheesecake
Right then, let's get into why this actually works. Most people treat cheesecake like a cake, but it's actually more like a custard. If you treat it too harshly, it fights back by cracking or becoming grainy.
Temperature Balance: Room temperature cream cheese prevents lumps, ensuring the batter is silky instead of curdled.
Moisture Control: The water bath keeps the oven humid, which stops the top from drying out and cracking.
Air Management: Adding eggs on low speed prevents too many air bubbles from forming, so the cake doesn't puff up and then collapse.
Fat Stability: Full fat sour cream adds a slight tang and helps stabilize the structure, giving it that velvety mouthfeel.
If you're wondering how this compares to other styles, here is a quick look at different methods.
| Method | Bake Time | Texture | Best For |
|---|---|---|---|
| Water Bath | 60 mins | Velvety/Dense | Special Occasions |
| Dry Bake | 50 mins | Firmer/Airy | Casual Parties |
| No Bake | 0 mins | Mousse like | Hot Summer Days |
But what about the actual chemistry? I've noticed that the ratio of fat to acid is what really determines if a slice holds its shape or slumps on the plate. According to Serious Eats, the water bath is the single most effective way to regulate the internal temperature of a custard based dessert.
Component Analysis
| Ingredient | Science Role | Pro Secret |
|---|---|---|
| Cream Cheese | Structural Base | Use blocks, not tubs, for better stability |
| Sour Cream | Acid/Tenderizer | Room temp prevents "breaking" the batter |
| Eggs | Binder | Add slowly to avoid incorporating air |
| Pumpkin Puree | Flavor/Moisture | Pat dry with a paper towel if too watery |
The Essentials You'll Need
For the crust, you'll want something that can stand up to the moisture of the filling. I love gingersnaps because they add a spicy kick that cuts through the richness of the cheese.
- 1.5 cups (150g) gingersnap cookie crumbs Why this? Adds a spicy, aromatic contrast to the vanilla
- 5 tbsp (70g) unsalted butter, melted Why this? Binds crumbs into a crisp shell
- 1 tsp (2g) ground cinnamon Why this? Bridges the gap between crust and filling
- 1 tbsp (12g) brown sugar Why this? Adds a deep, molasses like sweetness
For the velvet vanilla base: - 24 oz (680g) cream cheese, room temperature Why this? The core structure of the cake - 0.5 cup (100g) granulated sugar Why this? Standard sweetness without altering texture - 1 cup (240g) full fat sour cream, room temperature
Why this? Adds a silky, tangy finish - 3 large eggs, room temperature Why this? Sets the cake during baking - 1 tbsp (15ml) pure vanilla extract Why this? Classic aromatic base - 0.5 tsp (3g) salt Why
This? Balances the sugar and enhances pumpkin
For the pumpkin cheesecake swirl: - 0.5 cup (125g) pumpkin puree Why this? Pure autumn flavor - 2 oz (55g) cream cheese, room temperature Why this? Keeps the swirl thick and stable - 3 tbsp (35g) maple syrup Why this? Adds a woody
Sweetness pumpkin loves - 1 tsp (2g) pumpkin pie spice Why this? The classic fall blend - 0.25 tsp (1g) ground ginger Why this? Adds a sharp, fresh bite
If you don't have all of these, don't panic. Here are some swaps that actually work.
| Original Ingredient | Substitute | Why It Works |
|---|---|---|
| Gingersnaps | Graham Crackers | Neutral flavor. Note: Less spicy, more traditional |
| Sour Cream | Greek Yogurt | Similar acidity. Note: Slightly thicker texture |
| Maple Syrup | Honey | Similar viscosity. Note: Stronger flavor, may mask pumpkin |
| Pumpkin Puree | Butternut Squash Puree | Similar texture. Note: Milder flavor, needs more spice |
I once tried using low-fat cream cheese to be "healthy," and let me tell you, it was a disaster. The cake didn't set, and it had this weird, grainy texture. Honestly, don't even bother with low-fat options here. This is a treat, so let's keep the fat in.
The Right Gear for Baking
You don't need a professional kitchen, but a few specific tools make this creamy pumpkin swirl cheesecake much easier. A 9 inch springform pan is non negotiable, as you can't exactly flip a cheesecake out of a regular cake pan without it falling apart.
You'll also need a stand mixer or a handheld electric mixer. I usually use a KitchenAid because it's easier to keep the speed low when adding eggs. A wide bottomed baking pan or a roasting tray is essential for the water bath, as it needs to hold the springform pan and several cups of water.
Don't forget a long piece of heavy duty aluminum foil. You'll need to wrap the bottom and sides of your pan to prevent water from leaking into the crust. If you've ever had a soggy bottom, this is usually where the mistake happened.
Step-by-step Baking Guide
Let's crack on with the actual process. I've broken this down into phases so you can organize your workspace.
Phase 1: The Base
First, combine your gingersnap crumbs, melted butter, cinnamon, and brown sugar in a bowl. Mix until it feels like wet sand. Press this firmly into the bottom of your 9 inch springform pan. Use the base of a measuring cup to get it really packed down.
Bake at 325°F (160°C) for 10 minutes until it smells toasted and fragrant. Let it cool completely.
Phase 2: The Filling
Beat the room temperature cream cheese and sugar on medium low speed. You want it smooth and lump free, but don't go full blast or you'll whip too much air into it. Fold in the sour cream, vanilla, and salt. Now, the critical part: add eggs one at a time on the lowest speed.
Stop mixing the second the yellow streaks disappear. If you overmix here, you're inviting cracks.
Phase 3: The Swirl
In a separate small bowl, whip together the pumpkin puree, 2 oz of cream cheese, maple syrup, pumpkin pie spice, and ginger. Mix until it forms a thick, smooth paste. Pour your vanilla base over the cooled crust. Drop dollops of the pumpkin mixture onto the top. Use a knife or a skewer to gently swirl them together.
Don't over swirl, or you'll just get a muddy orange color instead of a marbled look.
Phase 4: The Bake
Wrap your pan in foil, place it in a roasting tray, and fill the tray with hot water until it reaches about an inch up the side of the pan. Bake at 325°F (160°C) for 60 minutes.
You're looking for the edges to be set, but the center should still have a slight jiggle when you shake the pan.
- 1. Temperature
- Ensure cream cheese is exactly room temperature (approx 68°F) before starting.
- 2. Water Level
- The water should reach exactly 1 inch up the pan side.
- 3. The Jiggle
- The center 2 inches of the cake should still move slightly when shaken.
Once it's done, let it cool on the counter for an hour, then slide it into the fridge for 6 hours. I know it's tempting to cut into it early, but the structure needs that cold set to become velvety.
Fixing Common Baking Glitches
Even with a guide, things happen. I've had my fair share of "oops" moments in the kitchen.
Troubleshooting Common Issues
| Issue | Solution | |||
|---|---|---|---|---|
| Why Your Surface Cracked | This usually happens because the cake was overbaked or the oven was too hot. The proteins in the eggs tighten too much and pull the surface apart. To prevent this, always use a water bath and take the | |||
| Why Your Crust Is Soggy | If water leaks into the pan, your crust becomes mushy. This is why the foil wrap is so important. If it happens anyway, you can try a slightly thicker crust next time or pre bake it for an extra 2 min | |||
| Why Your Filling Is Lumpy | Lumps are almost always caused by cold cream cheese. If you forgot to take it out of the fridge, you can microwave it in 10 second bursts, but be careful not to melt it. | Problem | Root Cause | Solut |
Creative Flavor Twists
Once you've mastered the creamy pumpkin swirl cheesecake, you can start playing with the flavors. If you're in the mood for something different, you might try a maple pecan twist by adding toasted pecans to the crust and a drizzle of maple syrup on top before serving.
For those who love a bit more fruit, an apple cinnamon swirl works beautifully. Just replace the pumpkin mixture with a thick apple compote. If you're looking for a more traditional base, my Classic New York Cheesecake recipe uses a similar logic but focuses on a deeper, denser vanilla profile.
If you want to go the "healthier" route, you can swap the sugar for a monk fruit sweetener. However, be aware that some sweeteners can change the texture, making it slightly grainier.
For a dairy-free version, cashew based cream cheeses can work, but the set time in the fridge will need to be extended to 12 hours.
Decision Shortcut:
- If you want more "bite" → Add 1/2 tsp extra ground ginger to the swirl.
- If you want a richer crust → Mix in 2 tbsp of melted brown butter.
- If you're short on time → Use a pre made gingersnap crust (but the homemade one is better).
Storage and Waste Tips
Store your cheesecake in the fridge, covered with a loose piece of plastic wrap or in a cake dome. It stays fresh and creamy for up to 5 days. If you have leftovers that you can't finish, you can actually freeze slices! Wrap them individually in parchment paper and then foil. They'll keep for about 2 months.
To reheat, just let them thaw slowly in the fridge overnight.
To make this a zero waste project, don't throw away the pumpkin guts or seeds from your fresh pumpkin. You can make Roasted Pumpkin Seeds for a salty snack that balances the sweetness of the cake. Also, if you have leftover cream cheese, it's great for a quick morning bagel spread or a savory dip.
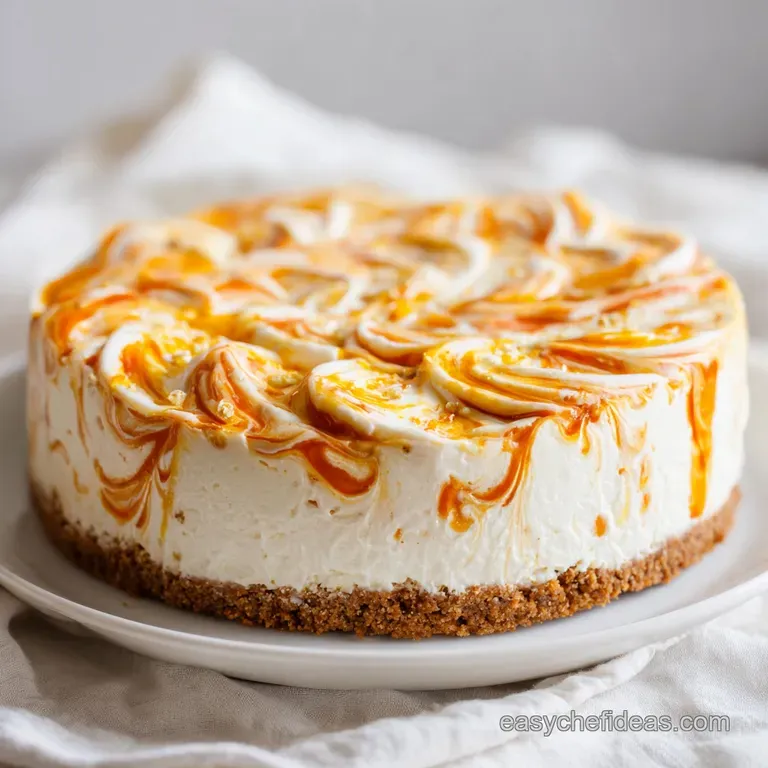
Plating Your Final Piece
Since this is a seasonal showstopper, the way you present it matters. Depending on who you're serving, you can choose different levels of effort.
The Plating Levels:
- Simple: A clean, thick slice on a white plate. The marble pattern does all the work here.
- Polished: A dollop of homemade whipped cream on the side, a dusting of cinnamon, and a single mint leaf for a pop of color.
- Restaurant: A thin smear of pumpkin coulis on the plate, a precise slice of cake, and a sprinkle of crushed gingersnaps around the base for texture.
| Level | Key Addition | Vibe |
|---|---|---|
| Simple | None | Family Lunch |
| Polished | Whipped Cream | Holiday Dinner |
| Restaurant | Coulis & Crumbs | Formal Event |
Right then, you're all set. This creamy pumpkin swirl cheesecake is a bit of a project, but the result is a dessert that looks like it came from a high end bakery. Just remember: room temperature ingredients, a steady water bath, and a whole lot of patience during the chilling phase. Let's get baking!
Recipe FAQs
Why did my cheesecake crack on top?
Overbaking or excessive heat. This causes the egg proteins to tighten too much and pull the surface apart. Always use a water bath at 325°F to regulate the temperature.
How to create the pumpkin swirl pattern?
Drop dollops of pumpkin mixture onto the vanilla base. Use a knife or skewer to gently swirl the two layers together before baking.
Is it true I can use cold cream cheese to save time?
No, this is a common misconception. Using cold cream cheese results in a lumpy filling. Ensure all cream cheese and sour cream are at room temperature for a smooth texture.
How long can I store this cheesecake in the fridge?
Up to 5 days. Keep the cake covered with a loose piece of plastic wrap or stored in a cake dome to maintain moisture.
How to freeze leftover slices?
Wrap slices individually in parchment paper and then foil. Store for up to 2 months and thaw slowly in the fridge overnight before serving.
Why is my cheesecake crust soggy?
Water leaked into the pan. This occurs if the foil wrap on the springform pan is not tight enough. Ensure a secure seal to keep the water bath external.
Can I make this without baking it?
No, this specific recipe requires baking to set the cream cheese and eggs. If you prefer a chilled dessert, you might enjoy making no-bake cheesecake bars instead.
Creamy Pumpkin Swirl Cheesecake