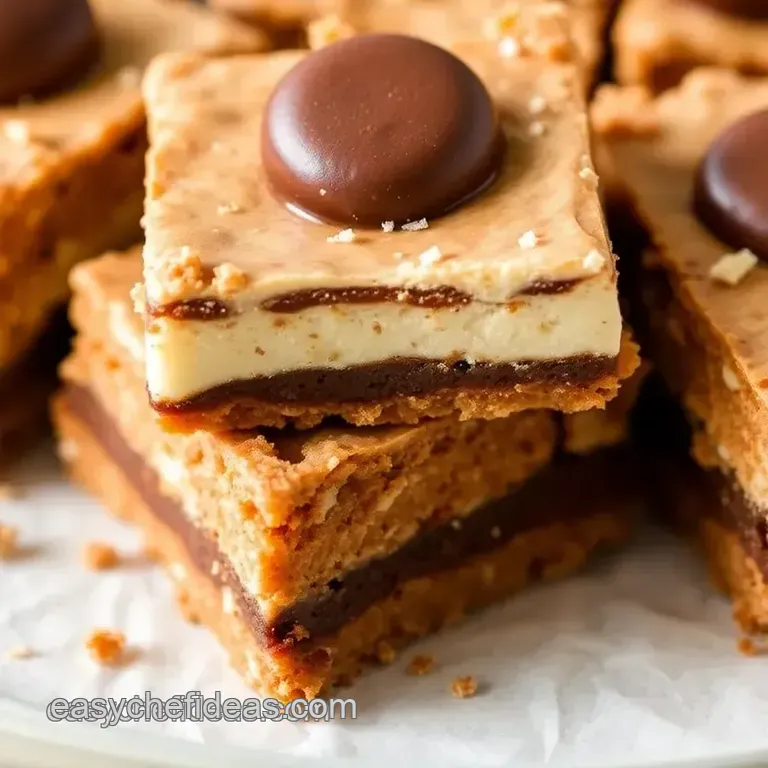
No-Bake Buckeye Bars
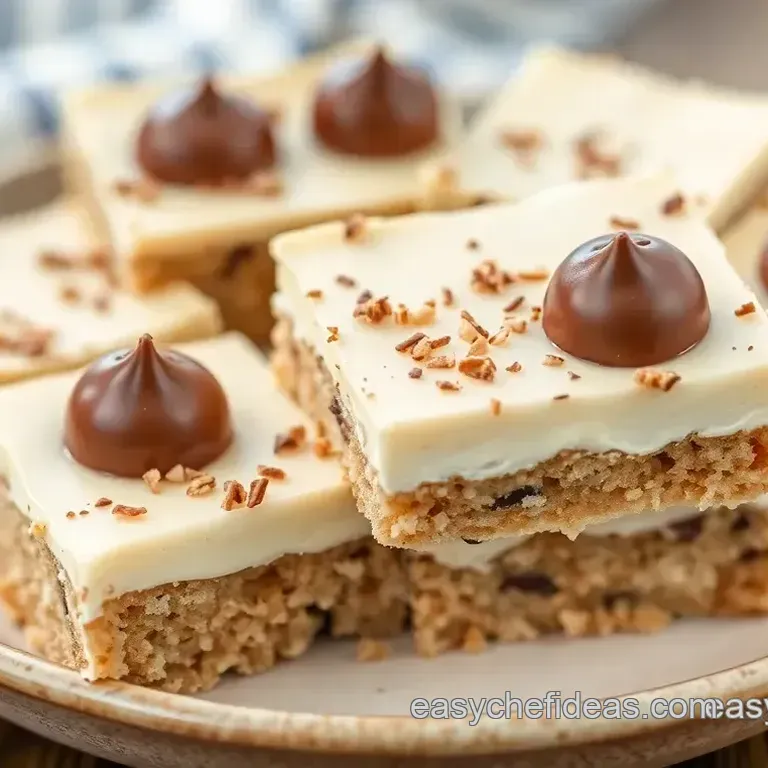
Satisfying Your Sweet Tooth with No-Bake Buckeye Bars: Decadent & Easy Treat
Hey there! have you ever had a dessert that was so good, you felt like it should be illegal? like, it's almost a crime to have something this delicious without breaking a sweat? well, let me tell you about these no-bake buckeye bars .
Picture this: it’s a hot summer day, the kids are running around, and you just want something easy peasy to fulfill that sweet craving.
These bars are your answer! seriously, they’re rich, creamy, and all kinds of amazing. they give you the perfect balance of sweet, salty, and nutty what’s not to love?
These treats are inspired by classic buckeye candy recipes , those little round beauties that are a favorite in ohio and beyond.
While making candy can seem like a big deal, you won’t have to worry about turning on the oven with these bars! oh, and just a heads up: while they're super simple to whip up, they can steal the spotlight at any gathering, from kids' parties to potlucks.
Trust me, everyone will be begging for the recipe!
Quick Recipe Overview
So, what’s the deal with these bars? no-bake buckeye bars are basically a mashup of easy peanut butter bars and chocolate heaven.
Inspired by the juicy tradition of buckeye candy , the recipe has evolved into a super popular dessert that’s just here to make your day a little sweeter.
Now, let’s break it down. you’ll be looking at about 15 minutes of active prep time and a quick 30 minutes chilling time.
That’s a total of 45 minutes easy, right? oh, and the best part, you get twelve bars out of this, perfect for sharing!
Key Benefits of No-Bake Buckeye Bars
Now, let’s talk about why you need these bars in your life right now. first off, they’re incredibly satisfying in terms of flavor.
Imagine creamy peanut butter staring lovingly at melted chocolate it’s a match made in dessert heaven.
Plus, these bars come loaded with some sweet health benefits! while they’re indulgent, they pack a hefty punch of protein thanks to the peanut butter.
Ain't that a win-win in snack land? they’re a fun way to enjoy a treat without guilt. and did i mention how kid-friendly they are? kids can help out in the kitchen since there’s no equipment needed to heat things up.
Thinking of serving these for special occasions? you betcha! they’re perfect as easy holiday treats or during family get-togethers. you might just find them making an appearance at every birthday and backyard bbq from now on.
Why These Bars Shine Over Other Desserts
So why not go for a standard cookie or traditional pie, you ask? the answer is simple: no-bake buckeye bars are easy to prepare and even easier to customize! if you want to switch it up, you can replace graham crackers with gluten-free alternatives or try a different type of chocolate for the topping.
And let’s not forget about their versatility. depending on how you cut ‘em, they’re perfect for that late night snack attack or as dessert bars for parties .
Just slice ‘em into smaller pieces, and voilà you have delightful little squares of happiness.
So, are you ready to dive into making these decadent treats? you’re gonna want to gather your ingredients creamy peanut butter, sweet chocolate, and that buttery graham cracker crust.
Stick around, and let’s get into the fun part of baking…well, not baking!
Essential Ingredients List
To create these delightful bars, we’ll need a few simple ingredients. grab some graham cracker crumbs, creamy peanut butter, and semisweet chocolate chips.
These are the building blocks for your new favorite cold dessert recipe .
Before we get our hands dirty with the actual recipe, let’s a take closer look at what makes them so scrumptious.
You’ll love how easy it is to throw it all together and how they transform into sweet and salty bars that everyone adores!
I’m excited to share this with you all; it’s gonna be a delicious ride!
Your Go-To Guide for Essential Ingredients in No-Bake Desserts
Alright, let’s dive into the world of no-bake desserts ! we’re talking about those sweet treats that don’t require you to sweat over a hot oven.
Among my favorites? no-bake buckeye bars: decadent & easy treat . seriously, if you haven’t tried them, you’re missing out! so, let's break down the essential ingredients and tools you’ll need to pull off these delicious treats without breaking a sweat.
Premium Core Components
First off, let’s chat about the basics. Here’s your list of premium core components to whip up those Easy Peanut Butter Bars .
Crust Ingredients:
- Graham cracker crumbs - 1 ½ cups (150g)
- Granulated sugar - ½ cup (100g)
- Unsalted butter - ½ cup (115g), melted
Now here’s a little trick: When picking the graham crackers, go for a brand that feels fresh. You don’t want any old crumbs that have been lounging in your pantry for ages.
Filling Ingredients:
- Creamy peanut butter - 1 cup (250g)
- Powdered sugar - ¾ cup (90g)
- Vanilla extract - 1 teaspoon
Quality matters here, folks! Look for creamy peanut butter that doesn’t have added sugar. Trust me; it’ll make those peanut butter chocolate bars sing!
Chocolate Topping Ingredients:
- Semisweet chocolate chips - 1 ½ cups (250g)
- Coconut oil or vegetable shortening - 2 tablespoons (30ml)
Pro tip: For the healthiest option, try using dark chocolate chips. It’ll give your bars a fantastic finish and a kick of antioxidants.
Storage guidelines - keep all your ingredients in airtight containers to ensure they stay fresh. the crust holds up for about a month, while the filling is best used within a week after mixing.
Fridge every single ingredient that can spoil easily.
Signature Seasoning Blend
No DIY Buckeye Candy Recipe is complete without a twist of flavor! Here’s where you get creative.
Essential Spice Combinations: A dash of salt can amplify the flavors. Consider adding a pinch of sea salt to your peanut butter mixture for that "wow" factor.
Herb Selections & Pairings: While this recipe leans on the sweet side, herbs don't really play a part here.
They say less is more, especially with desserts!
Smart Substitutions
What if you’re fresh out of graham crackers or need gluten-free options? No worries! Here are some smart substitutions :
- If you're in the mood for healthier dessert options , swap graham crackers with almond flour mixed with a bit of sugar and coconut oil.
- Out of peanut butter? Sunbutter or any nut-free alternative works just as well for a kid-friendly treat .
- And let’s not forget those emergencies. Crushed vanilla wafers make a perfect stand-in for graham crackers!
Kitchen Equipment Essentials
Ready to rock your kitchen? Here’s the equipment you’ll need:
- 8x8-inch baking pan - Go for glass or metal; just make sure it’s sturdy enough for those sweet, sweet layers.
- Mixing bowls - I recommend having a couple of sizes.
- Rubber spatula or wooden spoon - Perfect for blending your fills.
- Parchment paper - Makes getting your bars out a breeze!
Tip: You don’t need fancy gadgets for this recipe! A basic microwave or a ruler (yes, for measuring) will do.
Time to Get Baking (Sorta)
Before we jump into the actual instructions for creating these amazing no-bake buckeye bars , remember this: making desserts shouldn't be a chore it’s about enjoying the process and licking the spoon! with just a little prep, you can have a batch of these bad boys chilling in your fridge in no time.
So grab your ingredients and get ready for some fun!
Next up, I'll guide you through the step-by-step instructions to make those sweet and salty bars that are sure to please everyone. Stay tuned!
Professional Cooking Method: Your Go-To Guide
When it comes to whipping up something delicious, especially something like no-bake buckeye bars: decadent & easy treat , having some professional cooking methods in your back pocket can make all the difference.
Trust me, once you get these methods under your belt, you'll impress your friends, family, and even yourself! let’s dive into the essentials, step-by-step processes, expert techniques, and some sneak peeks into success strategies.
Essential Preparation Steps
Getting organized is key. this is where mise en place comes into play. it’s a fancy term, but all it means is having everything ready before you start.
So, for those no-bake desserts we're dreaming about, lay out your ingredients: graham cracker crumbs, creamy peanut butter, and chocolate chips.
I always set my timer for 15 minutes to prep trust me, it saves time later!
Time management tips fit in here too. ever burnt your grilled cheese while getting distracted? yeah, me too! keep a close eye on your cooking times.
For example, you’ll want to melt chocolate in 30-second intervals in the microwave, stirring each time to keep it from seizing up.
It’s all about keeping things flowing smoothly.
Organization strategies can be as simple as labeling bowls or using separate workspaces. Safety is also a major consideration. Keep your workspace tidy to avoid trip hazards, and remember, don't leave sharp knives lying around cut fingers are no way to enjoy your Buckeye Candy Recipe !
step-by-step Process
Now that we’re prepped, let’s get to the fun part!
Prepare the Pan : Line your 8x8-inch baking pan with parchment paper or grease it. You don’t want to lose any of those glorious bars when you take them out!
Make the crust : in a bowl, mix 1½ cups of graham cracker crumbs and ½ cup granulated sugar . add ½ cup melted butter and mix until it’s crumbly.
Press it firmly into the pan this is your foundation!
Prepare the filling : now for the star of the show! in another bowl, stir 1 cup of creamy peanut butter , ¾ cup of powdered sugar , and 1 teaspoon of vanilla extract until smooth.
Spread this heavenly mixture over your crust.
Chocolate Topping : Combine 1½ cups of semisweet chocolate chips and 2 tablespoons of coconut oil in a microwave safe bowl.
Microwave in 30-second bursts , stirring until melted and smooth.
Assemble : Pour the melted chocolate over your peanut butter layer, spreading it evenly. Give your pan a gentle tap on the counter. It helps to release any pesky air bubbles.
Chill : Pop it in the fridge for at least 30 minutes . You’ll want the chocolate to set, making cutting into bars much easier.
Cut and Serve : Once chilled, take those beauties out, cut into squares, and voila! You've got yourself some showstoppers.
When it comes to timing and temperature, you really can’t skimp on precision. keeping the chocolate sexy and smooth at just the right temperature is key to making your chocolate lovers treats shine.
Expert Techniques
Okay, but what if something goes wrong? here are some expert tips. if your chocolate’s clumping, you probably overheated it lower the temperature next time.
If the crust crumbles too much, you might’ve overdone it with the butter less is often more in baking.
For your quality checkpoints, always taste along the way. a pinch of salt in that peanut butter filling can make it pop.
And remember, not all chocolate is created equal; invest in good quality chocolate for the best results.
Success Strategies
Let’s chat common mistakes. over mixing the filling can make it grainy. not letting the bars set long enough means you’ll just create a gooey mess.
Always err on the side of caution with chilling times.
For quality assurance, before serving your dessert bars for parties , ensure they’re firm. Slice only when they’re nicely chilled, and keep any leftovers in the fridge.
Oh, and let’s talk about make-ahead options . These bars are actually perfect for prepping in advance. Stack 'em in an airtight container, and they’ll taste fresh for days!
In the end, cooking is all about practice and finding what works for you. So gather your ingredients, channel your inner pastry chef, and whip up these decadent snack recipes !
Before we wrap up, let's chat about some additional information for when you feel ready to take your no-bake game to the next level.
Whether you want to create no-bake cookie masterpieces or dive into gluten-free alternatives , the world of easy holiday treats awaits!
Additional Recipe Information for No-Bake Buckeye Bars: Decadent & Easy Treat
Alright, friends! Let’s dive into the details of how to elevate your No-Bake Buckeye Bars: Decadent & Easy Treat . Trust me, these bars aren’t just a feast for the taste buds; they can be a visual treat, too!
Pro Tips & Secrets
Making No-Bake Desserts like these buckeye bars is all about the little hacks that save time and kick up the flavor. Here’s the scoop:
- Keep It Smooth : Make sure to use creamy peanut butter. It blends way better than crunchy and gives you that silky filling we all crave.
- Save Your Time : Use a microwave for melting the chocolate. Just throw those chocolate chips in a bowl, zap 'em in 30-second bursts, and stir until smooth. It’s way quicker than a double boiler setup!
- Flavor Boost : Consider tossing in a pinch of sea salt into the peanut butter filling. That sweet salty combo? Absolute magic!
- Presentation Tip : When you cut your bars, use a hot knife! Just run it under hot water, dry it off, and slice through the chocolate like butter. Perfect cuts every time.
Perfect Presentation
Don't underestimate the power of a good presentation!
- Plating Techniques : Cut your bars into neat squares and stack them playfully on a plate. A little height adds drama!
- Garnish Ideas : Sprinkle some crushed nuts or colorful sprinkles on top before serving. It adds a pop!
- Color Combinations : Aim for contrasting colors. The dark chocolate topping against the creamy peanut butter and light crust makes your dessert look gourmet.
- Visual Appeal Tips : Use a clear dish to show off those gorgeous layers. It’s like art on a plate, y'all!
Storage & make-ahead
Now, we all love make-ahead desserts , right? Here’s how to keep your buckeye bars tasting fresh.
- Storage Guidelines : Pop these bars in an airtight container. They’ll stay fresh in the fridge for up to a week!
- Preservation Methods : They freeze like a dream! Cut them into bars before freezing, and you can snag a sweet treat anytime.
- Reheating Instructions : No need to reheat these bad boys! Just thaw in the fridge for a bit before enjoying.
- Freshness Duration : I wouldn’t keep them past a week in the fridge just to ensure they stay delectable.
Creative Variations
Feeling adventurous? Here are some funky spins on your classic Buckeye Candy Recipe :
- Flavor Adaptations : Switch it up with almond butter or even Nutella! Chocolate and peanut butter love to be joined by other nutty flavors.
- Dietary Modifications : Want a gluten-free version? Use gluten-free graham crackers or even some almond flour for the crust.
- Seasonal Twists : Add a layer of crushed peppermint candies around the holidays for a minty twist. Yum!
- Regional Variations : Try adding some spicy heat with a dash of cayenne in the filling. It’s a wild twist!
Complete Nutrition Guide
Okay, health buffs, listen up! Here’s the gist:
- Detailed Breakdown : Each bar carries about 250 calories, so you can snag a few without the guilt!
- Health Benefits : Peanut butter provides protein and healthy fats. Plus, the chocolate offers antioxidants. Win-win!
- Dietary Considerations : Be mindful if you have nut allergies; swaps are easy.
- Portion Guidance : These treats are pretty rich! One or two bars is more than enough for most unless you’re feeling bold!
Expert FAQ Solutions
Got questions? I’ve got answers!
- Common Questions : Can I use crunchy peanut butter? Sure, but it'll affect that creamy texture.
- Troubleshooting Guide : If your chocolate seizes, add a splash of coconut oil. That should smooth it right out.
- Success Tips : Read through the recipe beforehand. It helps keep things running smoothly when you’re in the kitchen.
- Variations Explained : Don’t hesitate to mix and match! The idea’s to have fun with it!
So, whether you’re whipping these up for a family shindig, a quick dessert recipe for a weeknight treat, or an easy holiday treat, the no-bake buckeye bars are your pals.
Look into in and make ‘em your own! remember, the kitchen is where the magic happens, so get creative and enjoy every bite.
Happy baking!
No Bake Buckeye Bars Decadent Easy Treat

Ingredients:
Instructions:
Nutrition Facts:
| Calories | 250 |
|---|---|
| Protein | 4g |
| Fat | 16g |
| Carbs | 25g |
| Fiber | 1g |
| Sugar | 15g |
| Sodium | 150mg |
