Sausage Gravy: Creamy Southern Comfort
- Time: Active 5 minutes, Passive 10 minutes, Total 15 minutes
- Flavor/Texture Hook: Savory, peppery, and incredibly silky with crispy browned meat bits
- Perfect for: Slow weekend mornings, holiday brunches, or a high protein breakfast
- Master Your Own Southern Style Sausage Gravy
- Analysis of Skillet Cooking Mechanics
- Analyzing Key Ingredients for Best Results
- Selecting the Components for Your Gravy
- Gathering Tools for the Ultimate Sauce
- Step by Step to Velvety Smoothness
- Fixing Common Gravy Texture Problems
- Adapting the Recipe for Every Table
- Breaking Down Gravy Misconceptions
- Keeping Leftovers Fresh and Savory Longer
- Presentation Tips for a Family Feast
- Recipe FAQs
- 📝 Recipe Card
Master Your Own Southern Style Sausage Gravy
The first thing you notice is that specific, aggressive crackle when the raw pork hits the skillet. It’s a sound that cuts through a quiet morning, promising something substantial and grounding.
As the heat climbs, the aroma of sage and savory fat starts to fill every corner of the room, mingling with the sharp, woody scent of freshly cracked black pepper. This isn't just breakfast, it's a ritual of nourishment that feels like a warm hug for your senses.
We’ve all had those gravies that are either too thin and watery or, worse, so thick they resemble wallpaper paste. I used to struggle with getting that balance right until I realized that the bulk pork breakfast sausage is the undisputed hero here.
It isn’t just an ingredient; it’s the foundation of the entire sauce. The fat it renders is liquid gold, carrying the flavor of the meat into every drop of milk. When you get that dark crust on the meat, you're building a depth of flavor that a simple salt shaker could never provide.
There is a genuine beauty in the contrast between the crispy, shattered edges of the browned sausage and the velvety, cream colored sauce that envelopes it. It’s a dish that celebrates simplicity and the culture of a shared table.
Whether you are piling it high over split biscuits or serving it alongside eggs, this recipe is about creating a community around a single, steaming pan. It’s honest, rich, and exactly what your soul needs on a rainy Sunday.
Analysis of Skillet Cooking Mechanics
Understanding the behavior of fat and starch in a heavy skillet is what separates a mediocre sauce from a world class one. This recipe works because we are creating a stable suspension of liquid and fat, using flour as the structural bridge.
- Fat Emulsification: The rendered pork fat coats the flour particles, preventing them from clumping together when the liquid is introduced.
- Starch Gelatinization: As the milk heats up, the starch molecules in the flour swell and burst, thickening the surrounding liquid into a silky texture.
- Maillard Reaction: Browning the sausage first creates complex flavor compounds that would be lost if the meat were merely boiled in the milk.
- Tempering the Roux: Starting with a small amount of cold milk creates a thick paste that can be smoothed out before the rest of the liquid is added, ensuring no lumps.
| Servings | Ingredient Adjustments | Pan Size | Cook Time |
|---|---|---|---|
| 2 people | 1/3 lb sausage, 1 cup milk | 8 inch skillet | 12 minutes |
| 6 people | 1 lb sausage, 3 cups milk | 12 inch skillet | 15 minutes |
| 12 people | 2 lb sausage, 6 cups milk | Large Dutch oven | 20 minutes |
When we talk about achieving that signature creamy texture, it is very similar to the process used in a Swedish Meatballs recipe, where the fat and flour must become one before the liquid enters the fray. This ensures the sauce stays unified rather than separating into an oily mess.
Analyzing Key Ingredients for Best Results
Every component in this skillet serves a specific functional purpose. We aren't just tossing things in; we are building a structure. The choice of whole milk over skim, for instance, isn't just about indulgence, it's about the way the milk solids interact with the pork fat to create a stable, rich mouthfeel that coats the back of a spoon.
| Ingredient | Science Role | Pro Secret |
|---|---|---|
| Bulk Pork Sausage | Primary fat source and flavor base | Don't drain the fat; it is the "oil" for your roux. |
| All Purpose Flour | Thickening agent through starch bonds | Toast it until it smells nutty to remove the "raw" taste. |
| Whole Milk | Liquid base and emulsification partner | Use cold milk to prevent the flour from clumping instantly. |
The pork sausage is the star here because of its high fat to lean ratio. Without that rendered fat, the flour has nothing to cling to, and you end up with a dry, pasty mess. By keeping all that fat in the pan, we ensure that every molecule of flour is saturated, which is the key to a translucent, professional looking finish.
Selecting the Components for Your Gravy
To get this right, you need to be specific about what goes into the pan. This isn't the time for low-fat alternatives or substitutions that compromise the structural integrity of the sauce. We are looking for richness and a specific savory profile that defines this dish.
- 1 lb Bulk Pork Breakfast Sausage: This provides the fat and the herbal backbone. Why this? The pre mixed seasonings in breakfast sausage offer deep, nostalgic flavor.
- 1 tbsp Unsalted Butter: Adds a touch of extra fat if the sausage is lean. Why this? Butter adds a rounded, creamy finish that pork fat alone sometimes lacks.
- 1/4 cup All Purpose Flour: Our primary thickener. Why this? AP flour has the right protein content to thicken without becoming gummy.
- 1 tsp Freshly Cracked Black Pepper: The heat source. Why this? Pre ground pepper is dusty; freshly cracked provides bright, floral heat.
- 1/2 tsp Kosher Salt: Enhances all other flavors. Why this? The larger grains make it harder to over salt the dish.
- 3 cups Whole Milk: The body of the sauce. Why this? The fat in whole milk is essential for a velvety, non watery texture.
- 1/4 tsp Crushed Red Pepper Flakes: A subtle, creeping heat. Why this? It cuts through the richness of the fat and dairy.
| Original Ingredient | Substitute | Why It Works |
|---|---|---|
| Whole Milk | Heavy Cream (diluted) | Mix 1 part cream to 2 parts water for a similar fat profile. |
| Pork Sausage | Turkey Sausage | Add 2 extra tbsp of butter to compensate for the lower fat. |
| AP Flour | Cornstarch | Use half the amount mixed with cold milk. Note: Texture will be more "gel like". |
The interaction between the black pepper and the pork is what creates that classic "Southern" profile. It’s a warm, glowing heat rather than a sharp, stinging one. Using freshly cracked pepper allows the oils to bloom in the hot fat, creating a much more aromatic experience than using the stuff that’s been sitting in a tin for three years.
Gathering Tools for the Ultimate Sauce
The gear you use for this matters just as much as the ingredients. You need something with a heavy bottom that can retain heat evenly. A thin, cheap pan will create hot spots, which leads to scorched flour and a bitter aftertaste that you simply cannot fix once it happens.
I always reach for my seasoned cast iron skillet or a heavy stainless steel pan. These materials allow the sausage to develop a deep, dark crust without burning. A wooden spoon is also a non negotiable for me.
It’s sturdy enough to break up the meat into uniform crumbles, which is vital for ensuring you get a bit of sausage in every single bite of gravy.
If you don't have a whisk, a fork can work in a pinch, but a balloon whisk is truly the best tool for integrating the milk. It forces air and liquid through the roux, breaking up any potential lumps before they have a chance to set.
You want to feel that resistance as the sauce thickens, and a whisk gives you the most feedback.
step-by-step to Velvety Smoothness

- Place the sausage in a cold heavy bottomed skillet and turn the heat to medium high.Note: Starting with a cold pan allows the fat to render slowly before the meat sears.
- Break the meat into small, uniform crumbles using a wooden spoon.Cook for 3–4 minutes until a dark crust forms and the kitchen smells like savory sage.
- Continue cooking until no pink remains. Do not drain the fat; this is essential for the next step.
- Reduce the heat to medium. This prevents the flour from burning instantly when it hits the pan.
- Sprinkle the flour evenly over the sausage and rendered fat. Ensure every piece of meat is lightly coated.
- Stir constantly for 2 minutes to cook out the raw flour taste. Stop when the mixture smells slightly nutty and looks like a golden paste.
- Slowly pour in 1/2 cup of cold milk while whisking vigorously. You are looking to form a thick, smooth paste first.
- Gradually add the remaining milk in a steady stream.Whisk continuously until the liquid is fully incorporated and no streaks remain.
- Simmer the mixture gently.Cook until the gravy reaches a thick, velvety consistency that coats the back of a spoon.
- Season with salt, remaining pepper, and red pepper flakes. Taste as you go to ensure the balance is right for your palate.
The key to this entire process is the transition between step 7 and step 8. If you dump all the milk in at once, the roux will go into "shock," and you'll end up with little flour dumplings floating in white milk.
By adding that first half cup slowly, you’re creating an emulsion that can then absorb the rest of the liquid without breaking.
Fixing Common Gravy Texture Problems
Even the most seasoned cooks run into issues with gravy. It’s a temperamental sauce because it relies so heavily on temperature and ratios. Most problems stem from rushing the process or trying to cut corners with the fat content.
Why Your Gravy Is Lumpy
Lumps happen when the flour isn't fully incorporated into the fat before the liquid is added, or when the liquid is added too quickly. If the flour particles "clump," the outside cooks and seals in the raw flour inside, creating those annoying little balls.
To fix this, you can try to whisk aggressively, but if they won't budge, pouring the gravy through a fine mesh sieve or using an immersion blender for ten seconds will save the day.
Why Your Gravy Is Greasy
If you see a layer of yellow oil floating on top, your emulsion has broken. This usually happens if the heat was too high or if there was too much fat for the amount of flour used. You can fix this by whisking in a "slurry" of one tablespoon of flour mixed with two tablespoons of cold milk.
This extra flour will grab onto the excess fat and pull it back into the sauce.
| Problem | Root Cause | Solution |
|---|---|---|
| Too Thick | Excessive reduction | Whisk in milk, 2 tablespoons at a time. |
| Bland Flavor | Under seasoned meat | Add more black pepper and a pinch of salt. |
| Floury Taste | Roux didn't cook long enough | Simmer for an extra 3 minutes on low heat. |
Common Mistakes Checklist
- ✓ Never drain the sausage fat; it is the structural base of the sauce.
- ✓ Whisk constantly when adding the first splash of milk to prevent clumping.
- ✓ Use whole milk for the best mouthfeel; skim milk will result in a thin, greyish sauce.
- ✓ Don't walk away during the simmer; the bottom can scorch in seconds.
- ✓ Ensure the flour turns golden brown before adding liquid to avoid a "raw" flavor.
Adapting the Recipe for Every Table
Scaling this recipe is fairly straightforward because the ratios are so consistent. If you are feeding a crowd, you can easily double or triple the ingredients. Just keep in mind that a larger volume of liquid takes longer to come to a simmer, so your total cook time might increase by about five minutes.
When scaling down for a solo breakfast, be careful with the seasonings. Spices like red pepper flakes and black pepper can become overwhelming in smaller batches, so I recommend starting with half of what you think you need and adjusting at the very end. If you find yourself with extra sausage but no milk, you could pivot and use the meat in a Savory Sausage Patty recipe instead.
| Method | Time | Texture | Best For |
|---|---|---|---|
| Stovetop | 10 minutes | Maximum control over creamy consistency | Quick weeknight or classic brunch |
| Oven (Cast Iron) | 20 minutes | Crispier meat but risk of separation | Hands off cooking for large groups |
If you are looking to make this ahead of time, which is a total lifesaver for holiday mornings, I suggest using gravy for Legendary Roasts recipe method. You can cook the sausage and flour together to create the "base," store it in the fridge, and then just whisk in the milk and simmer when you're ready to eat. It saves you the mess of browning meat while guests are over.
Breaking Down Gravy Misconceptions
One of the biggest myths is that you need to use heavy cream to make gravy "creamy." In reality, whole milk provides plenty of fat, and the creaminess actually comes from the starch in the flour and the way it suspends the pork fat.
Using only heavy cream often makes the dish too heavy and mutes the subtle herbs in the sausage.
Another common misconception is that you should drain the fat and use butter instead. While butter adds a nice flavor, the pork fat is where the essence of the sausage lives. Draining it is like throwing away the best part of the ingredient.
If your sausage is exceptionally lean and doesn't produce at least two tablespoons of fat, that's when you should supplement with butter, but never replace it entirely.
Finally, people often think that gravy needs to boil to thicken. This is dangerous. You want a gentle simmer. Boiling dairy can cause it to curdle or scorch on the bottom of the pan, ruining the silky texture you've worked so hard to create. If you see large, violent bubbles, turn that heat down immediately.
Keeping Leftovers Fresh and Savory Longer
Sausage gravy is one of those rare dishes that actually tastes better the next day as the flavors have time to fully meld. However, storage is key because dairy based sauces can absorb odors from the fridge very easily.
- Storage: Transfer the cooled gravy to an airtight glass container. It will stay fresh in the fridge for up to 3 days.
- Reheating: The gravy will thicken significantly into a solid block when cold. To revive it, place it in a small saucepan over low heat and whisk in a splash of milk (about 1 tablespoon per cup of gravy). This restores the velvety texture without making it too thin.
- Freezing: You can freeze this for up to 2 months. Thaw it completely in the fridge before reheating. Note: The sauce may look separated when thawed, but a vigorous whisking over low heat will bring it back together.
- Zero Waste: If you have a small amount of leftover gravy, use it as a filling for a savory pot pie or stir it into mashed potatoes for a massive flavor boost.
Presentation Tips for a Family Feast
While sausage gravy isn't traditionally known for its "pretty" looks, a few simple touches can make it look as good as it tastes. Serving it in a pre warmed cast iron skillet gives it a rustic, communal feel that invites people to dig in. The dark metal provides a beautiful contrast to the pale, creamy sauce.
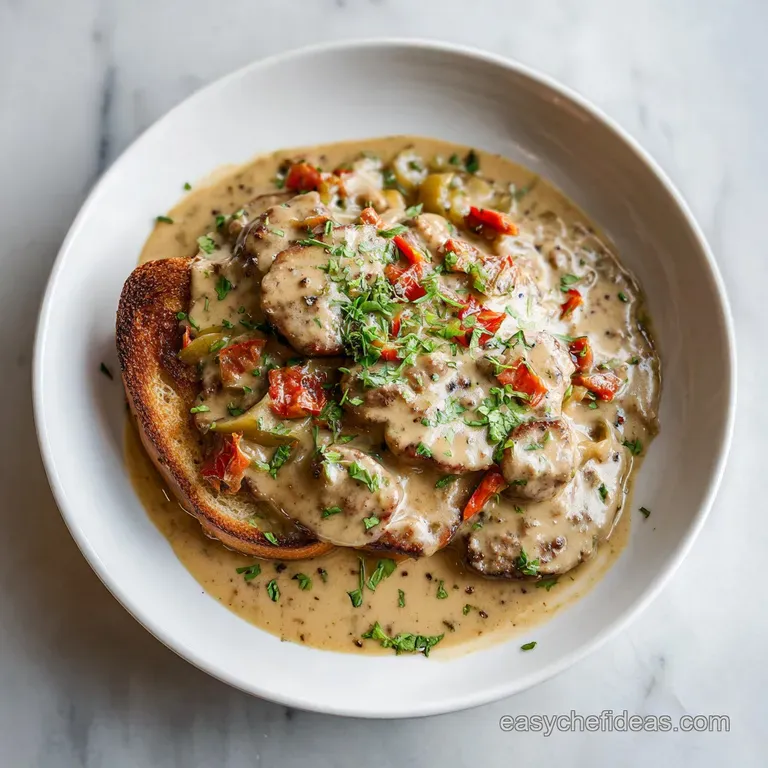
I always save a tiny bit of the browned sausage bits to sprinkle on top right before serving. This adds a visual cue of what's inside and provides a little extra crunch. A final dusting of freshly cracked black pepper and perhaps a few sprigs of fresh sage or parsley can brighten up the dish and make it feel more intentional.
Don't forget the vessel! While biscuits are the classic choice, this gravy is incredible over thick cut sourdough toast, crispy hash browns, or even a pile of sautéed kale. The goal is to provide a base that can soak up that rich sauce without becoming immediately soggy.
It’s about creating a plate that feels balanced, nourishing, and deeply satisfying for everyone at the table.

Recipe FAQs
What is the secret ingredient in sausage gravy?
The rendered pork fat is the secret. By never draining the fat after browning the 1 lb of bulk pork breakfast sausage, you create the essential roux base needed for a rich, flavorful sauce.
What are the ingredients for sausage gravy?
You only need seven pantry staples. The recipe requires 1 lb bulk pork breakfast sausage, 1 tbsp unsalted butter, 1/4 cup all-purpose flour, 1 tsp freshly cracked black pepper, 1/2 tsp kosher salt, 3 cups whole milk, and 1/4 tsp crushed red pepper flakes.
Can you eat gravy with diabetes?
No, this is a common misconception regarding dietary restrictions. Because this recipe uses 1/4 cup of flour as a thickener, it contains carbohydrates that significantly impact blood glucose levels; consult your healthcare provider for guidance on portion sizes or modifications.
What is the secret to sausage gravy?
The secret lies in proper roux development. If you enjoyed mastering this flour-to-fat ratio, apply the same silky smooth gravy principles to maintain a consistent, velvety texture in other savory sauces.
How to keep sausage gravy from becoming lumpy?
Whisk 1/2 cup of cold milk into the flour and sausage mixture first. By forming a thick paste before gradually adding the remaining milk in a steady stream, you ensure a smooth, uniform consistency every time.
How to brown the sausage correctly?
Start in a cold, heavy bottomed skillet over medium high heat. Break the meat into small crumbles and cook for 3 4 minutes until a dark crust forms, ensuring no pink remains before adding your flour.
How to avoid a raw flour taste in the finished gravy?
Stir the flour and fat mixture constantly for 2 minutes after combining. You are looking for the mixture to smell slightly nutty, which indicates the flour has toasted sufficiently to eliminate the raw starch flavor.
Classic Homemade Sausage Gravy

Ingredients:
Instructions:
Nutrition Facts:
| Calories | 279 calories |
|---|---|
| Protein | 14.8 grams |
| Fat | 19.4 grams |
| Carbs | 10.4 grams |
| Fiber | 0.3 grams |
| Sugar | 6.2 grams |
| Sodium | 615 milligrams |
