Oatmeal Chocolate Chip Bites: Chewy and Dense
- Time: 15 min active + 30 min baking
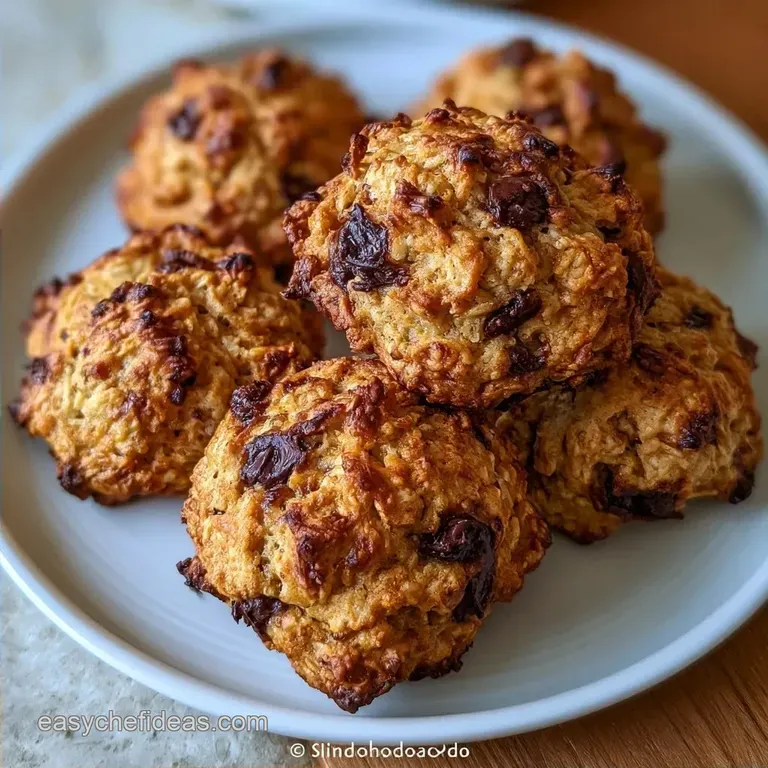
- Flavor/Texture Hook: Chewy center with mahogany brown edges
- Perfect for: Healthy snack prep or a quick breakfast
The smell of cinnamon hitting a hot oven is one of my favorite things. There is something about the way the oats toast and the chocolate begins to soften that just makes a kitchen feel like home.
I remember the first time I tried to replace butter in a snack bake, and it turned into a crumbly mess that tasted like cardboard.
The real hero here is the unsweetened applesauce. Most people reach for oil or butter to get that moist crumb, but applesauce provides a specific, tacky chew that keeps these from falling apart. It adds a subtle fruitiness that pairs with the maple syrup, making the flavor feel deep rather than just sugary.
You can expect a treat that feels like a hybrid between a cookie and an energy ball. These Oatmeal Chocolate Chip Bites don't spread much, so they stay thick and satisfying. They are the kind of snack you can throw in a bag and not worry about them smashing into a million pieces.
Baking Easy Oatmeal Chocolate Chip Bites
Reasons These Bites Work
Applesauce Base: It binds the oats together while adding moisture, which prevents the bites from becoming too dry or cakey.
Maple Syrup: This provides a liquid sweetener that caramelizes slightly in the oven, giving the edges a rich color.
Rolled Oats: According to King Arthur Baking, rolled oats maintain their structure better than quick oats, providing a hearty, satisfying chew.
| Method | Time | Texture | Best For |
|---|---|---|---|
| Oven | 30 min | Set and chewy | Meal prep |
| Stovetop | 15 min | Softer and gooey | Immediate craving |
Ingredient Deep Dive
| Ingredient | What It Does | Best Swap |
|---|---|---|
| Rolled Oats | Provides structure | Quick oats (softer texture) |
| Applesauce | Moisture and bind | Mashed banana (sweeter) |
| Maple Syrup | Sweetness and color | Honey (stronger flavor) |
| Coconut Oil | Richness and fat | Melted butter (classic taste) |
The Recipe Specs
Right then, let's look at the numbers. These are straightforward, but a few specific checkpoints keep them from turning into puddles on your tray.
First, keep your oven at exactly 175°C (350°F). If the oven runs too hot, the maple syrup burns before the center sets. Second, the baking window is 25-30 minutes. Any less and they feel raw, any more and they lose that chewy heart.
Finally, the 10 minute cooling period on the pan is mandatory. The internal structure finishes setting as they cool.
If you are wondering about the feel, these are dense. They aren't light like a cake. They have a weight to them that makes two or three bites feel like a full snack.
Necessary Ingredients
I prefer using organic maple syrup for that authentic woody note. Don't bother with "pancake syrup" which is mostly corn syrup, as it won't caramelize the same way.
- 1.5 cups rolled oats Why this? Holds shape better than quick oats
- 0.5 tsp baking powder Why this? Gives a tiny bit of lift
- 1 tsp ground cinnamon Why this? Essential warm aroma
- 0.25 tsp fine sea salt Why this? Balances the maple sweetness
- 0.5 cup unsweetened applesauce Why this? The primary moisture bind
- 0.33 cup pure maple syrup Why this? Natural sweetness and depth
- 2 tbsp melted coconut oil Why this? Adds a silky mouthfeel
- 1 tsp vanilla extract Why this? Rounds out the cinnamon
- 0.5 cup semi sweet chocolate chips Why this? Classic flavor pairing
- 0.25 cup chopped walnuts Why this? Adds necessary crunch
Essential Kitchen Gear
You don't need a fancy setup for this. A large mixing bowl and a sturdy spatula do most of the work. I use a medium cookie scoop to make sure every bite is the same size, which means they all finish baking at the same time.
Parchment paper is a lifesaver here. Because of the maple syrup, these can stick to a bare pan if your coating isn't perfect. A simple baking sheet is all you need. If you have a digital thermometer, you can check that your oven is actually at 175°C, as some older ovens drift.
The Essential Steps

Phase 1: The Foundation
- Preheat your oven to 175°C (350°F) and line a baking sheet with parchment paper.
- In a large bowl, whisk together the oats, baking powder, cinnamon, and salt. Note: Whisking ensures the cinnamon doesn't clump in one spot
Phase 2: Creating the Bind
- Stir in the applesauce, maple syrup, melted coconut oil, and vanilla extract.
- Fold the mixture with a spatula until a thick, sticky dough forms. Note: Stop as soon as the floury oat bits disappear
Phase 3: Baking to Perfection
- Gently fold in the chocolate chips and chopped walnuts, ensuring the chips are dispersed evenly.
- Using a cookie scoop, drop 12 rounded mounds of dough onto the prepared sheet.
- Press them down slightly with the back of a spoon to flatten the tops.
- Bake for 25-30 minutes until the edges turn light mahogany brown and the tops look matte.
- Remove from the oven and let them cool on the pan for 10 minutes to allow the internal structure to set.
Fixing Baking Problems
Sometimes the dough doesn't behave. Usually, it comes down to the moisture levels in your applesauce or the size of your oats. If the dough feels too wet to scoop, just stir in one extra tablespoon of oats. It's a quick fix that saves the whole batch.
Troubleshooting Common Issues
| Issue | Solution |
|---|---|
| Why Your Bites Are Too Flat | If the bites spread too much, your oven might be too cool, or your coconut oil was too hot when added. This prevents the structure from setting quickly. |
| Why Your Bites Feel Dry | Over baking is the main culprit. If you wait for them to look "done" in the middle, they've likely stayed in too long. Look for that matte top, not a brown top. |
| Why Your Chips Sank | This happens if the dough is too thin. Make sure you fold the chips in at the very end and don't over mix the wet ingredients. |
Customizing The Recipe
Once you've got the hang of these Oatmeal Chocolate Chip Bites, you can start swapping things around. If you want a different flavor profile, try swapping the cinnamon for a pinch of nutmeg or cardamom. It gives it a more autumnal, spiced vibe.
For a different texture, you could try my no bake cookie dough bars if you want to skip the oven entirely. If you prefer a more traditional cookie feel, you might like oatmeal cookies with chocolate chunks which use a different fat ratio.
Decision Shortcut:
- Want more chew? Add extra 2 tbsp applesauce.
- Want more crunch? Increase walnuts to 1/3 cup.
- Want them sweeter? Swap maple syrup for honey.
Freshness and Storage
These stay fresh longer than you'd think because the applesauce keeps them moist. Keep them in an airtight container in the fridge for up to 5 days. They actually taste great cold, almost like a chilled energy bar.
If you make a double batch, you can freeze them for up to 3 months. Just flash freeze them on a tray for an hour before putting them in a freezer bag so they don't stick together. To reheat, pop one in the microwave for 10-15 seconds to get the chocolate melty again.
For zero waste, if you have a bit of leftover applesauce in the jar, stir it into your morning yogurt or blend it into a smoothie.
Serving and Plating
Since I love the visual side of baking, I think about how these look on the table. These Oatmeal Chocolate Chip Bites are humble, but a few tweaks make them look professional.
Plating Levels:
- Simple: Serve them on a plain ceramic plate. Great for a quick breakfast.
- Polished: Arrange them on a dark slate board. Add a tiny pinch of flaky sea salt on top of each bite while they are still warm.
- Restaurant: Place three bites on a white porcelain plate. Add a small drizzle of warmed maple syrup across the top and a single mint leaf for a pop of color.
| Level | Surface | Garnish | Vibe |
|---|---|---|---|
| Simple | Ceramic Plate | None | Homey |
| Polished | Slate Board | Flaky Sea Salt | Modern |
| Restaurant | White Porcelain | Maple Drizzle | High end |
Debunking Oat Myths
Some people think you have to soak your oats overnight to make them digestible. For a baked treat like this, the heat and moisture from the applesauce do that work for you during the bake.
Another common thought is that baking powder is optional. While you can leave it out, you'll end up with a very dense, almost gummy disc. That half teaspoon provides just enough air to make them feel like a snack and not a brick.
These Oatmeal Chocolate Chip Bites are a great way to get a bit of fiber and energy without feeling like you're eating a health food. Just keep an eye on that matte finish on top, and you'll have a batch that's chewy, sweet, and totally satisfying.
Recipe FAQs
Are these the same as no-bake 4-ingredient energy balls?
No, these are baked treats. Unlike raw energy balls, these require a 350°F oven and baking powder to create a set, cookie like structure.
How to store these bites to keep them fresh?
Place them in an airtight container at room temperature for up to three days. For longer storage, keep them in the refrigerator.
Is it true that I should bake them until the centers are brown?
No, this is a common misconception. Baking until the middle is brown leads to dry bites; instead, remove them when the tops look matte and edges are light mahogany brown.
Why did my oatmeal bites spread too flat on the pan?
Your oven was likely too cool or the coconut oil was too hot. Either issue prevents the structure from setting quickly, causing the dough to spread.
Can I make these without walnuts?
Yes, you can omit them entirely. If you enjoyed the nutty profile here, see how that same element works in our homemade turtle candy.
Why did the chocolate chips sink to the bottom?
The dough was likely too thin or overmixed. Fold in the chocolate chips at the very end to ensure they stay dispersed throughout the bite.
Are these bites a good option for kids' lunchboxes?
Yes, they are a great lunchbox addition. They provide a portable, satisfying snack that stays stable at room temperature throughout the school day.
Oatmeal Chocolate Chip Bites