Frozen Mango Kiwi Raspberry Pops: the Tropical Tri-Colour Lolly
- The Tropical Tri-Colour Lolly: Sunshine Mango, Kiwi Zing, and Raspberry Pops
- The Chemistry of Chill: Why These Flavors are Perfect Popsicle Partners
- Essential Building Blocks for Frozen Mango Kiwi Raspberry Pops
- The Complete Guide to Making Frozen Mango Kiwi Raspberry Pops: From Puree to Perfect Freeze
- Achieving the Perfect Layers: Chef’s Troubleshooting and Freezing Tips
- Demolding and Dedicated Storage for Your Tri-Colour Treats
- Tropical Dessert Pairings: Creative Ways to Serve These Frozen Mango Kiwi Raspberry Pops
- Recipe FAQs
- 📝 Recipe Card
The Tropical Tri-Colour Lolly: Sunshine Mango, Kiwi Zing, and Raspberry Pops
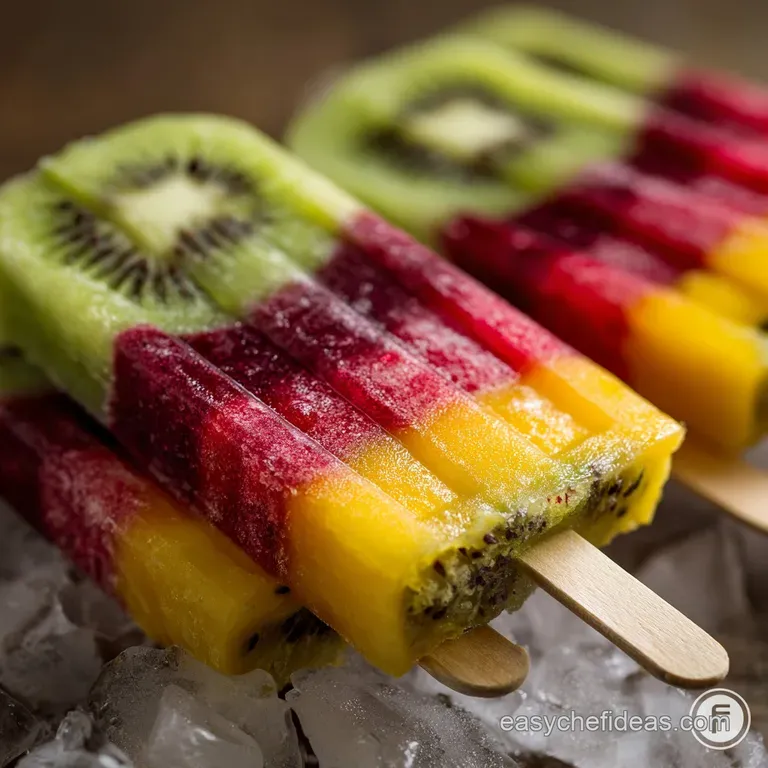
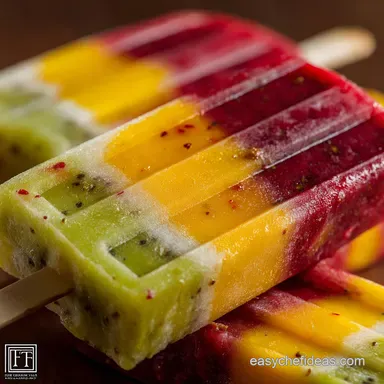
That moment when you pull a perfectly layered pop out of the mold? Pure victory, right? The bright colours electric green, sunset gold, and crimson red are just insanely satisfying and look way more complicated than they actually are.
I swear, the tartness of the raspberry hits you right before the creamy mango sweetness kicks in, creating the most incredible balance of tropical flavour.
Honestly, this recipe for [Frozen Mango Kiwi Raspberry Pops] is a true summer lifesaver because it’s no-bake, virtually hands off, and dirt cheap if you grab frozen fruit on sale. You don't need fancy equipment, just a decent blender and some cheap popsicle molds.
This is the ultimate "I made that myself" low-effort treat that absolutely crushes those boring, store-bought, overly sweet fruit popsicles every time.
I’ve definitely learned the hard way how easy it is for the layers to bleed together, turning your beautiful creation into a muddy swamp mess that looks... less appetizing. But don't panic! I finally figured out the exact timing for the interim chill, and I’m spilling all the secrets.
Your tri-colour frozen mango kiwi raspberry fruit pops are going to be visually stunning and perfectly delicious. Let's crack on!
The Chemistry of Chill: Why These Flavors are Perfect Popsicle Partners
The Delightful Simplicity of a No-Cook Treat
I absolutely love that this entire process avoids the stovetop, making it perfect for those scorching afternoons when turning on the oven feels like a crime. Since we skip the cooking, the natural integrity of the fruit’s vitamins and freshness remains totally intact.
It’s truly a simple blend and freeze method.
This makes these frozen desserts a brilliant option if you're looking for satisfying snacks that don't weigh you down. Plus, they feel much more indulgent than just biting into a plain piece of fruit, which is always a bonus!
Flavour Profile Deep Dive: Mango, Kiwi, and Raspberry
The magic of these frozen treats lies in the flavour synergy. Mango is naturally creamy and high in solids, which gives it that lovely smooth texture when frozen. Kiwi provides the necessary bright green zing, cutting through the mango’s richness with acidity.
Finally, the raspberry layer delivers a tart, almost sharp finish, ensuring the overall pop isn't cloyingly sweet.
Projected Prep and Freeze Time Breakdown
Listen, you need patience for this recipe, mostly because the freezer does most of the heavy lifting. Active prep takes about 20 minutes to chop and blend everything up. The critical part is the layering we need at least an hour between each layer to ensure clean colour separation.
Total freezing time needs to be overnight for these fruit pops to achieve that solid, shatterproof consistency we’re aiming for.
Balancing Creamy Mango Texture with Tart Kiwi Zing
When you blend the mango, you’ll notice it achieves a thickness similar to a soft serve ice cream or a smoothie base. That high sugar and natural pectin content helps it freeze smoothly rather than turning into shards of ice.
The kiwi layer, being slightly looser, benefits from having a thicker base underneath it, which prevents sinkage.
Why Raspberry Provides the Essential Acidic Pop
Every good frozen snack needs a counterpoint to sweetness, and that's where the raspberry shines. High in natural acids, it acts as the perfect palate cleanser. It’s the final layer, so you hit the tartness first, pulling you through the rich middle layers.
Structuring the Layers for Optimal Visual Appeal
The goal is three distinct horizontal stripes. Since the mango puree is often the heaviest, I usually place that on the bottom, as it provides the most solid foundation for the subsequent layers.
The raspberry puree is the most vibrant and usually goes on top, making a gorgeous presentation when you finally release the frozen pops from the mold.
Essential Building Blocks for Frozen Mango Kiwi Raspberry Pops
We are looking for intensely flavourful fruit here. Don't skimp on quality; your final result directly reflects the fruit you started with.
Selecting the Sweetest Ripe Mangoes
A good ripe mango should give slightly under pressure and have a rich, complex aroma near the stem the more ripe, the less extra sweetener you’ll need. If fresh mango isn't accessible or is too expensive, high-quality frozen mango chunks work brilliantly and often make the blending process easier.
I often use fresh mangoes in my [Southwestern Black Bean Quinoa and Mango Medley: Summer Salad Stunner], so I always try to have them on hand!
Handling the Kiwi Layer for Maximum Green Vibrancy
Kiwi can sometimes look a bit dull once blended, especially if you blend too long. To maintain that electric green colour, add a small splash of fresh lime juice, which also prevents oxidation. Peel them meticulously ; you absolutely do not want pieces of skin disrupting that perfect texture.
Optional Sweeteners and Natural Substitutions
I love using agave nectar because it blends seamlessly and helps keep the texture smooth due to its low freezing point. However, use whatever you prefer!
| Ingredient | My Top Choice | Substitution Option |
|---|---|---|
| Mango | Ripe Ataulfo (Honey Mango) | Ripe Peaches or Pineapple (Use less water). |
| Kiwi | Fresh, slightly soft | Green Grapes or Honeydew Melon. |
| Raspberries | Flash frozen, whole | Strawberries or Pitted Cherries. |
| Sweetener | Agave Nectar or Honey | Maple Syrup or simple sugar syrup. |
| Lime Juice | Freshly Squeezed | Lemon Juice or 1 tsp white vinegar (only for acidity). |
Preparing Fruit Purees for Smooth Blending
Consistency is king here. Each puree should be thick enough to hold its shape slightly but thin enough to pour easily into the molds. If your fruit is super thick (like some mangos can be), just use the recipe’s allotted water to thin it down, adding it one teaspoon at a time.
Don't over thin it , or your pops will be too icy and brittle.
The Complete Guide to Making Frozen Mango Kiwi Raspberry Pops: From Puree to Perfect Freeze

Phase 1: Preparing and Blending the Individual Purees
First, divide your common base ingredients (water, lime juice, sweetener) into three small bowls. This guarantees even flavour across all layers. Next, blend the mango chunks with the contents of the first bowl until perfectly smooth.
Repeat this exact process for the kiwi and then the raspberries, using a fresh bowl of base ingredients each time.
Phase 2: Mastering the Layering and Chill Cycles
Pour the mango puree into the molds, filling them one-third of the way up. Pop them straight into the freezer for 60 minutes . This is not optional! The layer needs to be firm enough to resist the weight of the next layer.
Remove, pour the kiwi puree gently on top, filling to the two-thirds mark, and freeze for another 60 minutes .
Ensuring the Sticks Stay Centered During Initial Set
Once the second kiwi layer is poured, the first mango layer should be semi firm, creating a solid enough base to hold your sticks perfectly upright. Insert the sticks now, making sure they run straight down the middle. If you put them in too early, they'll inevitably drift sideways!
Knowing When the Pops are Fully Frozen (The Tap Test)
After you've topped them off with the raspberry layer and given them 6– 8 hours, how do you know they are done? Give the exposed stick a gentle tap. If there is any wobble, or if the pop starts to flex near the neck, they need more time.
When they are truly done, the stick should feel absolutely rigid, like it's cemented into place.
Chef's Note: If you want an incredibly smooth raspberry layer, you must pass it through a fine mesh sieve after blending. Those tiny raspberry seeds can be annoying when you’re trying to enjoy a smooth, luxurious frozen dessert.
Achieving the Perfect Layers: Chef’s Troubleshooting and Freezing Tips
Preventing Bleeding: The Key to Crisp Colour Separation
This is the number one question I get! The secret is the temperature, not the speed. If you pour a room temperature puree onto a layer that is only slightly slushy, they will instantly mix.
The previous layer must be truly set firm enough that if you lightly tap it with a spoon, it feels solid. If your freezer runs warm, extend that interim chill time to 75 minutes.
My Pop Won’t Come Out: Proper Release Techniques
Do not, I repeat, do not tug violently on the stick. You'll just pull the stick out and leave the frozen pop behind in the mold, which is heartbreaking.
The 30 Second Warm Water Bath Technique
Fill a tall jug with warm tap water (not boiling!). Dip the entire plastic mold unit (or just the individual mold) into the water, ensuring the water level stays below the lip of the mold. Hold it there for 10 15 seconds.
This warms the outside edge just enough to break the vacuum seal, letting the pop slide out beautifully.
Dealing with a Slushy or Icy Consistency
If your pops are too hard or icy, you likely added too much water when thinning the purees. Next time, reduce the water by 1 tablespoon per layer. Conversely, if they are slushy and won't freeze, you probably added too much sweetener (which acts as an antifreeze).
If you’ve been fighting an overly slushy texture with other recipes, maybe try my [Skinny Frozen Hot Chocolate: Ultra Rich Ww Frappe Recipe] instead it embraces the slush!
Adjusting Sweetness Post Blending
If you taste your puree and realize it’s not sweet enough, add more agave or honey before you start freezing. You cannot fix the sweetness once the freezing process has begun. Always taste first!
Demolding and Dedicated Storage for Your Tri-Colour Treats
Wrapping Individual Pops for Freezer Longevity
Once your pops are fully frozen and you've successfully demolded them using the warm water bath, you need to protect them. The best way to store them for long periods is to wrap each one individually in cling film or wax paper. This prevents freezer burn and protects them from picking up weird freezer smells.
Storage & Freezing
Wrapped fruit pops will happily last in a standard freezer for up to 3 months, although let’s be real, they usually vanish within a week. Store them in an airtight container or a heavy duty freezer bag once wrapped. Keeping them in a container prevents physical damage, ensuring those beautiful layers stay intact.
Tropical Dessert Pairings: Creative Ways to Serve These Frozen Mango Kiwi Raspberry Pops
These frozen snacks are perfect on their own, but they also shine when paired with other summery dishes. The mango flavor here makes them a fantastic partner for dishes that also feature that tropical sweetness.
If you're hosting a party, serve these alongside small bites of my famous [Baked Coconut Shrimp: Ultra Crispy Oven Recipe with Mango Dip]. The mango in the dip complements the frozen pops beautifully.
They also make a wonderful, light palate cleanser after a richer dessert. If you’re making a no-bake feast, consider serving these pops immediately after a slice of [Mango Cheesecake Charlotte: Easy No-Bake Layered Dessert]. The cold, tart pop breaks up the richness perfectly.

Recipe FAQs
Why are my popsicles icy or crystallized instead of smooth?
Icy pops usually indicate too high a water content or a lack of solids to manage the crystallization process. To improve the texture, consider adding a tablespoon of plain yogurt, coconut cream, or a touch of corn syrup to your fruit purees.
These ingredients help lower the freezing point and produce a much creamier, smoother mouthfeel.
Can I substitute other fruits for the kiwi or raspberry layers?
Absolutely, this recipe is highly adaptable to seasonal fruits. For the green layer, consider using green grapes or honeydew melon, and for the berry layer, blackberries or blueberries work excellently.
Ensure that the new fruit purees are blended to the same smooth, thick consistency as the original layers to ensure they layer correctly.
How do I ensure the three color layers stay distinct and don't mix?
The key to clean layers is partial freezing between stages. Pour in the first layer (Mango) and freeze it completely for 45 60 minutes until it is firm enough to support the next layer.
When adding the subsequent puree, pour it slowly over the back of a spoon to prevent it from puncturing or mixing with the layer below.
What if my fruit isn't sweet enough? What are the best options for sweetening?
If your fruit requires extra sweetness, natural alternatives like maple syrup, agave nectar, or honey are preferred over granulated sugar, as they dissolve easily. Start by adding one teaspoon of sweetener per cup of fruit puree and tasting before freezing.
Remember that the cold temperature will dull the perceived sweetness, so the mixture should taste slightly sweeter than your ideal.
How long can I store these popsicles in the freezer?
When stored properly, homemade fruit pops maintain their best quality for about six to eight weeks in the freezer. To prevent freezer burn and flavor absorption, remove the pops from the molds after they are solid and wrap each one tightly in wax paper or place them in an airtight container.
My pops are stuck in the mold. What is the safest way to release them?
Do not pull the sticks, as they may break and separate from the pop. Instead, fill a tall glass or container with lukewarm tap water. Dip the bottom of the mold into the water for about 15 to 20 seconds; this quick dip melts a thin outer layer of ice, allowing the pop to slide out easily.
Can I make an adult version of these fruit pops using alcohol?
Yes, you can create a ‘boozy’ pop, but you must use alcohol sparingly, as it significantly lowers the freezing point. Substitute approximately one tablespoon of fruit puree with a clear spirit like vodka, gin, or white rum per cup of mixture.
Using too much alcohol will prevent the pops from ever fully solidifying.
Frozen Mango Kiwi Raspberry Pops
Ingredients:
Instructions:
Nutrition Facts:
| Calories | 175 kcal |
|---|---|
| Protein | 2.5 g |
| Fat | 1.2 g |
| Carbs | 42.9 g |
