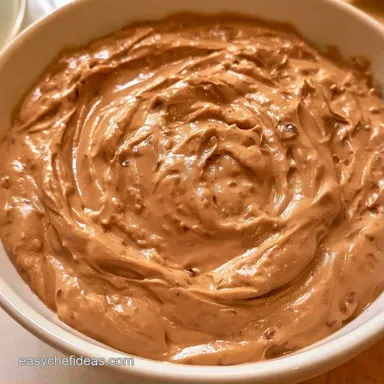
Chicken Liver Pâté with Butter and Shallots

- Time: 15 min active + 10 min cook + 10 min cooling + 4 hours chilling
- Flavor & Texture: Rich, buttery, and silky smooth
- Perfect for: Holiday parties or seasonal gatherings
Make-ahead: Prepare up to 3 days before your event.
Easy Chicken Liver Pâté
A loud sizzle in the pan usually means great flavor, but with livers, too much heat turns them rubbery and grainy. That's the most common fail. Most people overcook the meat, which destroys the delicate texture and makes the final spread feel mealy.
The trick is a controlled, medium-heat sear. You want a brown exterior but a center that stays just barely pink. This keeps the result light and spreadable.
This chicken liver pâté is a brilliant addition to a seasonal grazing board. I like pairing it with autumn figs or sliced winter pears to cut through the richness. It's an impressive appetizer that looks high-end but takes very little actual effort.
Why the Texture Works
- Low Heat Searing: Keeping the heat at medium prevents proteins from tightening. This avoids that "rubbery" feel in the finished spread.
- Cold Butter Emulsion: Stirring in chilled cubes while blending creates a stable, velvety finish that is much less likely to separate.
| Liver Choice | Texture Difference | Impact | Cost |
|---|---|---|---|
| Fresh Livers | Firmer, cleaner taste | Ideal for a crisp finish | Standard |
| Frozen Livers | Softer, more moisture | May require longer searing | Slightly cheaper |
The Ingredient Breakdown
| Ingredient | Role | If You Don't Have It |
|---|---|---|
| Chicken Livers | Primary body and taste | Use duck livers for a more decadent flavor |
| Chilled Butter | Adds shine and firm texture | Heavy cream can work, though the result is softer |
| Chicken Stock | Adds depth and helps deglaze | Beef stock or water with a bit of lemon juice |
The Full List
- 1 lb chicken livers, cleaned and dried
- 4 tbsp unsalted butter Why this? Used to sauté the aromatic vegetables
- 2 shallots, finely chopped
- 2 cloves garlic, minced
- 2 tbsp chicken stock
- 1/2 tsp salt
- 1/4 tsp black pepper
- 1 pinch ground nutmeg
- 4 tbsp unsalted butter, cubed and kept cold Why this? Crucial for achieving a smooth emulsion
- 2 tbsp heavy cream
- 2 tbsp unsalted butter, melted Why this? Forms a layer on top to stop browning
| Original Ingredient | Substitute | Why It Works |
|---|---|---|
| Heavy Cream | Coconut Cream | Comparable fat levels. Note: Introduces a subtle tropical flavor |
| Chicken Stock | Beef Stock | Provides a similar richness, but may be saltier |
Necessary Kitchen Tools
You'll need a heavy skillet, preferably stainless steel or cast iron, to get a proper sear. A food processor gives the smoothest emulsion, while hand-mixing will leave a coarser texture. I also suggest a fine-mesh sieve if you want a truly professional result.
The Cooking Process
Phase 1: Sautéing the Aromatics
Place 4 tbsp (57g) of butter in a skillet over medium heat until melted. Toss in the diced shallots and cook for 3 to 5 minutes until translucent and softened, ensuring they do not brown. Mix in the minced garlic, heating for another 30 seconds until aromatic.
Phase 2: Searing the Livers
Raise the heat slightly and add the chicken livers in a single layer. Brown for 2 to 3 minutes per side until browned on the outside. Use a thermometer to verify they reach 160°F (71°C), though the centers should remain slightly pink.

Phase 3: Deglazing and Flavoring
Pour in 2 tbsp (30ml) of chicken stock to deglaze the pan, scraping up the browned bits. Mix in the salt, black pepper, and nutmeg. Remove the pan from the heat and stir in 2 tbsp (30ml) of heavy cream until well combined.
Phase 4: Blending and Setting
Move the mixture to a food processor and let it cool for 10 minutes. Note: Blending hot livers into cold butter can cause the fat to break. Puree until smooth, then incorporate 4 tbsp (57g) of chilled cubed butter one piece at a time with the motor running until emulsified.

Phase 5: The Final Seal
Spoon the pâté into a glass jar, smoothing the top with a spatula. Create a thin seal by pouring 2 tbsp (28g) of melted butter over the surface. Chill in the refrigerator for at least 4 hours to set.
Common Problems and Fixes
Fixing a Grainy Texture
If the mixture feels slightly coarse after blending, pass the puree through a fine-mesh sieve using the back of a spoon. This removes any remaining bits of connective tissue and creates a professional, smooth feel.
Preventing a Runny Set
A runny pâté usually means the butter wasn't chilled enough or the mixture was too hot when blended. If it's too soft, you can try chilling it for an extra 2 hours. If it still won't set, you can gently fold in another tablespoon of chilled, softened butter.
Stopping the Grey Color
Livers turn grey when they are steamed rather than seared. This happens if the pan is too crowded or the heat is too low. Make sure you cook the livers in a single layer and don't move them too often, allowing a deep brown crust to form.
Customizing the Flavor
For a more herbed version, stir in fresh thyme or parsley just before blending.
If you're serving this alongside something with more heat, maybe try these Spicy Hot Sauce Tostadas. The contrast between the rich liver spread and the spicy tostadas makes for a great party platter.
Storage Guidelines
Store the jar in the refrigerator with the butter seal left intact. Following USDA guidelines on food storage, cooked leftovers are safe for 3 to 4 days.
This preparation is excellent for freezing. Keep it in a freezer-compatible container for a maximum of 3 months. To use, let the jar defrost slowly in the fridge overnight; this helps maintain the emulsion and stops the fat from separating.
When reheating, ensure the temperature hits 165°F (74°C) to comply with USDA FSIS safety standards. When reheating cooked leftovers, check with a food thermometer that the center reaches 165°F (74°C); the appliance temperature and time alone do not confirm this.
Serving Suggestions

Enjoy this chilled alongside a toasted baguette or thin rye crisps. I recommend pairing it with cornichons or a spoonful of onion jam. For an elegant look, garnish the jar with a sprig of fresh thyme or a few peppercorns before the butter seal firms up. It's visually stunning and tastes even better.
Good to Know
Why is chicken liver pâté good for you?
It is rich in essential vitamins. Livers are highly nutrient-dense, providing significant amounts of vitamin A and B vitamins.
Is this pâté cooked or raw?
It is fully cooked. For safety, the livers are seared until the center hits 160°F (71°C).
How to make chicken liver pâté smoother?
Process the mixture in a food processor after letting it cool for 10 minutes. Slowly add chilled cubed butter while the motor is running to create a stable emulsion.
Can this keep in the fridge and be frozen?
Yes, it keeps well in both. Refrigerate it for 3 to 4 days or freeze it in a secure container for up to 3 months.
What causes the pâté to stay soft like a mousse?
The high fat content from butter and heavy cream creates a creamy, spreadable texture. Unlike some terrines, this recipe does not use gelatin to bind it.
When thawing frozen pâté, what is the best method?
Thaw the jar slowly in the fridge overnight. This preserves the emulsion and prevents the fat from separating.
Does the pâté taste too strongly of liver?
No, the flavors are balanced. The addition of shallots, garlic, and nutmeg mellows the mineral intensity. If you loved the savory balance here, see how we use a similar creaminess in our butternut squash sauce.
Silky Chicken Liver Pâté