Apple Crisp Cheesecake: Velvety and Golden
- Time:30 minutes active + 6 hours 10 mins baking/chilling = Total 7 hours 40 mins
- Flavor/Texture Hook: Velvety, tangy filling with a golden, buttery crunch
- Perfect for: Seasonal dinner parties or a show stopping holiday dessert
- Savor the Seasonal Apple Crisp Cheesecake
- Why This Texture Hits Different
- Picking Your Seasonal Elements
- The Essential Baking Tools
- Step-by-Step Baking Guide
- Solving Common Baking Glitches
- Troubleshooting Common Issues
- Adapting for Different Diets
- Freshness and Storage Guide
- Plating Your Final Masterpiece
- Recipe FAQs
- 📝 Recipe Card
Savor the Seasonal Apple Crisp Cheesecake
The first thing that hits you is the smell - that deep, toasted cinnamon and brown sugar aroma that practically hugs you the second you walk into the kitchen. I remember the first time I tried this, it was a rainy Tuesday in October.
I had these gorgeous, tart Granny Smith apples and a sudden craving for something that felt like a warm hug but looked like a fancy bakery window display. I spent the whole afternoon watching that oven, terrified the top would crack, but the moment I pulled it out, the sizzle of the butter in the crumble was just music to my ears.
It's a bit of a project, I won't lie. You can't rush a good cheesecake, and this one is no exception. But the payoff is a slice that has everything - the salty sweet snap of the graham cracker crust, the silky smooth heart of the cake, and those jammy, tender apples.
It's basically two of the best desserts ever made, having a little baby together.
If you've ever felt intimidated by cheesecakes, let me tell you, we've all been there. I once forgot the water bath and ended up with a cake that looked like a dried out riverbed. But once you follow these steps, the Apple Crisp Cheesecake becomes a reliable win.
It's all about the temperature of your ingredients and a little bit of patience during the chill time. Trust me, the wait is where the magic happens.
Why This Texture Hits Different
I used to think the water bath was just an extra dish to wash, but it's actually the secret to that velvety consistency. Here is what's actually happening in your oven:
- The Steam Secret: The water bath keeps the oven humid and the temperature stable, which prevents the eggs from overcooking and causing surface cracks. This is a technique highlighted by Serious Eats to ensure a flat, creamy top.
- Pectin Magic: Sautéing the apples first breaks down the pectin, turning them from hard slices into a jammy, tender layer that doesn't release too much water into the cake.
- Cold Butter Crumbs: Using cold, cubed butter in the topping creates tiny pockets of fat that steam during baking, resulting in a shatter crisp texture rather than a greasy paste.
- Acid Balance: The lemon juice in the apple layer prevents oxidation and provides a bright contrast to the heavy fats in the cream cheese.
| Apple Variety | Tartness | Texture | Best For |
|---|---|---|---|
| Granny Smith | High | Firm | Maximum contrast and hold |
| Honeycrisp | Medium | Very Crisp | Sweeter, more modern taste |
| Fuji | Low | Soft | Very sweet, may get too mushy |
| Braeburn | Medium | Firm | Balanced, classic apple flavor |
Right then, let's look at what's actually doing the heavy lifting in the ingredients.
Picking Your Seasonal Elements
When you're building an Apple Crisp Cheesecake, the quality of your fat sources determines the mouthfeel. I always go for full fat cream cheese - honestly, don't even bother with the low-fat stuff; it changes the structure and leaves you with a grainy texture.
| Ingredient | Science Role | Pro Secret |
|---|---|---|
| Cream Cheese | Structure/Fat | Must be room temp to avoid lumps |
| Sour Cream | Acidity/Tenderness | Adds a slight tang that balances sugar |
| old-fashioned Oats | Texture/Binding | Provides the chewiness in the topping |
| Granny Smith | Flavor Contrast | High acidity cuts through the richness |
For the Graham Cracker Crust
- 1.5 cups (180g) graham cracker crumbs Why this? Classic honey wheat base for a salty sweet contrast
- 1/3 cup (75g) unsalted butter, melted Why this? Binds the crumbs into a solid base
- 2 tbsp (25g) brown sugar Why this? Adds a caramel note to the crust
- 1/4 tsp (1.5g) salt Why this? Prevents the crust from tasting flat
For the Velvety Cheesecake Filling
- 24 oz (680g) full fat cream cheese, softened to room temperature Why this? Essential for a smooth, non lumpy batter
- 1 cup (200g) granulated sugar Why this? Provides clean sweetness without altering texture
- 3 large eggs, room temperature Why this? Binds the fats and provides lift
- 1 cup (240ml) sour cream, room temperature Why this? Creates a silky, lighter mouthfeel
- 1 tsp (5ml) vanilla extract Why this? Rounds out the tang of the cheese
- 1 tbsp (8g) all purpose flour Why this? Stabilizes the structure to prevent sinking
- 1 tsp (2g) ground cinnamon Why this? Bridges the flavor between cake and apples
For the Cinnamon Apple Layer
- 1 lb (450g) Granny Smith apples, peeled and thinly sliced Why this? Holds shape during baking
- 2 tbsp (30g) unsalted butter Why this? Coats apples for a rich glaze
- 1/4 cup (50g) brown sugar Why this? Creates a sticky, syrupy coating
- 1 tsp (2g) ground cinnamon Why this? Classic seasonal flavor profile
- 1 tbsp (15ml) lemon juice Why this? Keeps apples bright and adds zing
For the Brown Sugar Crisp Topping
- 1/2 cup (45g) old-fashioned rolled oats Why this? Adds rustic, chewy texture
- 1/2 cup (65g) all purpose flour Why this? Gives the crumble its structure
- 1/2 cup (100g) brown sugar, packed Why this? Deep molasses flavor for a dark gold color
- 1/2 cup (115g) unsalted butter, cold and cubed Why this? Critical for the "shatter" effect
- 1/2 tsp (1g) ground cinnamon Why this? Ties the topping to the apples
- 1/4 tsp (1.5g) salt Why this? Enhances the butter and sugar
The Essential Baking Tools
You don't need a professional kitchen for this, but a few specific tools make the process way less stressful. If you're using a springform pan, make sure it's in good shape. I've had pans leak in the water bath before, and that's a nightmare you don't want.
I recommend a heavy duty 9 inch springform pan and a larger roasting pan or baking sheet that can hold it. For the apples, a cast iron skillet (like Lodge) is great because it holds heat so well, making the sautéing process much faster.
You'll also want a handheld mixer or a stand mixer such as KitchenAid to get the cream cheese truly smooth.
Don't forget a piece of heavy duty aluminum foil. You'll need to wrap the bottom of your pan tightly to keep the water out. If you're unsure, you can use two layers of foil and a piece of kitchen twine to tie it securely around the base.
Step-by-step Baking Guide
Let's crack on. This is where we put it all together. Remember, room temperature is your best friend here. If your cream cheese is cold, you'll have lumps that no amount of mixing can fix.
Phase 1: The Foundation
- Mix graham cracker crumbs, melted butter, brown sugar, and salt in a medium bowl until the mixture feels like wet sand.
- Press the mixture firmly into the bottom of a 9 inch springform pan, using the bottom of a measuring cup to get it even.
- Bake at 350°F (175°C) for 8 minutes until it smells toasted and fragrant. Note: Pre baking the crust prevents it from getting soggy under the filling.
Phase 2: The Creamy Core
- Beat the softened cream cheese and granulated sugar on medium speed until completely smooth.
- Incorporate the eggs one at a time on low speed, mixing just until combined. Note: Over beating eggs adds too much air, which causes the cake to rise and then collapse.
- Stir in the sour cream, vanilla, flour, and cinnamon until the batter is silky. Pour this over your pre baked crust.
Phase 3: The Apple Sauté
- Melt 2 tbsp butter in a skillet over medium heat.
- Add the sliced apples, brown sugar, cinnamon, and lemon juice.
- Sauté for 5-7 mins until the apples are slightly softened and the liquid has become a thick syrup. Note: Don't overcook them here; they'll finish in the oven.
Phase 4: The Final Assembly
- In a bowl, combine oats, flour, brown sugar, cinnamon, and salt.
- Use a pastry cutter or your fingers to cut in the cold cubed butter until the mixture is crumbly.
- Spread the sautéed apple layer evenly over the cheesecake batter, then sprinkle the streusel on top.
- Wrap the pan in foil and place it in a large baking sheet filled with hot water.
- Bake for 1 hour and 10 minutes until the edges are set but the center still has a slight, uniform jiggle.
- Cool the pan to room temperature, then refrigerate for a minimum of 6 hours.
Chef's Tip: To get a perfectly clean slice, dip your knife in hot water and wipe it dry between every single cut. This prevents the filling from sticking to the blade and smudging your beautiful layers.
Solving Common Baking Glitches
Even for us obsessed cooks, things go sideways. The most common issue with an Apple Crisp Cheesecake is the "cracked top" or the "soggy base." Most of the time, it's a temperature or moisture issue.
Troubleshooting Common Issues
| Issue | Solution | ||
|---|---|---|---|
| Why Your Cheesecake Cracked | If you see a fissure running down the middle, you probably over mixed the batter or baked it at too high a temperature. When you beat the eggs too vigorously, you incorporate air bubbles that expand a | ||
| Why Your Crust Is Soggy | A soggy bottom usually happens if the crust wasn't pre baked or if the apple layer was too wet. Sautéing the apples to release the pectins is the key to preventing this. | ||
| Why Your Topping Isn't Crunchy | If your crumble feels more like a cookie than a crisp, the butter was likely too warm when you mixed it in. You want distinct chunks of butter to create those airy, crispy pockets. | Problem | Root Ca |
Adapting for Different Diets
I've had a few friends ask if they can tweak this for their dietary needs. While the full fat version is the gold standard for texture, you can make some adjustments. If you're looking for something a bit lighter, you could try a Cinnamon Apple Crisp as a side instead of a full cake.
Gluten-free Version
You can easily make this gluten-free. Swap the graham cracker crumbs for GF crumbs and use a 1:1 gluten-free flour blend (like Bob's Red Mill) for the filling and topping. According to King Arthur Baking, measuring by weight (grams) is critical when using GF flours to avoid a gritty texture.
Low Sugar Alternative
To reduce the sugar, you can replace the granulated sugar in the filling with a monk fruit sweetener. However, keep the brown sugar in the topping; it's what gives the Apple Crisp Cheesecake its characteristic color and depth. Just note that sugar-free alternatives can sometimes leave a slight aftertaste.
Making Cheesecake Bars
If you want smaller portions, you can bake this in a 9x13 pan. Just press the crust into the rectangle and reduce the baking time by about 15 minutes, since the cake will be thinner. These make for great party bites.
Freshness and Storage Guide
A cheesecake actually tastes better the next day once the flavors have had time to meld. But you have to store it correctly to keep that topping from getting soft.
Fridge Storage: Keep the cake in the refrigerator, covered with a loose piece of foil or a cake dome. It will stay fresh for up to 5 days. I find that if you wrap it too tightly with plastic wrap, the moisture can make the oat topping lose its crunch.
Freezer Storage: This recipe freezes beautifully. Wrap individual slices in parchment paper and then tightly in foil. They'll last for about 2 months. To reheat, just let a slice thaw in the fridge overnight. Don't try to microwave it, or you'll lose that velvety texture.
Zero Waste Tips: Don't throw away your apple peels and cores! You can simmer them with a bit of cinnamon and water to make a quick apple tea, or store them in a jar with sugar and water to start a homemade apple cider vinegar.
Even the leftover graham cracker crumbs can be tossed into a smoothie for a little extra flavor.
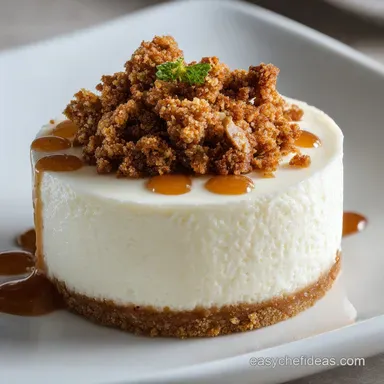
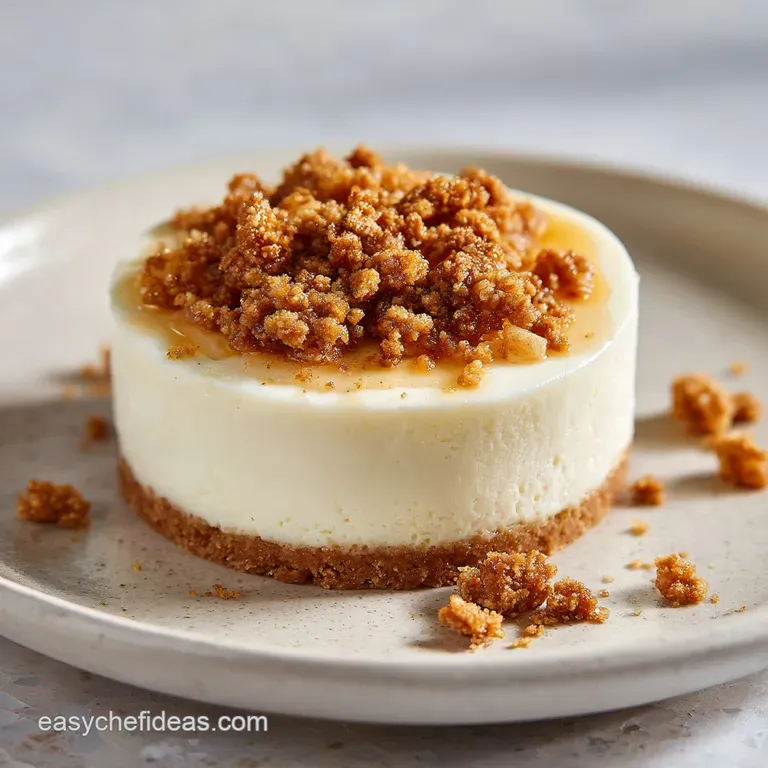
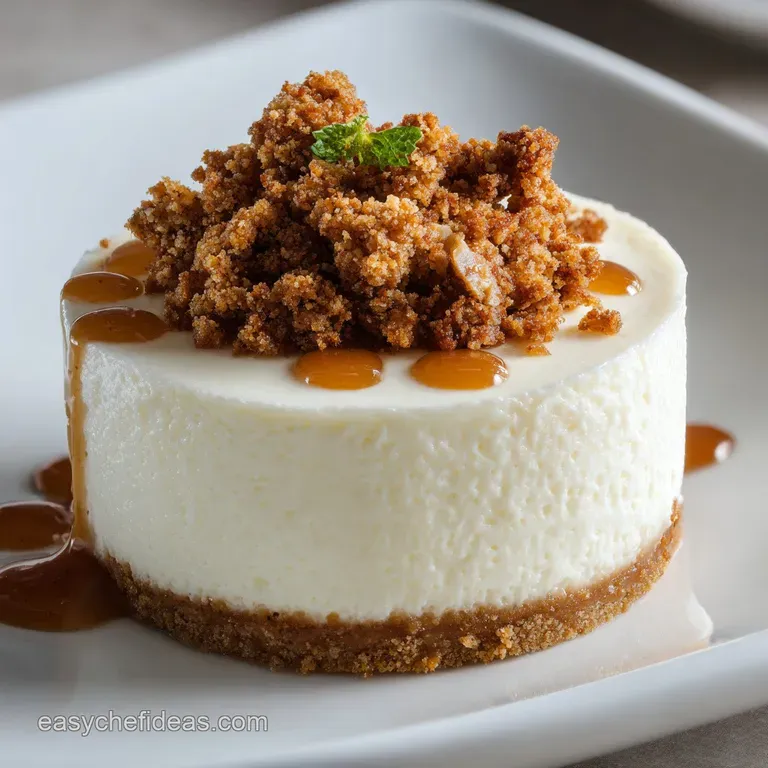
Plating Your Final Masterpiece
Since we're going for a seasonal, artful look, how you present this matters. You want the contrast between the white cream cheese and the golden topping to pop.
The Simple Approach: A generous slice on a plain white plate. This lets the layers speak for themselves. Perfect for a cozy family dinner.
The Polished Look: Add a dollop of homemade whipped cream on the side and a light dusting of cinnamon powder across the plate. This version is great for a holiday brunch.
The Restaurant Style: Place a smaller slice in the center of a slate board. Drizzle a thin line of salted caramel sauce around the cake and garnish with a single, thin slice of fresh apple and a tiny mint leaf for a pop of green.
| Plating Level | Garnish | Plate Style | Vibe |
|---|---|---|---|
| Simple | None | Dessert Plate | Homey & Cozy |
| Polished | Whipped Cream | White Ceramic | Elegant Brunch |
| Restaurant | Caramel Drizzle | Slate Board | Fine Dining |
But what about the common myths? Let's clear those up. Some people tell you that you can skip the water bath if you use a springform pan with a very high wall, but that's not true. The water bath is about temperature control, not just leaks. I once tried to skip it for an Apple Cobbler inspired cake and the edges were burnt before the middle was set.
Another myth is that you should bake the cheesecake until the center is firm. Absolutely not. If the center is firm in the oven, you've overcooked it, and it will be dry. You want that slight jiggle - it's the only way to ensure the final result is silky.
Right then, you've got all the tools and tricks. Now it's your turn to get that Apple Crisp Cheesecake in the oven. Just remember: be patient with the chill time, and don't skimp on the butter. Happy baking!
Recipe FAQs
Do I really need to refrigerate the cheesecake for 6 hours?
Yes, this is critical for the texture. The cake requires this time to fully set and firm up, ensuring clean slices and a creamy consistency.
How to avoid a soggy crust?
Sauté the sliced apples with brown sugar and cinnamon before adding them to the cake. This releases the pectins and reduces the moisture that would otherwise soak into the base.
Is it true that the water bath is unnecessary for this recipe?
No, this is a common misconception. A water bath regulates the oven temperature to prevent the surface from cracking and ensures an even bake.
How to ensure the cheesecake batter is smooth?
Beat the cream cheese and sugar until completely smooth before incorporating eggs one at a time on low speed. Using room temperature ingredients is the only way to prevent lumps.
Why did my cheesecake crack during baking?
You likely overmixed the batter or baked it at too high a temperature. Beating the eggs too vigorously incorporates air bubbles that expand and burst in the heat.
How to make the apple crisp topping crunchy?
Cut cold cubed butter into the flour, oats, and sugar until the mixture is crumbly. Avoid overworking the dough, as too much handling makes the topping dense like a cookie.
What is a good accompaniment for this dessert?
Serve it with a dollop of whipped cream. For more autumnal flavors, try pairing a slice with some spiced pumpkin butter.
Apple Crisp Cheesecake