The Ultimate Easy Apple Cobbler Recipe
- The Ultimate Easy Apple Cobbler Recipe: The Secret to a Velvety Filling and a Crumbly Biscuit Top
- The Ultimate Easy Apple Cobbler Recipe Overview
- Why This Recipe Works: The Science of Texture and Spice
- Essential Ingredients and Smart Substitutions
- Step-by-Step: How to Master the Perfect Apple Cobbler
- Troubleshooting: Common Mistakes and Expert Tips
- Storage, Freezing, and Making Cobbler Ahead
- Creative Ways to Serve Your Homemade Cobbler
- Recipe Card
- Recipe FAQs
- 📝 Recipe Card
The Ultimate Easy Apple Cobbler Recipe: The Secret to a Velvety Filling and a Crumbly Biscuit Top
The Ultimate Easy Apple Cobbler Recipe Overview
Stop scrolling. I need you to imagine the sound of a perfectly baked biscuit topping shattering under a spoon, followed by that first deep inhale of cinnamon and warm apples. That smell?
It’s pure fall magic, and it’s exactly what happens when you bake this simple apple cobbler recipe.
Listen, I've tried every cobbler method out there the fancy ones with laminated pastry, the weird ones that dump dry cake mix over fruit. But the best ones, the ones that actually deliver on flavor and texture without demanding your entire afternoon, are always the simplest.
This is my go-to easy apple cobbler recipe , refined over years of testing, and it nails the classic comfort dessert experience in just 60 minutes, start to finish.
Forget the fussy deep dish pies or the sometimes too-chewy crumbles. We are making a true apple cobbler , featuring soft, buttery biscuits perched right on top of a bubbling, velvety apple filling. It's fast, forgiving, and the absolute perfect pairing for a scoop of vanilla bean ice cream. (Pro-tip: If you love apples but want that distinct fried dough flavor without the fryer, you might also obsess over my Baked Apple Fritters Recipe Easy: Golden Healthy Maple Glazed !)
| Prep Time | Cook Time | Total Time | Yield | Category | Cuisine | Calories |
|---|---|---|---|---|---|---|
| 20 Mins | 50 Mins | 60 Mins | 8 Servings | Dessert | American | 378 |
Why This Recipe Works: The Science of Texture and Spice
Baking a perfect apple cobbler isn't about luck; it's about understanding how the ingredients interact in the heat. This Apple Cobbler achieves its legendary status through careful technique.
What Defines a True Cobbler vs. Crisp or Crumble?
The difference is all about the topping. A crisp has a crunchy, streusel like top often made with oats and butter (like my Cinnamon Apple Crisp: The Classic Recipe with an Ultra Crunchy Oat Topping ). A cobbler, however, is topped with distinct drops or scoops of biscuit dough that puff up and bake into individual, pillowy domes. These biscuits must be tender yet structurally sound enough to soak up a tiny bit of the buttery apple juices without getting completely soggy.
Understanding the Role of Lemon Juice in Filling
We are using a small amount of lemon juice (just 1 tablespoon), and it’s non-negotiable, even if your apples are tart. Why? It's not just for flavor balance. The acidity in the lemon juice stabilizes the pectin in the apples, helping them maintain their shape during the 50 minute bake time.
Without it, your apples might break down into mush.
Achieving the Fluffy, Golden Biscuit Topping
The key to a light biscuit top is cold fat and minimal handling. We cut very cold butter into the dry ingredients. When that cold butter hits the hot oven, it rapidly releases steam, creating dozens of tiny air pockets. This results in a shatteringly crisp exterior and a light, velvety interior.
The batter should be slightly thicker than commercial pancake batter just thick enough to hold its shape when dropped by the spoonful.
Essential Ingredients and Smart Substitutions
This recipe uses only about 14 simple ingredients. We keep the filling minimal so the natural sweetness and spice of the apples shine through.
| Original Ingredient | Best Substitute | Why It Works |
|---|---|---|
| All-Purpose Flour (for filling) | Cornstarch or Arrowroot Powder (1:1) | Both act as efficient thickeners. Note: Cornstarch gives a shinier finish to the sauce; arrowroot may be slightly cloudier but is preferred for organic/non-GMO diets. |
| Granulated Sugar (for filling) | Maple Syrup or Coconut Sugar | Maple Syrup (use ¾ cup, reduce liquid slightly) adds moisture and richness but brings a strong, distinct maple note. Coconut sugar (1:1) is less sweet and has a molasses flavor profile. |
| Butter (cold, cubed) | Vegetable Shortening (cold) | Shortening has a higher melting point, producing an exceptionally flaky, tender biscuit. Note: Butter adds crucial flavor; shortening biscuits will be less complex in taste. |
| Baking Powder | Baking Soda + Cream of Tartar (½ tsp soda + 1 tsp cream of tartar per 1 Tbsp powder) | Necessary chemical leaveners. Must ensure adequate acidity (like buttermilk or lemon juice) is present to activate the baking soda if replacing powder completely. |
| Buttermilk | Milk + 1 tsp Lemon Juice or Vinegar (let sit 5 minutes) | The acid curdles the milk, mimicking buttermilk's tang and tenderizing effect. Note: Essential for reacting with the leavening agent for optimal rise. |
| Apples (mixed) | Pears or Peaches | Pears hold up very well when baked. Peaches create a much softer filling; reduce sugar by 2 Tbsp as peaches are often sweeter than baking apples. |
Choosing the Best Apples for Baking (Sweetness and Structure)
For the best apple cobbler , you need apples that hold their shape. A mix is ideal: I use half Granny Smith (for tartness and structure) and half Honeycrisp or Fuji (for sweetness and balanced flavor). Skip soft apples like McIntosh; they turn into baby food during the 50 minute bake time.
Dairy and Fat: Butter vs. Shortening in the Topping
The buttery flavor is essential, but make sure the butter is diced and icy cold . If you want an extra flaky top think shortcake texture you can replace half the butter with cold vegetable shortening.
Optimizing Spices for Deep Autumn Flavor
We use cinnamon, nutmeg, and a tiny pinch of cloves. Cloves are powerful, so use them sparingly! The goal is warmth, not overwhelming spice. If you prefer a nuttier base (sometimes seen in a "Healthy Apple Cobbler" style), feel free to swap 2 tablespoons of AP flour in the topping for finely ground almond flour.
step-by-step: How to Master the Perfect Apple Cobbler

This apple cobbler recipe is designed for speed. Plan for 20 minutes of active prep before the oven takes over.
1. Preparing the Filling: Slicing and Seasoning (Prep Time: 15 Minutes)
Preheat your oven to 400°F (200°C). Grease a 9x13 baking dish lightly. Peel, core, and slice your apples into uniform ½-inch thick wedges. Uniformity is key for even cooking! In a large bowl, toss the apples with the ¼ cup of flour, sugar, cinnamon, nutmeg, cloves, and lemon juice.
Mix until the apples are glossy and evenly coated. Dump the filling into the prepared baking dish.
2. Mixing the Biscuit Topping for Optimal Fluff
In a separate medium bowl, whisk together the flour, granulated sugar, baking powder, salt, and cinnamon. Use a pastry blender or your fingers to cut in the cubed cold butter until the mixture resembles coarse cornmeal, with some pea-sized pieces of butter still visible. This is where the magic happens!
In a small bowl, whisk the buttermilk and vanilla extract. Pour the wet mixture into the dry ingredients and stir gently, only until just combined. The batter should be thick and shaggy do not overmix, or your biscuits will be tough.
3. Assembling and Baking the Dessert
Drop the biscuit dough by large spoonfuls evenly over the apple filling. Don’t worry about covering every inch; the dough will spread slightly, and leaving gaps allows the filling to bubble up and caramelize.
Sprinkle the tops of the biscuits with the remaining 2 Tbsp of coarse sugar (like turbinado or sparkling sugar) for texture and crunch.
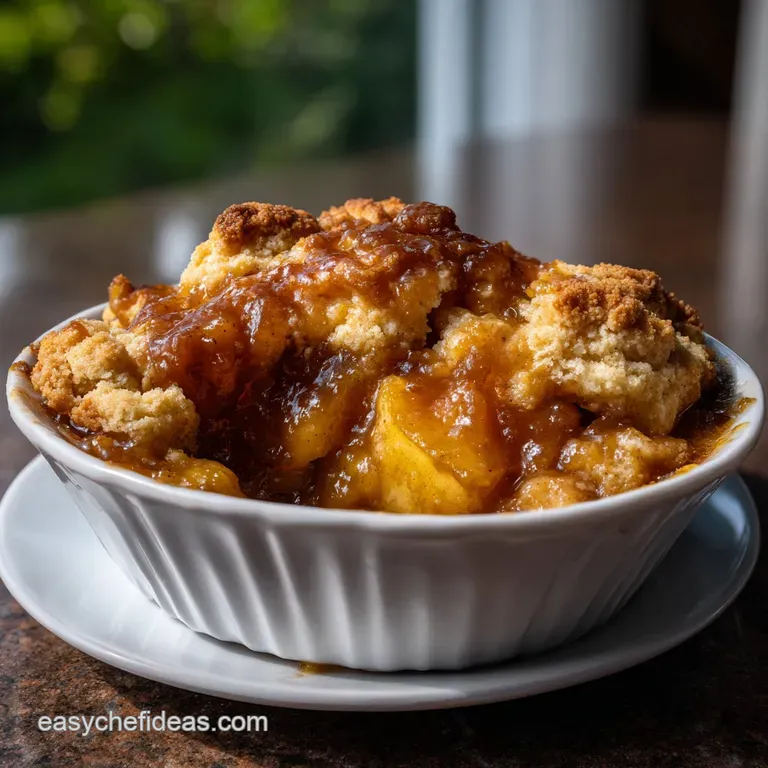
4. Knowing When Your Cobbler Is Done (Visual and Internal Cues)
Bake for 50 minutes. If the topping starts getting too brown around the 35 minute mark, lightly tent the dish with foil. The apple cobbler is done when the topping is deep golden brown and firm to the touch, and the apple juices are visibly bubbling up around the edges and center, thick and syrupy.
Remove from the oven and let cool on a wire rack for 10- 15 minutes before serving this resting time allows the sauce to fully set.
Troubleshooting: Common Mistakes and Expert Tips
Even the most straightforward recipes have pitfalls. Here’s how to avoid them when making your perfect apple cobbler .
| Common Mistake | Root Cause | The Fix |
|---|---|---|
| Soggy/Gummy Topping | Overmixing the biscuit dough (developing gluten) or using warm butter. | Use COLD butter and mix the dough only until the flour streaks disappear. Less is more. Also, ensure the filling is thick enough (don't skip the 1/4 cup flour/cornstarch). |
| Filling is watery | Apples have released too much moisture (usually due to under thickening or wrong apple type). | Add an extra tablespoon of thickener (flour/cornstarch) to the filling mix. Or, briefly precook the apples for 5 minutes to release excess moisture before assembling. |
| Apples are undercooked | Slices were too thick, or the oven temperature was inconsistent. | Slice apples no thicker than ½ inch. If they look done but feel tough, cover loosely and bake 10 minutes longer. |
| Cobbler is dry | Baked too long, or not enough liquid in the topping/filling ratio. | Always cover with foil if the topping browns too fast. Use a full fat buttermilk to ensure adequate moisture in the biscuit dough. |
Storage, Freezing, and Making Cobbler Ahead
One of the great things about this easy apple cobbler recipe is how well it handles storage, though nothing beats it fresh from the oven.
Prepping the Filling and Topping in Advance
You can slice and season the apple filling up to 12 hours ahead. Keep it tightly covered in the fridge. Mix the dry ingredients for the topping ahead of time, but do NOT add the butter or buttermilk until you are ready to assemble and bake.
If you try to mix the topping too far ahead, the leavening agents start losing power, and the biscuits won't rise as high.
Reheating Leftovers Without Drying Out the Biscuits
Store leftovers, tightly covered, in the fridge for up to 4 days. To reheat, the microwave makes them soft and moist, but for that glorious crisp exterior, put individual servings back in the oven at 300°F (150°C) for 10- 15 minutes until warmed through and the top is crunchy again.
Freezing
Yes, you can freeze cobbler! Bake the apple cobbler completely, let it cool, and then cover it tightly (preferably in a freezer safe dish with two layers of foil). It holds for up to 3 months. Thaw overnight in the fridge and reheat as directed above.
Creative Ways to Serve Your Homemade Cobbler
The classic serving method is warm with vanilla ice cream the cold cream melts into the hot, buttery pockets and caramel filling, creating pure heaven.
Best Ice Cream and Sauces for Pairing
For a fun twist, try salted caramel ice cream or a scoop of praline pecan. If you want to make the apple cobbler extra decadent, drizzle the whole thing with a thin, silky caramel sauce or a little bourbon spiked whipped cream.
Alternative Garnishes to Elevate the Dessert
A simple dusting of powdered sugar makes the brown biscuit tops pop. Or, finely toast some pecans or walnuts and sprinkle them right before serving. The added crunch is fantastic against the soft apples. If you’re looking for a slightly healthier, morning friendly version of apples and spices, you might like my Apple Cinnamon Breakfast Quinoa: Creamy Fall Bowl Ready in 30 Minutes .
This apple cobbler is seriously the perfect dessert for fall, for Sunday supper, or just for a random Tuesday when you need a little cozy comfort. Enjoy this incredible Apple Cobbler !
Recipe Card
| Ingredients for Apple Cobbler | Notes |
|---|---|
| APPLE FILLING | |
| 6 cups (about 5 6 medium) firm apples, peeled, cored, and sliced (Granny Smith + Honeycrisp mix is best) | |
| ¾ cup granulated sugar (or ½ cup plus 2 Tbsp for a less sweet filling) | |
| 1 Tbsp fresh lemon juice | Essential for balancing sweetness and stabilizing pectin. |
| ¼ cup all-purpose flour (or cornstarch for GF) | |
| 1 tsp ground cinnamon | |
| ½ tsp ground nutmeg | |
| Pinch of ground cloves | Use sparingly! |
| COBBLER TOPPING | |
| 1 ½ cups all-purpose flour | |
| ⅓ cup granulated sugar | |
| 1 Tbsp baking powder | Crucial for the biscuit rise. |
| ½ tsp ground cinnamon | |
| ½ tsp salt | |
| 6 Tbsp (¾ stick) unsalted butter, cold and cubed | |
| ¾ cup buttermilk, full fat | Or whole milk mixed with 1 tsp white vinegar. |
| 1 tsp vanilla extract | |
| 2 Tbsp coarse sugar (Turbinado or Demerara) for sprinkling | Optional, but highly recommended for crunch. |
Instructions:
- PREP THE OVEN AND DISH (5 Mins): Preheat oven to 400°F (200°C). Lightly grease a 9x13-inch baking dish.
- MAKE THE FILLING (15 Mins): In a large bowl, combine the apples, ¾ cup sugar, lemon juice, ¼ cup flour, cinnamon, nutmeg, and cloves. Toss until the apples are well coated and glossy. Pour the filling evenly into the prepared baking dish.
- MAKE THE TOPPING (5 Mins): In a separate bowl, whisk together the 1 ½ cups flour, ⅓ cup sugar, baking powder, salt, and ½ tsp cinnamon. Cut in the cold butter using a pastry blender or your fingertips until the mixture resembles coarse crumbs.
- ADD WET INGREDIENTS (5 Mins): In a small cup, whisk the buttermilk and vanilla. Add the liquid to the dry ingredients and stir gently until just combined. The dough will be thick and shaggy do not overmix!
- ASSEMBLE AND BAKE (50 Mins): Drop the biscuit dough by large spoonfuls over the apple filling. Sprinkle the tops with the coarse sugar. Bake for 50 minutes, or until the topping is golden brown and the filling is bubbling thickly.
- COOL AND SERVE (10 Mins): Let the apple cobbler cool on a wire rack for 10 minutes before serving with ice cream or whipped cream. The filling will thicken as it cools. Enjoy this simple and delicious apple cobbler .

Recipe FAQs
What kind of apples work best for this cobbler?
For the best texture and flavor balance, use a mix of firm, slightly tart apples like Granny Smith combined with sweeter varieties such as Honeycrisp or Fuji. This mixture prevents the filling from becoming too mushy while maintaining a pleasant tang.
Can I make the apple filling ahead of time?
Yes, you can prepare the apple filling up to 24 hours in advance and store it in an airtight container in the refrigerator. Let it sit at room temperature for about 30 minutes before topping it with the biscuit dough to ensure even baking.
How do I prevent the biscuit topping from getting soggy?
Ensure your apples are not overly watery before topping them; you can slightly reduce the liquid if necessary. Also, placing the raw biscuit dough directly onto the hot fruit filling helps the bottom set quickly during the initial bake.
How should I store leftover apple cobbler?
Store leftovers covered tightly at room temperature for up to one day, or in the refrigerator for up to four days. For the best experience, reheat individual servings in an oven or air fryer to crisp up the biscuit topping again.
What makes the filling "velvety" as described?
The velvety texture often comes from incorporating a small amount of cornstarch or flour with the sugar and spices, which thickens the released apple juices into a smooth, luscious sauce rather than a watery liquid.
Can this recipe be frozen?
It is generally best enjoyed fresh, but you can freeze the baked cobbler. Cool it completely, wrap it securely in plastic wrap and foil, and freeze for up to three months; thaw overnight in the refrigerator before reheating.
What temperature should I bake the cobbler at?
Most standard cobbler recipes call for a relatively high initial baking temperature, often around 400°F (200°C), for the first 15-20 minutes to set the crust, before reducing the heat slightly if the top browns too quickly.
Ultimate Easy Apple Cobbler Recipe

Ingredients:
Instructions:
Nutrition Facts:
| Calories | 405 kcal |
|---|---|
| Protein | 3.5 g |
| Fat | 12.5 g |
| Carbs | 70.4 g |
| Fiber | 3.4 g |
| Sugar | 50.8 g |
| Sodium | 260 mg |
