Tender Top Round Roast with Aromatic Crust
- Time: Active 15 minutes, Passive 1 hours 15 mins, Total 1 hours 30 mins
- Flavor/Texture Hook: Aromatic herb crust with a silky, tender interior
- Perfect for: Sunday family dinners or nutritious weekly meal prep
- Achieving a Juicy and Tender Top Round Roast
- The Science of Heat and Muscle Fibers
- Component Analysis and Flavor Roles
- Selecting Quality Ingredients and Savvy Substitutes
- Essential Tools for a Professional Finish
- Step by Step Layers of Flavor
- Solving Texture and Temperature Hurdles
- Adapting the Batch for Any Crowd
- Flavor Myths and Kitchen Realities
- Maximizing Freshness and Using Every Scrap
- Side Dishes to Complete the Table
- Top Round Roast FAQs
- 📝 Recipe Card
Achieving a Juicy and Tender Top Round Roast
The kitchen filled with the sharp, woody scent of rosemary and the pungent warmth of smashed garlic the first time I actually got this right. For years, I avoided this cut because I thought it was destined to be dry, gray, and frankly, a bit like chewing on a leather belt.
I remember one specific Sunday dinner where I served a roast so tough we practically needed a chainsaw to get through it. It was embarrassing, but it taught me the most valuable lesson in home cooking: lean meat requires a specific kind of respect.
Nourishing our community starts with understanding the ingredients we bring into our homes. This recipe isn't about hiding the meat under heavy sauces, it's about celebrating the beef itself.
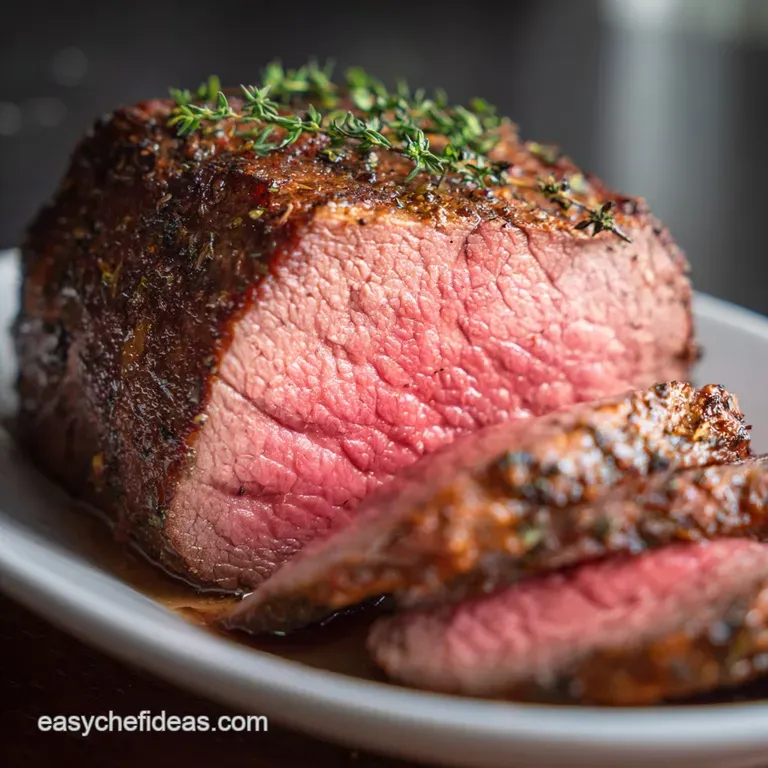
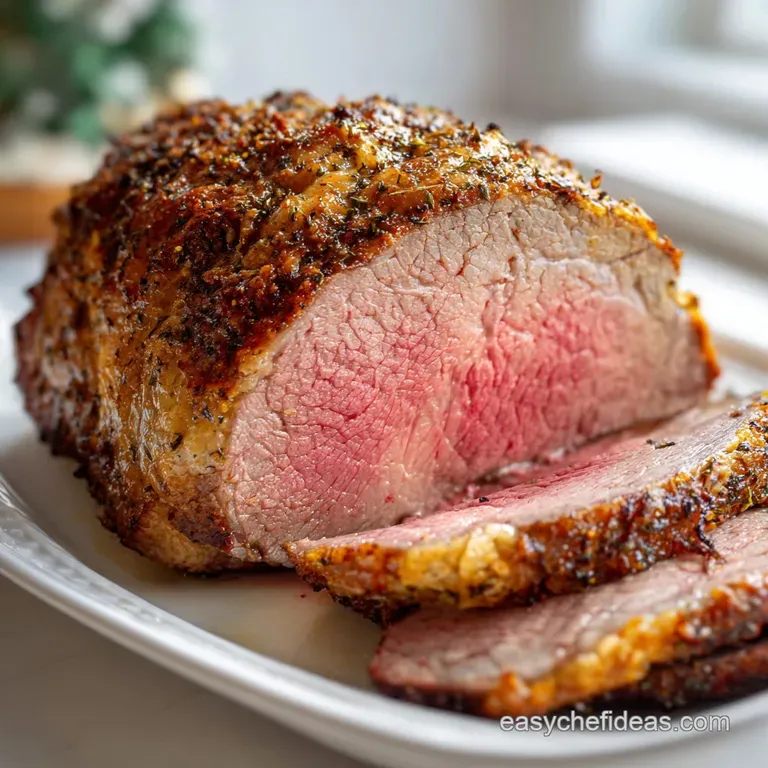
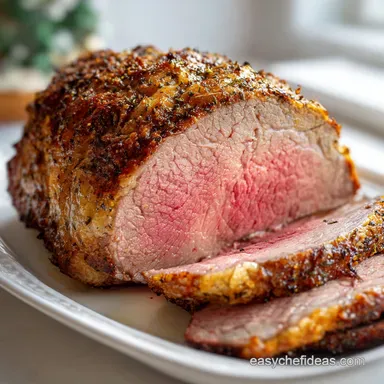
When you pull this out of the oven, the exterior should have a dark, craggy bark while the inside remains a beautiful, uniform pink. The contrast between the salt crusted edge and the succulent center is what makes this a staple in my house.
We aren't just making dinner, we are building a tradition of flavor that respects both the animal and the culture of slow, mindful cooking. It's about taking a modest cut and, through a little bit of patience and a few pantry staples, creating something that feels truly special.
Once you hear that first sizzle as the beef hits the pan, you'll know exactly what I mean. Trust me, the wait is the hardest part, but your patience will be rewarded with a velvety texture that melts in your mouth.
The Science of Heat and Muscle Fibers
Protein Denaturation: High initial heat causes surface proteins to tighten and brown, creating the Maillard reaction which develops deep savory notes.
Connective Tissue Softening: While low in fat, the gentle heat of 325°F allows the lean muscle fibers to warm gradually without contracting too violently and squeezing out moisture.
Carryover Thermodynamics: Internal energy continues to cook the center even after removal from the oven, typically rising by 5 to 10 degrees during the rest.
Osmotic Seasoning: Salt draws moisture out initially, dissolves into a brine, and is then reabsorbed into the fibers to season the meat from the inside out.
| Thickness | Internal Temp | Rest Time | Visual Cue |
|---|---|---|---|
| 2 to 3 inches | 125°F (Rare) | 15 minutes | Deep red, very soft touch |
| 3 to 4 inches | 135°F (Med Rare) | 20 minutes | Warm pink, slight resistance |
| 4+ inches | 145°F (Medium) | 20 minutes | Light pink, firm touch |
Precision is the bridge between a tough dinner and a memorable meal. Using a digital thermometer is the only way to guarantee you don't cross the line into overcooked territory. Remember, the meat doesn't stop cooking just because the oven is off, so pulling it early is a non negotiable step for success.
Component Analysis and Flavor Roles
| Ingredient | Science Role | Pro Secret |
|---|---|---|
| Kosher Salt | Moisture Retention | Apply 2 hours early to deeply season the interior fibers. |
| Yellow Onion | Steam Generation | Acts as a natural roasting rack to prevent the bottom from scorching. |
| Bone Broth | Thermal Buffer | Provides a humid environment in the pan to prevent surface drying. |
| Garlic | Aromatic Infusion | Minced garlic in oil creates a sticky paste that adheres herbs to the crust. |
Understanding the "why" behind your shopping list changes how you cook. The bone broth isn't just for moisture, it's a foundation for a Silky Smooth Homemade recipe that you can whip up while the meat rests on the board.
Selecting Quality Ingredients and Savvy Substitutes
To nourish your family with the best results, start with a 3.5 lbs top round roast that has a consistent shape. This ensures it cooks at the same rate from end-to-end. Look for a piece with a small fat cap if possible, as this will baste the meat naturally as it renders in the oven.
- 3.5 lbs top round roast: The star of the show. Why this? Lean but flavor dense, perfect for thin slicing and sandwiches.
- 3 tbsp extra virgin olive oil: Helps the herb rub stick. Substitute: Avocado oil for a higher smoke point.
- 4 cloves garlic, minced: Essential for that classic aroma. Substitute: 1 tsp garlic powder if fresh is unavailable.
- 1 tbsp fresh rosemary, finely chopped: Adds a woody, pine like depth. Substitute: 1 tsp dried rosemary, crushed.
- 1 tbsp fresh thyme, minced: Brings a subtle earthy sweetness. Why this? Thyme bridges the gap between the beef and the onions.
- 2 tsp kosher salt: Use a coarse grain for better coverage. Substitute: 1 tsp table salt (but be careful, it's saltier).
- 1 tsp coarsely cracked black pepper: Provides a bit of heat and texture. Substitute: White pepper for a more floral, less biting spice.
- 1 cup beef bone broth: Keeps the pan from drying out. Substitute: Dry red wine for a richer, more acidic profile.
- 1 large yellow onion, peeled and quartered: Flavor base and roasting rack. Substitute: Shallots for a more delicate, garlicky onion flavor.
Essential Tools for a Professional Finish
You don't need a kitchen full of gadgets, but a few specific items make a world of difference. A heavy bottomed roasting pan or a large cast iron skillet (like a Lodge) is vital for heat retention. You want something that can go from the stovetop to the oven without a second thought.
The most important tool in your arsenal is a digital meat thermometer. Guessing based on time is a recipe for disaster because every oven and every 3.5 lbs top round roast is slightly different. If you want that The Secret to recipe level of consistency, you have to measure the internal temperature accurately.
Finally, make sure you have a very sharp carving knife. Slicing this roast against the grain is the final step in ensuring tenderness. If your knife is dull, you'll end up tearing the meat rather than gliding through it, which ruins that beautiful velvety texture we worked so hard to achieve.
step-by-step Layers of Flavor
- Temper the meat. Remove the beef from the fridge 1 hour before cooking. Note: This ensures the center isn't ice cold when the outside starts browning.
- Prepare the rub. Mix the 3 tbsp olive oil, minced garlic, rosemary, thyme, salt, and pepper in a small bowl.
- Coat the roast. Pat the beef completely dry with paper towels, then rub the herb paste over every inch until the surface is fully covered.
- Preheat and sear. Heat your roasting pan over medium high heat and sear the beef for 2 to 3 minutes per side until a dark brown crust forms.
- Set the base. Remove the meat momentarily and place the quartered yellow onion in the center of the pan.
- Add liquid. Pour the 1 cup beef bone broth around the onions. Note: Avoid pouring liquid directly over the beef to keep the crust intact.
- Roast low and slow. Place the meat on top of the onions and move the pan to a 325°F oven.
- Monitor the temp. Roast for approximately 1 hours 15 mins until the internal temperature hits 130°F for medium rare.
- The crucial rest. Transfer the roast to a cutting board and tent loosely with foil for 20 minutes until the juices redistribute.
- Slice and serve. Carve into thin ribbons against the grain for maximum tenderness.
Solving Texture and Temperature Hurdles
Even with the best intentions, things can go sideways. The most common issue with a top round roast is toughness. This usually stems from two things: skipping the resting period or slicing with the grain instead of against it.
When you slice against the grain, you are shortening the muscle fibers, making them much easier for your teeth to break down.
If you find that the exterior is getting too dark before the center is done, your oven might be running hot. You can fix this by loosely draping a piece of aluminum foil over the top of the roast. This reflects some of the direct heat while allowing the ambient temperature to continue cooking the middle.
| Problem | Root Cause | Solution |
|---|---|---|
| Gray, dry meat | Internal temp exceeded 150°F | Pull the roast at 130°F and rely on carryover heat. |
| Rub sliding off | Meat was damp before seasoning | Pat the surface bone dry with paper towels first. |
| Lack of flavor | Salt didn't penetrate | Season the meat 2 to 24 hours in advance. |
Common Mistakes Checklist
- ✓ Never cook the meat straight from the fridge; cold centers lead to uneven results.
- ✓ Avoid using a glass baking dish for searing; it can shatter under high heat.
- ✓ Don't skip the sear; the Maillard reaction provides 80% of the exterior flavor.
- ✓ Refrain from slicing immediately; you'll lose all the succulent juices on the board.
- ✓ Always check your thermometer calibration in ice water before starting.
Adapting the Batch for Any Crowd
When you are cooking for a larger community, scaling up is relatively simple. For a double batch (7 lbs of beef), you don't necessarily double the cooking time. Instead, focus on the thickness of the meat. If you have two separate roasts, the time remains similar to a single roast.
If you have one massive piece, you’ll need to increase the time by about 20% and use a larger roasting pan.
For a smaller group, you can easily cut the recipe in half. When working with a 1.75 lbs roast, reduce the bone broth to 1/2 cup to keep the ratio correct. The cooking time will drop significantly, likely taking only 45 to 55 minutes. Always rely on that thermometer rather than the clock!
| Fresh Component | Shortcut Alternative | Flavor Impact |
|---|---|---|
| Fresh Rosemary/Thyme | Dried Poultry Seasoning | More muted, herbaceous notes; less "bright" finish. |
| Smashed Garlic Cloves | Jarred Minced Garlic | Slightly sweeter, less pungent punch. |
| Homemade Bone Broth | Beef Bouillon Cube | Higher salt content; lacks the velvety mouthfeel of gelatin. |
Decision Shortcut
- If you want a Peppery Crust, double the cracked black pepper and add 1 tsp of dried mustard to the rub.
- If you want a Holiday Profile, add 1/2 tsp of ground cloves and 1/2 cup of red wine to the pan.
- If you want Sandwich Meat, cook the roast to 125°F, cool it completely in the fridge, and slice it paper thin the next day.
Flavor Myths and Kitchen Realities
One of the biggest myths in the culinary world is that searing meat "seals in the juices." Science has proven this isn't true; moisture loss happens regardless of whether the meat is seared or not. What searing actually does is create a complex layer of flavor through the Maillard reaction.
We sear for the taste and texture of the crust, not to create a waterproof barrier.
Another misconception is that you need to baste the roast every 15 minutes. Every time you open that oven door, you lose a significant amount of heat, extending the cook time and potentially drying out the exterior. This roast is lean, and "basting" with broth doesn't actually penetrate the meat.
Trust the initial rub and the humidity in the pan to do the work.
Finally, some people think that "prime" cuts are the only ones worth roasting. In reality, the top round roast is a fantastic example of how technique can make a budget friendly cut taste like a luxury. It’s about understanding the muscle structure and using gentle heat to prevent the fibers from toughening up.
Maximizing Freshness and Using Every Scrap
Storage: Store leftovers in an airtight container in the fridge for up to 4 days. To keep the meat from drying out, store it in its own juices or a bit of extra broth. For long term storage, you can freeze the cooked roast for up to 3 months.
Wrap it tightly in plastic wrap and then foil to prevent freezer burn.
Zero Waste: Don't you dare throw away that yellow onion or the pan drippings! The onions become incredibly sweet and jammy after roasting; I love to mash them into a spread for roast beef sandwiches.
Any leftover beef bones or trimmings can be tossed into a pot with water and veggie scraps to make a fresh batch of stock. Even the herb stems have flavor; throw them into your next soup or stew for an extra layer of earthiness.
Side Dishes to Complete the Table
To truly nourish your guests, serve this roast with sides that balance the richness of the beef. A bright, acidic salad with a lemon vinaigrette can cut through the savory notes beautifully. If you're looking for something heartier, Oven Baked Beef recipe sides like mashed potatoes or a root vegetable mash are traditional for a reason.
I also highly recommend serving this alongside some Foolproof Fluffy Dinner recipe rolls. There is nothing better than using a soft roll to mop up the last of the herb infused bone broth from your plate. It turns a simple meal into a full sensory experience that feels like a warm hug from the inside out. This dish isn't just fuel; it's a way to bring people together around a table filled with care and culture.

Top Round Roast FAQs
What is a top round roast good for?
It is excellent for thinly sliced roast beef. Because it is a very lean cut, it performs best when cooked low and slow to medium rare (130°F) and then sliced thinly against the grain.
What is the best cooking method for top rounds?
Slow roasting to medium rare is the best method. Sear the roast first for color, then roast at a low temperature like 325°F until it hits the target internal temperature, followed by a mandatory rest.
Why is top round so cheap?
It is cheap because it is a very lean primal cut with little intramuscular fat. This lack of fat means it requires precise temperature control to avoid drying out, making it less forgiving than well marbled cuts.
Does round roast get more tender the longer you cook it?
No, this is a common misconception for this cut. Because top round is lean, cooking it past medium rare (135°F) causes the muscle fibers to contract severely, squeezing out moisture and resulting in a tougher final texture.
How do I ensure my top round roast slices easily after cooking?
Rest the roast, tented, for at least 20 minutes after cooking. This crucial rest period allows the internal juices to redistribute evenly throughout the muscle fibers, preventing them from pouring out when you start slicing.
Can I substitute the beef broth with water when roasting?
No, substitute with a flavorful liquid for best results. Using plain water won't add flavor to the drippings and might lead to a less appealing pan sauce later on; try using wine or stock instead, similar to the savory base in our Classic Beef Stroganoff Recipe A Family Favourite.
Is it necessary to rub the roast with salt hours ahead of time?
Yes, dry brining significantly improves internal seasoning. Salting the meat 2 to 24 hours prior allows the salt to draw out moisture, dissolve, and then be reabsorbed, seasoning the interior fibers deeply.
Tender Top Round Roast
Ingredients:
Instructions:
Nutrition Facts:
| Calories | 309 calories |
|---|---|
| Protein | 47 g |
| Fat | 12 g |
| Carbs | 2 g |
| Fiber | 1 g |
| Sugar | 1 g |
| Sodium | 638 mg |
