The Festive Frost Crisp Peppermint Meringue Kisses Swiss Method
- The Science of Sweetness: Why Swiss Meringue Excels
- Essential Gear and Premium Ingredients for Peppermint Meringues
- Mastering the Silky, Stable Swiss Meringue Base
- Shaping and Setting Your Festive Peppermint Meringue Kisses
- Low and Slow: The Drying Process for Crisp Results
- Troubleshooting Common Meringue Challenges
- Storage Solutions and Flavor Variations for Peppermint Meringues
- Recipe FAQs
- 📝 Recipe Card
The Science of Sweetness: Why Swiss Meringue Excels
The journey to perfectly crisp and stable meringue is rooted in precise kitchen chemistry, and for reliability, the Swiss method reigns supreme. Unlike the raw, often unreliable French method, or the scalding hot syrup required for Italian meringue, the Swiss technique offers a beautiful middle ground.
It involves gently heating the egg whites and sugar over a simmering water bath (bain marie) to a temperature of 160°F (71°C). This crucial warming step achieves two things simultaneously: it partially pasteurizes the egg whites for safety, and most importantly it ensures every single sugar crystal is fully dissolved.
This dissolving action creates a highly stable, glossy base before the whisking even begins, guaranteeing a robust structure capable of holding its shape through the long, slow drying process required for these delicate Peppermint Meringues .
Achieving That Signature Marshmallow Chewy Center
Many amateur bakers struggle to find the balance between a crispy shell and a satisfying interior. French meringues are often too brittle, shattering into shards, while improperly cooked Italian meringues can be dense.
The Swiss method, by incorporating air into the pre-warmed, thickened base, traps moisture more effectively. When these gorgeous meringue kisses dry in the low-temperature oven, the exterior crisps up dramatically, but the perfectly structured interior maintains a wonderful, slightly pliable, marshmallow like chew.
This texture contrast is precisely what elevates a simple Meringue cookie recipe from ordinary to exceptional.
A Naturally gluten-free Treat for Every Occasion
One of the great joys of meringue is its natural simplicity. These light and airy treats rely solely on whisked egg whites and sugar, making them inherently gluten-free, fat-free, and delightful for nearly every guest.
Whether you are preparing them for a large holiday gathering making them essential Meringue Christmas fodder or just enjoying them with a cup of tea, their elegance and ease of preparation are unmatched.
On top of that,, because of their stable structure, they stack beautifully, making them ideal Cute meringue cookies for edible gifts.
Essential Gear and Premium Ingredients for Peppermint Meringues
Meringues are a study in precision, meaning the quality of your ingredients and the cleanliness of your equipment are non-negotiable. While the ingredient list is refreshingly short, every component plays a critical role in the final outcome of your peppermint meringues recipe .
Prepping Egg Whites and Granulated Sugar (Temperature Matters)
The base requires 120 grams (about four large) of egg whites, ideally separated while cold but allowed to come to room temperature before heating. Room temperature egg whites whip to a higher volume than cold ones, essential for maximizing lift. Crucially, measure your sugar by weight (240 grams) for accuracy.
While standard granulated sugar works, superfine or caster sugar is highly recommended. Its smaller crystal size speeds up the dissolving process over the bain marie, leading to a smoother, faster, and more stable meringue base.
Recommended Kitchen Tools and Piping Equipment
A reliable stand mixer fitted with a whisk attachment is truly a necessity for achieving the requisite stiff, glossy peaks; whipping this volume of meringue by hand takes superhuman effort.
For the initial heating phase, an instant read digital thermometer is absolutely crucial to ensure the mixture reaches precisely 160°F (71°C) before whipping. Finally, to shape those lovely, uniform kisses, utilize a large piping bag fitted with a star tip, such as a Wilton 1M.
Choosing the Right Peppermint Extract (Avoid Oil-Based)
For flavoring these holiday treats, we use 1 teaspoon of pure peppermint extract. It is vital to confirm that you are using an alcohol based or water based extract, not an oil-based one.
Any trace of fat, including oil-based flavorings, will destabilize the egg white foam, preventing the meringue from achieving those critical stiff peaks and resulting in a flat, sticky mess.
Mastering the Silky, Stable Swiss Meringue Base
The transition from a grainy sugar and-egg mixture to a glossy base is the magic of the Swiss method. Once the egg whites, sugar, and the optional 1/2 teaspoon of cream of tartar are combined in the mixer bowl, place the bowl over a saucepan of gently simmering water the water should not touch the bottom of the bowl.
Whisk constantly and gently until the mixture reaches 160°F (71°C) or, if you don't have a thermometer, until a small amount rubbed between your fingers feels completely smooth and non-gritty. Immediately remove the bowl from the heat and transfer it to the stand mixer.
Start whipping on medium speed for two minutes to introduce air, then increase to high speed. The meringue will transform over the next 8 to 12 minutes into a thick, brilliantly white, and deeply glossy foam.
The whipping is complete when the meringue is so stiff that the bowl can be inverted without the meringue moving.
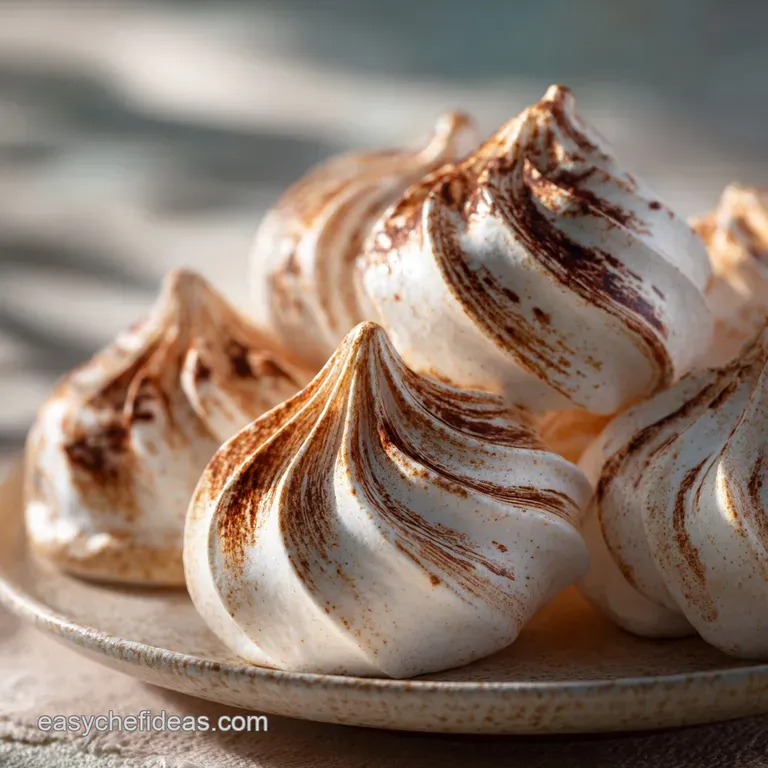
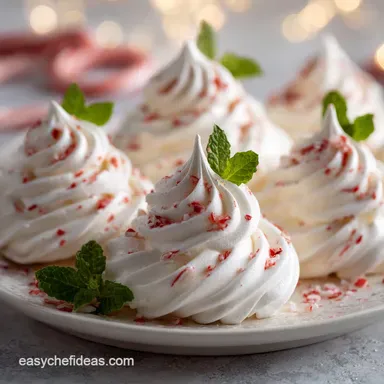
Shaping and Setting Your Festive Peppermint Meringue Kisses

Once the meringue is whipped stiff and the bowl is cool to the touch, gently fold in the peppermint extract and a pinch of salt. This is also the time to incorporate any crushed peppermint meringues with candy canes pieces, if using.
For that cheerful, festive visual, paint vertical lines of red or pink gel food coloring (avoiding liquid color which adds unwanted moisture) inside the pastry bag before filling it with the meringue.
The slight pressure applied during piping will draw the color, creating a beautiful red swirl on the outside of each kiss. Using a consistent hand to pipe small rosettes or simple rounded shapes onto parchment lined baking sheets ensures that all your Easy meringues are the same size, promoting even drying.
Low and Slow: The Drying Process for Crisp Results
Meringues are dried, not baked, and patience is your most important tool during this phase. The goal is to dehydrate the meringue completely without browning it.
Gently Warming the Egg Whites via the Bain Marie Method
As established, the precise heating of the egg whites to 160°F is the prerequisite for a sturdy base. This stabilization ensures the piped shapes will hold rigid during the long, low-temperature drying process. If this step is rushed or the sugar remains gritty, the meringue will collapse or weep while in the oven.
Whipping to Stiff, Glossy, and Stable Peaks
Following the heating phase, whipping until the meringue holds incredibly rigid peaks that stand straight up is essential. On top of that,, ensuring the base of the mixing bowl is completely cool confirms the stability of the foam, indicating it is ready to be piped and placed into the oven.
Striping the Pastry Bag for the Cheerful Red Swirl
The visual appeal of these festive treats is heightened by the simple technique of striping the bag. By using gel coloring, you achieve vibrant results with minimal moisture addition, ensuring the structural integrity of the Peppermint Meringues .
Precise Piping Techniques for Uniform Meringue Shapes
Piping uniformly sized kisses is critical because meringues dry at the rate of their thickness. Varying sizes will lead to some pieces over drying and browning while others remain sticky inside. Leave ample space about one inch between each piece on the parchment paper.
Optimal Oven Temperatures and Baking Time Adjustments
The oven must be set extremely low, ideally to 200°F (95°C), or even lower if your oven runs hot. If the temperature is too high, the sugar caramelizes, causing the meringues to turn a yellowish brown. The drying time ranges from 90 minutes to two full hours.
If your meringues begin to color, reduce the heat immediately.
Testing Meringues for Complete Internal Dryness
To check for doneness, gently test one meringue on the baking sheet. It should lift effortlessly off the parchment paper. If the bottom sticks even slightly, or if it feels soft and sticky, it needs more time in the heat.
Once they pass this test, turn the oven off, prop the door open slightly with a wooden spoon, and allow the meringues to cool and continue drying inside the cooling oven for 30 to 45 minutes, or until the oven is completely cold.
Troubleshooting Common Meringue Challenges
Meringue baking involves potential pitfalls, but most can be traced back to two culprits: grease or moisture. If your meringue fails to whip up properly, it’s highly likely that a speck of egg yolk or fat was present on the mixing bowl or whisk.
Always wipe down your equipment with a vinegar soaked paper towel beforehand as a preventative measure. If the meringues crack during drying, the oven temperature was likely too high or the heat was inconsistent.
Finally, if the finished cookies feel sticky after cooling, the sugar was probably not fully dissolved during the bain marie phase, meaning the sugar is attracting external moisture.
Storage Solutions and Flavor Variations for Peppermint Meringues
Once cooled, these delicate treats require careful handling to maintain their crispness.
Preventing 'Weeping' or Sticky Exterior Surfaces
The Swiss method significantly reduces the chance of 'weeping' (where syrupy moisture seeps out) because the sugar is fully integrated into the proteins. However, the biggest enemy to a crisp exterior is humidity.
Never store meringues while they are still warm, and never store them in the refrigerator, as the cold environment traps moisture, turning them immediately sticky.
Dealing with High Humidity and Altitude Impacts
If you live in a notoriously humid environment or at high altitude, meringues become significantly more challenging. To stabilize the egg whites against moisture interference, consider including an acid.
While this specific peppermint meringues recipe calls for the optional 1/2 teaspoon of cream of tartar, effective alternatives include 1/2 teaspoon of white vinegar or lemon juice, offering a reliable option for those preparing peppermint meringues without cream of tartar .
How to Keep Meringue Kisses Crisp for Weeks
Fully cooled meringues must be transferred to an airtight container. Kept at room temperature, away from heat and moisture, they will retain their crisp texture for up to two to three weeks.
If they soften slightly, a brief 10 15 minute flash dry in a 250°F (120°C) oven (turned off immediately) can sometimes revive them.
Alternative Winter Spice and Chocolate Flavor Combos
The peppermint base is wonderfully adaptable. For a richer dessert, the completed peppermint meringues dipped in chocolate are phenomenal simply melt high-quality dark chocolate and dip the cooled meringue bases.
Alternatively, swap out the peppermint extract for 1 teaspoon of pure vanilla and a half teaspoon of cinnamon or cardamom for a different seasonal spice mix. Or, fold in finely grated dark chocolate to the finished meringue for a decadent chocolate mint chip variation.

Recipe FAQs
Why are my Peppermint Meringues sticking to the paper? It’s a bit of a sticky wicket!
If your meringues are glued firmly to the parchment, it means they haven't completely dried out during the baking or, more crucially, the cooling phase. Meringues don't bake; they dry!
Ensure your oven temperature is truly low (no higher than 200°F/95°C) and resist the urge to open the door while they’re cooking. The final hour of drying in the turned off oven is essential for stability don’t rush this step or they’ll collapse like a faulty soufflé.
My meringues look lovely, but they’ve started weeping sugar syrup what’s gone wrong?
Ah, the dreaded ‘weeping’! This usually occurs if the sugar wasn't fully dissolved before you started whipping. The Swiss method is fantastic for preventing this, but you must ensure the egg white mixture reaches 160°F (71°C) or feels absolutely smooth between your fingers.
Undissolved sugar crystals draw moisture from the air, causing the structure to collapse and ‘weep’ syrup, resulting in a soggy bottom and we definitely don't want that!
How long will these crisp kisses keep, and where’s the best place to store them?
Meringues are surprisingly robust if stored correctly! Humidity is their nemesis, so the golden rule is: never refrigerate them, as the moisture will make them chewy and gooey. Keep them in a perfectly airtight tin or container at cool room temperature a dry larder or cupboard is ideal.
Stored properly, they should happily keep their perfect crunch for up to two or three weeks, making them brilliant to bake ahead of the festive rush.
I fancy a change; what other festive flavours can I use instead of peppermint?
There is plenty of scope for a variation! You can swap the peppermint extract for 1 teaspoon of pure vanilla bean paste for a more traditional flavour, or perhaps use half a teaspoon of almond extract. For a true winter warmer, fold in the zest of an orange and a pinch of ground cinnamon at the end.
Remember to always use gel colouring and pure extracts, as any extra liquid will destabilise your meringue.
Are Peppermint Meringues suitable for dietary needs, like gluten-free or low-fat diets?
Yes, these little marvels are naturally gluten-free and virtually fat-free, using only egg whites and sugar as their primary components. This makes them a great option for guests avoiding gluten. However, don't be fooled by how light they feel; they are predominantly sugar.
They are certainly a lovely, airy treat, but they are still a delicious indulgence best enjoyed with a strong cuppa!
Swiss Peppermint Meringue Kisses
Ingredients:
Instructions:
Nutrition Facts:
| Calories | 133 kcal |
|---|---|
| Protein | 1.2 g |
| Fat | 0.7 g |
| Carbs | 9.2 g |
| Fiber | 0.4 g |
| Sodium | 7 mg |
