Honey Garlic Shrimp Sticky Sizzling 15Minute Weeknight Feast
- Why This Is the Ultimate 15 Minute Weeknight Dinner
- Unlocking the Secret to Perfect Honey Garlic Shrimp in Minutes
- Building the Irresistible Honey Garlic Sauce Base
- Prepping Your Ingredients and Essential Kitchen Tools
- From Pan to Plate: The 5 Minute Cooking Method
- Step and by-Step Guide to Cooking Honey Garlic Shrimp to Perfection
- Serving Suggestions and Customizing Your Meal
- Recipe FAQs
- 📝 Recipe Card
Why This Is the Ultimate 15 Minute Weeknight Dinner
Look, I love cooking. You know this. But there are some nights (usually Tuesdays, for some reason) where the thought of spending forty minutes chopping feels like climbing Everest.
That’s when the Honey Garlic Shrimp recipe walks in, steals the show, and sits you down to dinner faster than the delivery driver could ring the doorbell.
It’s not just fast; it’s ridiculously quick. We’re searing the shrimp, hitting it with a potent, sticky, sweet and salty glaze, and that’s pretty much it.
The whole recipe, start to finish, is about 15 minutes, provided you’ve got your garlic minced ahead of time. I’m serious. This is my absolute go and to for when I need something that feels a little bit special maybe like a fancy Asian and inspired stir fry but requires the effort level of boiling pasta.
The flavor payoff here is astronomical for the time investment. You get that beautiful savory punch from the soy and the garlic, followed by the comforting stickiness of the honey. Right then, let’s crack on.
Unlocking the Secret to Perfect Honey Garlic Shrimp in Minutes
The goal here is duality: perfectly cooked, tender shrimp and a glossy, thick, clinging sauce. If you get one without the other, you’ve just got sad stir fry components. We want the full honey garlic shrimp bowls experience.
The Magic of Flash and Cooking Shellfish
Shrimp is the ultimate fast food, but it’s also incredibly delicate. If you cook it low and slow, it turns into rubber bands. No thank you. The key is to sear it hot and fast. I mean screaming hot.
You want high heat to create a little bit of color and texture on the outside while leaving the inside tender and juicy. We are aiming for about 90 seconds per side. Once it starts to turn opaque pink, it’s done, and we whisk it out of the pan immediately.
We bring it back later, but only for the final 30 second coating. That’s the pro move.
Defining the Signature Sticky Glaze
The ideal honey garlic shrimp sauce needs thickness. Without it, you’ve just made soup. The sticky texture comes from three players: the honey itself, the heat (which reduces the liquids), and our secret weapon: cornflour (cornstarch) slurry.
You might be tempted to just dump the honey and soy in. Don't do that. By adding that tiny teaspoon of cornflour mixed with cold water right into the sauce before it hits the pan, we guarantee that when the sauce hits the heat, it thickens immediately and adheres to the shrimp beautifully. It's brilliant.
Is Frozen or Fresh Shrimp Better for This Recipe?
Honestly? It barely matters for the flavor, but it matters hugely for the texture. Most "fresh" shrimp at the counter was likely frozen and thawed anyway. So save your cash and buy the good quality frozen kind.
But here is the massive caveat: you must, must , MUST thaw it completely (run it under cold water if you’re short on time) and then pat it completely dry with paper towels. I mean really dry.
If you throw wet shrimp into the pan, the water turns to steam, the pan temperature drops, and you steam your shrimp instead of searing it. You won't get that lovely sear, and the sauce won't stick as well.
Building the Irresistible Honey Garlic Sauce Base
This base is simple, but every component plays a role. We’re combining the savoury backbone (soy sauce), the necessary sweetness (honey), and the kick (garlic and ginger). But what about the tang?
Most people skip the rice vinegar in honey garlic shrimp recipes , but that small teaspoon of acidity cuts through the richness of the butter and the cloying sweetness of the honey. It gives the whole dish balance, making it taste like something you’d order out.
It’s the difference between merely sweet, and complexly sweet and sour.
Related Recipes Worth Trying
- Greek Garlic Roasted Potatoes The Custardy TavernaStyle Recipe — Greek Garlic Roasted Potatoes deliver the essential taverna experience This traditional Greek lemon garlic roasted potatoes recipe uses a secret stock bath...
- Cilantro Lime Quinoa Bowls with Shrimp Healthy Weeknight Dinner — Cilantro Lime Quinoa Bowls with Shrimp are vibrant highprotein meals ready in 35 minutes This healthy dinner recipe delivers maximum TexMex flavor perfect...
- Shrimp Tacos Zesty ChipotleLime Recipe Ready in Just 30 Minutes — These Shrimp Tacos are vibrant and fast Enjoy the best shrimp tacos with a smoky chipotlelime marinade and crunchy cilantro slaw An easy healthy meal ready...
Prepping Your Ingredients and Essential Kitchen Tools

This is a Shrimp Recipe For Dinner that lives and dies by preparation. Since the cooking takes less time than a pop song, you must have everything ready chopped, measured, and whisked before the stove even comes on. This is Mise en Place in action.
The Role of Fresh Ginger vs. Powdered
This is one of my culinary hills I will happily die on: always use fresh ginger here. Always. Powdered ginger is fine for baking cookies, but it has a dusty, muted flavor. Freshly grated ginger offers a bright, fiery kick and that beautiful aroma that instantly makes your kitchen smell like a professional kitchen.
It takes thirty seconds to grate a teaspoon; make the effort.
How to Select and Prepare the Best Shrimp (Deveining Tips)
I usually go for large (21/25 count per pound) shrimp. It’s easier to handle and less likely to overcook. I prefer mine peeled and deveined, but with the tails on mostly because it looks nicer in the pan, though tails and off is easier to eat with rice.
If you are deveining yourself (saving money, yay!), grab a paring knife and make a shallow cut along the back curve. Use the tip of the knife or a toothpick to pull out that dark, gritty vein. Simple.
CRUCIAL NOTE: Never, ever cook the shrimp with the shell on if you’re planning to smother it in a sticky sauce like this. The glaze won't reach the meat, and you’ll just have sticky fingers and bland shrimp.
Complete Ingredient Measurements (Metric and Imperial)
| Ingredient | US Customary | Metric |
|---|---|---|
| Large Shrimp (Prawns) | 1 lb | 450 g |
| Soy Sauce (Low Sodium) | 3 Tbsp | 45 ml |
| Honey | 1/4 cup | 60 ml |
| Fresh Garlic (minced) | 3 cloves | ~15 g |
| Fresh Ginger (minced/grated) | 1 tsp | 5 ml |
| Unsalted Butter | 1 Tbsp | 15 g |
| Rice Vinegar | 1 tsp | 5 ml |
| Cornflour Slurry (1 tsp cornflour + 1 Tbsp cold water) | 1 batch | 1 batch |
Why a Cast Iron Skillet is Recommended
While a wok is great for a big honey garlic shrimp stir fry , I actually prefer a cast iron skillet for smaller batches. Why? Heat retention. Cast iron holds heat like nothing else.
When you toss that cold, raw shrimp into the pan, the temperature barely drops, allowing you to achieve that proper sear quickly. If you use a thin pan, the temperature crashes, and you end up steaming the shrimp instead.
From Pan to Plate: The 5 Minute Cooking Method
Seriously, the clock starts now. Once the pan is hot, it’s a blur of activity. We’re cooking the shrimp first and then setting it aside. We’re building the sauce second using the residual heat and the lovely browned bits left in the pan (that’s flavor!).
Finally, we introduce the two star players for a rapid toss. The total cooking time is five minutes, maximum.
Step and by-Step Guide to Cooking Honey Garlic Shrimp to Perfection
Achieving the Ideal Sear on Your Shrimp
Get your oil hot over medium and high heat. Season the shrimp lightly (remember the soy sauce is already salty). Toss them into the pan in a single layer. You hear that sizzle? That’s what you want. If you don't hear that sound, your pan isn't hot enough, and you need to wait.
Cook for 60 to 90 seconds until the bottom is pink and golden, then flip them using tongs. Once they are opaque, pull them out. They are currently slightly undercooked which is perfect because they are going back in the glaze later.
Simmering the Sauce to Maximum Stickiness
Reduce the heat to medium. Add the butter. Let it melt, then add the minced garlic and ginger. Sauté them for only about 30 seconds. Do not let the garlic brown. It will taste bitter and nasty, and you’ll have to start over (I’ve been there, trust me).
Pour in your whisked glaze mixture (honey, soy, cornflour slurry, vinegar). Whisk constantly. Because of the cornflour, it will bubble and thicken up almost instantly, within 30 seconds. It should be thick and glossy, coating the back of a spoon.
When to Remove the Shrimp from the Heat
Immediately after the glaze thickens, return the previously seared shrimp to the pan. Toss them gently using tongs for about 15 to 20 seconds just to coat them thoroughly and heat them back up. The moment they are fully coated and uniformly pink, yank that pan off the heat.
If you cook them longer than this, they seize up and become tough. That beautiful 'C' shape they form? Perfect. If they curl into a tight 'O', you went too long.
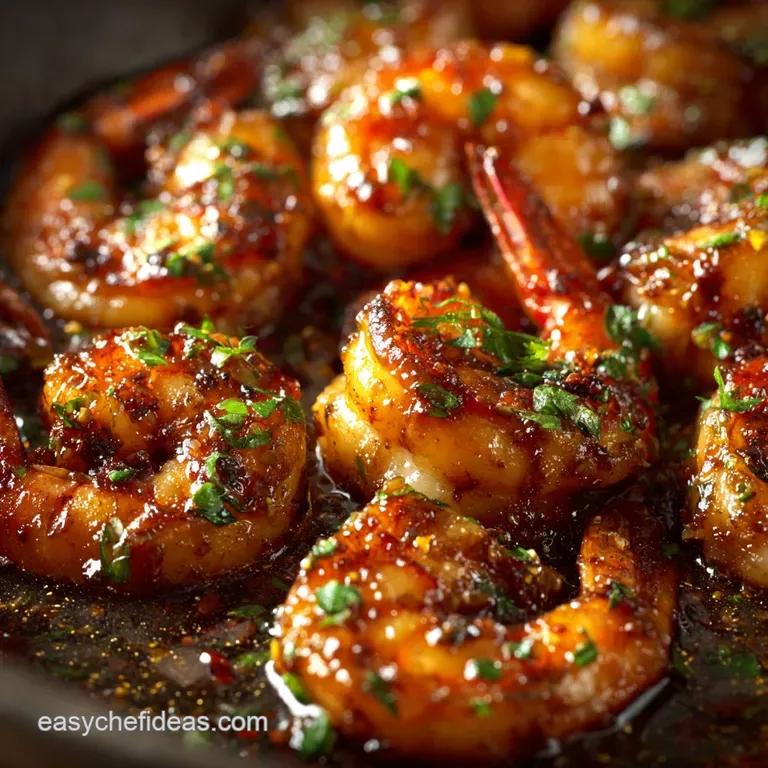
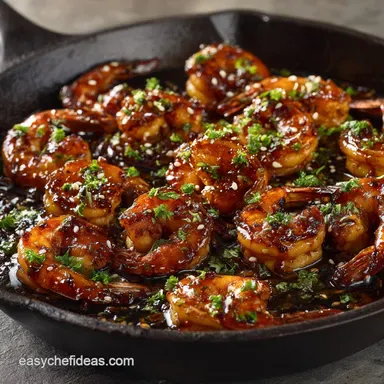
Finishing Touches and Plating Presentation
The dish is intensely colored, so we need something green and vibrant. I use sliced spring onions (scallions). Sprinkle them over the top right before serving, along with a dash of toasted sesame seeds for texture. Don't add the garnish while the dish is still cooking, or it will wilt and look sad.
Presentation matters, even on a Tuesday night!
Serving Suggestions and Customizing Your Meal
This recipe is designed to be versatile. You can serve it as a main protein or turn it into an entire meal by pairing it with simple, absorbent sides.
Making This Recipe Paleo or Gluten and Free
This is surprisingly easy to adapt!
- Gluten and Free: Swap the soy sauce for Tamari (which is certified GF) or use coconut aminos. Tamari works flawlessly.
- Paleo/Strict: Use coconut aminos instead of soy sauce, and swap the cornflour slurry for an arrowroot powder slurry (which functions similarly to cornflour but is Paleo compliant). Skip the rice vinegar if you're being extremely strict, but I highly recommend keeping the honey (unless you use a compliant alternative like coconut nectar).
Perfect Pairings: What to Serve Alongside the Shrimp
- Rice: Steaming hot jasmine rice is the classic base. It absolutely soaks up that rich honey garlic shrimp sauce .
- Green Stuff: Quickly blanched or steamed broccoli or sugar snap peas. The crunch is essential contrast to the sticky glaze.
- Low Carb: Serve over cauliflower rice or zucchini noodles.
Safely Storing Leftover Shrimp Dishes
Shrimp is best eaten immediately. Seriously. It loses its lovely texture quickly. If you must store leftovers (and this applies to all seafood), cool it rapidly and store it in an airtight container in the fridge for no more than 1 day. I try not to rely on day and two shrimp dishes.
Approximate Calorie Count and Macronutrient Breakdown
Note: This is an estimated breakdown based on average portion sizes and ingredients, excluding side dishes. If you use low and sodium soy sauce, you help manage the sodium count drastically.
| Nutrient | Estimate Per Serving (1/3 of recipe) |
|---|---|
| Calories | ~350 kcal |
| Protein | ~30 g |
| Fat | ~18 g |
| Carbohydrates | ~18 g |
| Sugar | ~15 g (Primarily from honey) |
| Sodium | ~650 mg (Use low and sodium soy sauce to manage this) |

Recipe FAQs
How do I stop the shrimp in this Sticky & Sizzling Honey Garlic Shrimp recipe from going rubbery?
The secret is speed shrimp are delicate things! Only cook them for about 60 90 seconds per side until they curl into a gentle ‘C’ shape, and crucially, remove them from the pan immediately before you start making the glaze.
My sticky glaze didn't get thick and glossy. What went wrong?
The thickening agent is cornflour (cornstarch), so you must ensure you whisk the sauce thoroughly just before pouring it into the pan to wake up the slurry, then let it simmer rapidly for 30 seconds to activate the thickening.
Can I prep the shrimp or the sauce ahead of time for a quick dinner?
Absolutely. You can whisk the honey garlic glaze together and store it in an airtight container in the fridge for up to four days, but avoid marinating raw shrimp beforehand as the acids will prematurely cook and toughen the protein.
I need to avoid soy sauce or honey; what are the best substitutes?
If you're steering clear of soy, Tamari or Coconut Aminos work splendidly, though if using the latter, you might want to slightly reduce the honey. For the honey itself, a good quality maple syrup or agave nectar provides the necessary sweet stickiness.
Is this dish particularly high in salt, and can I make it healthier?
The main sodium culprit is the soy sauce, so swapping to a low-sodium version is your best bet to manage the salt intake without compromising the flavour profile.
Sticky Honey Garlic Shrimp In 15 Minutes
Ingredients:
Instructions:
Nutrition Facts:
| Calories | 245 kcal |
|---|---|
| Protein | 25.0 g |
| Fat | 5.0 g |
| Carbs | 25.0 g |
