Birthday Bash Cake Pops Starbucks Copycat Perfection
- Unlocking the Magic: Why These Copycat Cake Pops Rule Dessert Tables
- The Nostalgia Factor: Recreating Starbucks' Iconic Birthday Treat
- Assembling Your Cake Pop Arsenal: What You Absolutely Need
- Beyond the Basics: Achieving True Birthday Cake Flavour
- The Alchemy of Mixing: Transforming Crumbles into Dough
- Rolling Perfection: Sculpting Flawless Cake Balls
- The Dipping Ritual: Achieving a Smooth, Crack-Free Coating
- Troubleshooting Common Cake Pop Calamities
- Elevating Your Treats: Variations on the Classic Birthday Pop
- Recipe FAQs
- 📝 Recipe Card
Unlocking the Magic: Why These Copycat Cake Pops Rule Dessert Tables
There’s a certain undeniable charm to biting into a perfectly crafted cake pop. That initial satisfying crack of the sweet shell giving way to a dense, truffle like interior is pure confectionery magic.
Among the pantheon of beloved sweet treats, the Starbucks Copycat Birthday Cake Pops hold a legendary status. They are the miniature dessert that perfectly encapsulates celebration in every single bite.
For food enthusiasts and home bakers alike, recreating that exact flavour profile that specific, nostalgic sweetness is the ultimate culinary quest. Why settle for less when you can achieve bakery perfection right in your own kitchen?
The Nostalgia Factor: Recreating Starbucks' Iconic Birthday Treat
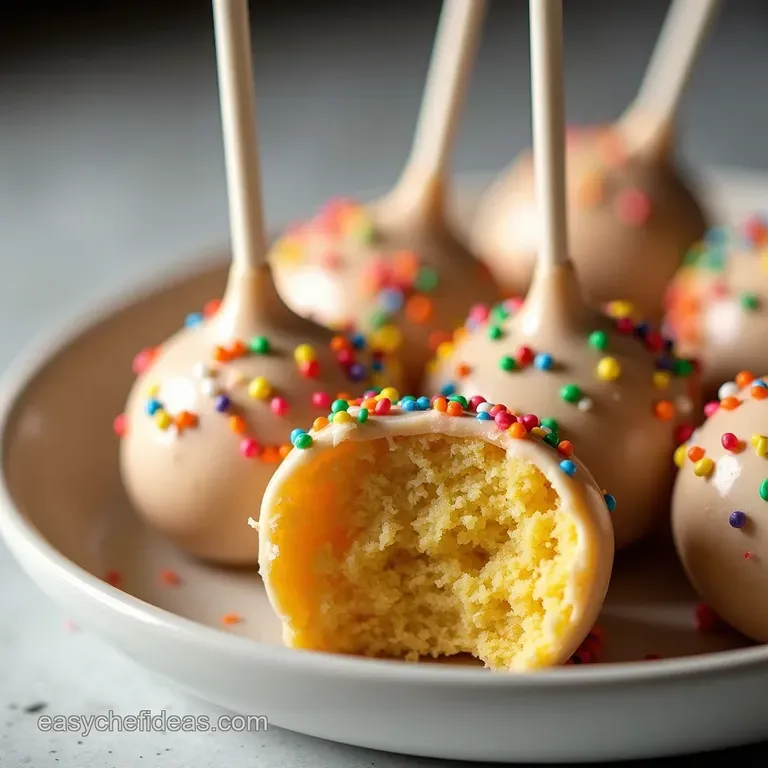
These aren't just any cake pops; they are a meticulously engineered flavour experience. We are aiming for that signature dense, yet somehow still fluffy centre, bound together with a sweet embrace, all clad in that familiar, cheerful white shell dotted with primary coloured sprinkles.
Achieving this level of accuracy requires understanding the specific components that make the original so memorable. This Starbucks Birthday Cake Pops Recipe is your guide to bypassing the coffee shop queues and mastering the art of the Copycat Birthday Cake Pops .
The Secret to That Signature Fluffy Cake Texture
The foundation of any truly great cake pop lies in the cake itself. While you could certainly bake a cake from scratch, convenience often calls for a high-quality boxed mix. For this Vanilla Cake Pop Recipe , we leverage a standard white cake mix.
The secret isn't just in the baking, but in the subsequent treatment: the cake must be baked, cooled completely, and then meticulously crumbled. This process ensures we eliminate any large air pockets, setting the stage for the dense, Moist Cake Pops Recipe texture we are aiming for.
Why Making Starbucks Copycat Birthday Cake Pops at Home is Superior
While the accessibility of the original is great, making your own Starbucks Cake Pop Copycat allows for unparalleled control over quality and freshness. You dictate the quality of your binding agent that rich vanilla frosting and you can fine tune the flavour with additions like clear vanilla extract to hit that exact "birthday cake" note.
Beyond that,, you can scale the recipe easily, making these the Best Birthday Cake Pops for your next event without the inflated price tag.
A Whirlwind Tour of Sweet Success
Our journey to creating these irresistible treats breaks down into three main phases: creating the flavourful, dense cake truffle centre, preparing the coating for a flawless dip, and finally, the assembly and decoration. This process, while requiring patience during the chilling stages, is highly rewarding.
With approximately 45 minutes of active prep time, followed by mandatory chilling, you can soon be enjoying these gorgeous Homemade Birthday Cake Pops .
Assembling Your Cake Pop Arsenal: What You Absolutely Need
Before we dive into the mixing bowl, it’s vital to gather your tools and ingredients. A successful bake hinges on having the right equipment ready to go. Since we are aiming for 18 to 20 standard sized pops, ensure you have ample space on your counter for the cooling and drying process.
Beyond the Basics: Achieving True Birthday Cake Flavour
The distinction between a mediocre cake ball and an authentic, nostalgic treat lies in the flavour synergy between the cake, the binder, and the coating. We are layering subtle flavour cues to achieve that iconic taste.
Core Components for the Cake Base and Binding Agent
For the cake base, a standard white cake mix is the starting point, baked according to package directions until fully cooked and then allowed to cool completely and I mean completely . For the binding agent, we utilize about one cup of thick, high-quality vanilla frosting.
This thick frosting provides the necessary structure that allows the crumbles to hold shape. Crucially, to mimic that specific bakery note, we introduce one teaspoon of clear vanilla extract .
This imparts the authentic essence without adding unwanted brown colouration to our pristine white base.
Sourcing the Ideal Coating Chocolate and Sprinkles
When it comes to the coating for your Starbucks Copycat Recipe , do not be tempted by standard white chocolate chips. They contain stabilizers that prevent smooth melting and a hard set. Instead, opt for high-quality white candy coating wafers or melts.
These are specifically formulated to melt smoothly and set with a beautiful sheen. For decoration, traditional rainbow jimmies or nonpareils are non-negotiable for that classic birthday look.
Essential Gadgets: Tools to Guarantee Perfect Spheres
While you can technically make these with just a bowl and your hands, certain tools streamline the process significantly. You’ll need a large mixing bowl, a rubber spatula, and ideally, a fork or potato masher for achieving ultra fine cake crumbs.
For setting, a baking sheet lined with parchment paper is necessary, and for the final drying stage, either a sturdy Styrofoam block or a dedicated Cake Pop Stand is essential to keep your creations perfectly upright while the coating sets.
Related Recipes Worth Trying
- Fluffy Flavourful Besan Chilla Quick Savoury Pancakes — Ditch the bland breakfasts This foolproof Besan Chilla recipe yields light proteinpacked chickpea flour pancakes perfect for any meal
- Easy Fluffy Besan Chilla Savory Chickpea Pancakes — Master the ultimate Besan Chilla recipe These quick noegg pancakes made from gram flour are light flavourful and perfect for a healthy snack
- The Definitive Classic New York Cheesecake Recipe CrackFree — Learn how to make the perfect Traditional New York Cheesecake with a dense velvety texture using a gentle bake method Guaranteed to be the best cheesecake...
The Alchemy of Mixing: Transforming Crumbles into Dough
Once your cake is cool, the true transformation begins. The goal here is texture control. Place your cooled cake into the mixing bowl and use your hands or a fork to break it down into fine, uniform crumbs imagine the consistency of wet sand.
Now, gently fold in the measured vanilla frosting and the clear vanilla extract. It’s imperative to mix this by hand, using a gentle squeezing and folding motion. You are aiming for a thick, pliable "dough" that is completely uniform and holds its shape firmly when compressed between your fingers.
If it seems too dry, add frosting one tablespoon at a time; if it’s too wet, chilling it for a bit longer often firms it up.
Rolling Perfection: Sculpting Flawless Cake Balls
With your perfect truffle dough ready, the next step is portioning. Use a small cookie scoop or a teaspoon to measure out uniform amounts, typically resulting in balls about 1 to 1.5 inches in diameter. Roll each portion firmly between your palms to create smooth, tight spheres.
Place these perfectly shaped balls onto your parchment lined baking sheet. Uniformity here is key, as it ensures even dipping later. Immediately move this tray to the refrigerator.
This is a mandatory step; chilling the cake balls for at least 60 minutes solidifies the mixture, preventing them from crumbling or deforming when skewered or dipped.
The Dipping Ritual: Achieving a Smooth, Crack Free Coating
The final stage is where precision matters most. Achieving that crack free, glossy shell requires warm coating and cold centres.
step-by-step Crumb Preparation and Icing Integration
We must prepare our coating before we commit to dipping. Place your 16 ounces of white candy melts along with one tablespoon of vegetable shortening or coconut oil into a microwave safe glass or mug. Melt in 30-second bursts, stirring vigorously between each interval, until the mixture is completely smooth and fluid.
The shortening is critical; it thins the melts, ensuring they flow thinly off the cake ball, preventing thick, lumpy coatings.
Chilling Times: The Non-Negotiable Stage for Stability
Once the cake balls are chilled, we execute the crucial "glue" step. Take a lollipop stick and dip the very tip (about 1/4 inch) into the melted coating. Immediately insert this coated end about halfway into a chilled cake ball.
Return these skewered balls to the freezer for approximately 10 minutes. This hardens the coating 'glue,' anchoring the stick securely to the dense interior, which prevents future stick slippage.
Mastering the Dip: Techniques for Ultra Glossy Finishes on Your Starbucks Copycat Birthday Cake Pops
Remove your firmly anchored pops from the freezer. Hold the pop near the base of the stick and gently dip it entirely into the warmed candy melt mixture, twisting gently as you pull it out. The goal is full coverage with a thin layer.
Immediately lift the pop out and gently tap the stick vertically against the side of the mug. This vibration shakes off the excess coating, leaving behind that desired smooth, thin shell. While the coating is still wet, quickly sprinkle or roll the pop over your chosen decorations.
Troubleshooting Common Cake Pop Calamities
Even expert bakers face hurdles. If your cake balls are crumbling excessively during rolling, your mixture is too dry; add a teaspoon more frosting. If your coating is separating or looking grainy, it is likely overheated; remove it from the heat and stir in a few extra pieces of dry candy melt to help re-emulsify it.
The most common issue is stick failure; this almost always points back to insufficient chilling after skewering (Step 6). Never rush that 10-minute freezer stop!
Elevating Your Treats: Variations on the Classic Birthday Pop
While the classic white shell is iconic, customization is half the fun of making Homemade Birthday Cake Pops .
Storage Solutions: Keeping Your Pops Fresh for Maximum Enjoyment
These treats are best when the cake interior remains moist. Store finished cake pops in an airtight container at cool room temperature for up to three days. If your kitchen is warm, refrigeration is acceptable, but allow them to come to room temperature for about 15 minutes before serving, as the cold can slightly mute the flavour and harden the shell too much.
Pro Tips for Perfect Stick Adhesion (No Wobbles Allowed!)
To guarantee flawless stick insertion, always insert the stick straight, avoiding any scraping against the side of the cake ball. Remember, the ‘glue’ step is the secret weapon here.
If you skip chilling the balls before gluing, the warm cake will melt the coating, leading to eventual detachment.
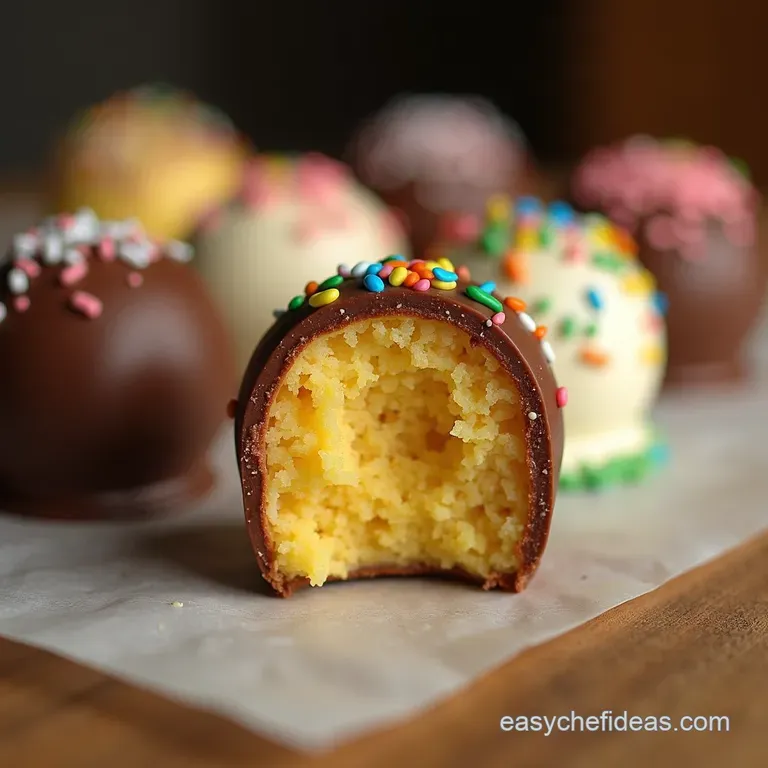
Creative Coatings: Beyond the Standard White Chocolate Shell
Don't be afraid to experiment once you’ve mastered the classic. After setting the initial white shell, you can dip the lower third of the pop into a contrasting colour, like light pink or turquoise candy melts, before adding more sprinkles.
Alternatively, dip the finished white pop halfway into melted dark chocolate for a sophisticated, layered look.
Whether you are assembling these for a major celebration or simply satisfying a craving for that specific, sugary taste, this detailed guide ensures your Starbucks Copycat Birthday Cake Pops are met with adoration. Happy baking!

Recipe FAQs
Why do my Starbucks Copycat Birthday Cake Pops keep falling off the stick during dipping?
Ah, that’s a classic rookie error the "pop detachment"! This almost always means the cake ball wasn't cold enough, or you skipped the crucial 'glue' step. Make sure your cake balls are rock solid from the freezer before dipping, and always dip the tip of the stick in the melted coating first, inserting it deeply into the ball, then chill for 10 minutes before the main dip.
My candy coating looks thick and clumpy, not smooth like the bakery ones. How do I fix this?
That thickness is a real nuisance, it makes dipping a nightmare! The secret to that silky smooth, thin coating is adding a little bit of fat to thin the candy melts. Stir in about one tablespoon of vegetable shortening or refined coconut oil to your melted coating it lowers the viscosity perfectly for an even dip.
Never use water, or it will seize up!
Can I make these Starbucks Copycat Birthday Cake Pops ahead of time, or do they need eating fresh?
These are brilliant for making ahead! Once the coating is fully set, they keep beautifully in an airtight container at room temperature for up to a week, just like store-bought versions. Avoid the fridge if possible, as condensation can make the coating sticky or cause the sprinkles to bleed.
I don't want to bake a cake; what's the easiest substitution for the cake base?
If you want to skip the oven altogether, you can absolutely use a store-bought, unfrosted vanilla or funfetti layer cake just make sure it’s fresh! Alternatively, for a super quick fix, use a packet of high-quality vanilla flavoured wafer cookies, crushing them finely and mixing them with the frosting instead of cake crumbs.
The recipe calls for white coating, but I want the authentic colours. What food colouring should I use?
For the best, brightest colours without watering down your coating, you must use gel food colouring, not the liquid kind you might use for icing cookies. Gel colours are highly concentrated, meaning a tiny drop will tint your melted candy beautifully.
Divide your melted coating into separate bowls before adding the colour.
Are these cake pops supposed to be really sweet, or am I using too much frosting?
They are definitely meant to be sweet that’s part of the fun! The Starbucks version leans heavily into sugary nostalgia. If yours taste too sweet, try reducing the frosting by a quarter cup initially and adding more only if the mixture won't hold its shape.
The high sweetness balances out when paired with a strong, bitter coffee!
Starbucks Copycat Cake Pops

Instructions:
Nutrition Facts:
| Calories | 250kcal |
|---|---|
| Fat | 13g |
| Fiber | 0.5g |
