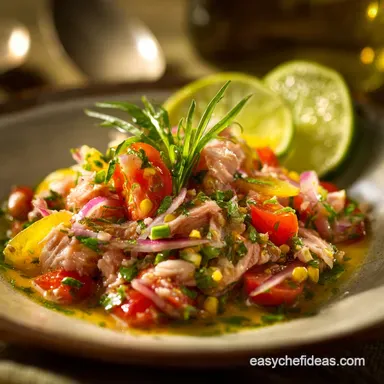
Speedy Canned Tuna Ceviche Zesty Lime Avocado and Crispy Tostadas

Elevating the Pantry: Why This Canned Tuna Ceviche Shines
Okay, hear me out. I know, I know. "Canned tuna" and "ceviche" usually belong in completely different culinary universes. One implies quick desperation, the other, vibrant, fresh dining. But I’m here to tell you that this Speedy Canned Tuna Ceviche is one of the best kitchen tricks I’ve ever learned.
It’s vibrant, ridiculously simple, and uses the stuff you already have lurking in your cupboard. It’s proof that a pantry staple, when treated with respect (read: smothered in lime juice and fresh peppers), can absolutely deliver knockout flavor.
This isn't just a healthy tuna ceviche; it’s an absolute lifesaver when you need a little burst of summer holiday on a Tuesday afternoon.
The Crucial Difference: Cooked vs. Traditional Acid Cured Fish
Let’s get the semantics out of the way. Traditional ceviche uses raw fish, and the acid in the citrus juice chemically "cooks" the protein. Since canned tuna is already cooked and preserved, this isn’t technically a traditional cure, right? Absolutely not.
But we are adopting the flavor profile, and critically, we are using the lime juice to cure and mellow the aromatics —the raw onions and peppers. This is where the magic happens. We’re borrowing the technique to achieve that unmistakable bright, zesty, fresh taste.
We call it ceviche because it looks and tastes like it, and honestly, are you going to argue with something this refreshing?
Mastering Maximum Flavor with Minimal Effort
My philosophy is always: get the most out of the least amount of work. This recipe requires maybe 15 minutes of actual chopping. The remaining 30 minutes is mandatory chilling time. That wait is the secret weapon for this Simple Canned Tuna Ceviche.
It allows the lime juice to penetrate the red onion and bell pepper, softening their aggressive edges and pulling all the flavors together. If you skip the rest period, you just have chopped veggies and tuna swimming in acid. If you wait, you get a harmonious dish where every component shines. It’s brilliant.
Beyond the Sandwich: Repurposing Canned Tuna for Entertaining
Canned tuna gets a bad rap because we usually associate it with sad office lunches or maybe a casserole from the 1970s. But canned tuna is a fantastic, affordable protein base. When you dress it up with enough color, crunch, and acid, it transforms completely.
This Canned Tuna Ceviche is elegant enough to serve at a summer gathering especially if you put it out with a big bowl of crispy chips and call them Canned Tuna Ceviche Tostadas. Suddenly, your humble pantry meal becomes a chic, zero cook appetizer.
The Essential Building Blocks for the Zesty Canned Tuna Ceviche

Selecting the Perfect Can: Oil-Packed vs. Water Packed Tuna
This decision matters, especially for texture. I lean toward oil-packed tuna (specifically olive oil) because the flavor is inherently richer, and the texture stays moist even after draining.
That said, if you’re focusing on making this the absolute healthiest tuna ceviche possible, water packed is the way to go but you must add back at least a tablespoon of good extra virgin olive oil to replace some of that lost fat and improve mouthfeel.
Drain either one thoroughly, or you’ll end up with a watery, greasy mess.
| Choice | Pros for Ceviche | Quick Cons |
|---|---|---|
| Oil-Packed | Richer flavor, better texture | Requires extensive draining |
| Water Packed | Lower fat, very clean flavor base | Can be dry; requires added olive oil |
The Holy Trinity: Fresh Citrus, Heat, and Herb Components
Three things are non-negotiable for success here: fresh lime juice, something crunchy (like the bell pepper and onion), and fresh cilantro (coriander). I know some people think cilantro tastes like soap, and if that’s you, feel free to swap it for parsley or mint, but you’ll lose a bit of that classic Canned Tuna Ceviche Mexican vibe.
For the heat, I use a diced jalapeño (seeds removed if you prefer less heat). The lime juice acts as the main binding agent and seasoning.
If you take only one piece of advice from this recipe, let it be this: Do not, under any circumstances, use bottled lime juice. It simply lacks the vibrant, clean acidity required for simple canned tuna ceviche.
Essential Equipment: Prepping Tools for Maximum Efficiency
You don’t need a fancy food processor in fact, please don't use one! We want texture, not paste. All you really need is a good, sharp knife for dicing the vegetables uniformly. Consistency in chopping size means consistency in flavor pickup.
The second essential tool is a non-reactive mixing bowl (glass or ceramic is perfect) and a decent citrus reamer or juicer. Seriously, cranking out four limes by hand is a workout nobody needs.
Crunchy Companions: Serving Suggestions and Garnishes
The best Best Canned Tuna Ceviche is all about contrast. You have the soft tuna and creamy avocado, but you need a vessel for the texture.
- Crispy Tortilla Chips: The classic choice. Bonus points if they’re slightly warmed.
- Plantain Chips (Mariquitas): A slightly sweeter, more complex crunch.
- Iceberg or Butter Lettuce Cups: Fantastic for a light, low-carb lunch.
- Freshly Sliced Avocado: This is a component of the ceviche itself, but adding a thin fan of avocado on the side of the plate looks very professional.
Related Recipes Worth Trying
- 15Minute Spicy Canned Salmon Rice Bowls with Gochujang Mayo — The ultimate pantry power meal These Spicy Canned Salmon Rice Bowls are ready in 15 minutes A creamy fiery Gochujang mix transforms humble canned fish into...
- Proper Canned Tuna Croquettes Recipe Creamy Béchamel Style — Forget dry fishcakes Master this easy canned tuna croquettes recipe with a glorious crispy crust and creamy Spanish béchamel filling Includes an air fryer...
- Classic Crunchy Tuna Salad The Best Recipe for Proper Sandwiches — Forget mushy fillings This creamy crunchy and easy tuna salad uses fresh acid for brightness Learn the trick for the perfect chunky homemade tuna salad mixture
Executing the Quick Prep: Assembling Your Vibrant Tuna Mix
The Initial Drain: Preparing the Canned Tuna Base
This might sound like a given, but drain the tuna thoroughly, then give it an extra press. No one wants oily residue diluting the precious lime marinade. Once drained, transfer the tuna to your mixing bowl and use a fork to gently flake it apart.
We are aiming for distinct, chunky pieces of protein, not a mashed paste ready for a sandwich. Gently is the key word here.
Layering the Flavors: Acid, Aromatics, and Seasoning Order
Before the tuna meets the lime, we need to address the red onion. This is my absolute favorite home cook trick: place the finely diced red onion in a small sieve and run ice-cold water over it for 30 seconds, or soak it in a small bowl of ice water for five minutes.
This process mellows the sulfur compounds responsible for that harsh, lingering raw onion burn. Drain it really well. Then, combine the mellowed onion, diced bell pepper, and jalapeño with the tuna. Pour the fresh lime juice over everything. Add the salt and pepper. Give it a gentle mix.
The Quick Chill: Optimizing Texture and Acidity Balance
Once the mixture is fully coated in the marinade, cover the bowl and stick it in the fridge for a minimum of 30 minutes. This is where the magic happens and you turn a simple mix into Canned Tuna Ceviche.
If you’re truly time crunched, 15 minutes will do, but 30 allows the lime to truly "cook" the vegetables' flavor profile, resulting in a deeper, more cohesive taste. The cold temperature also makes the whole dish feel cleaner and more refreshing when served.
Presentation Perfection: Plating and Serving Techniques
When you’re ready to serve, pull the bowl from the fridge and give it one last taste check. Does it need a tiny pinch more salt? A dash more lime? Now, and only now, gently fold in the diced avocado. If you add the avocado too early, it will brown and soften into mush, ruining the texture.
I like to serve this in small glass bowls or martini glasses for an appetizer, topped with a generous sprinkle of extra cilantro and maybe a little smoked paprika for color.
Optimizing Your Ceviche: Expert Tips, Swaps, and Storage
Adaptations and Dietary Swaps for This Recipe
This Tuna Ceviche Recipe Canned is wonderfully flexible. If you are aiming for a tropical vibe, try adding 1/4 cup of finely diced mango or pineapple the sweetness pairs beautifully with the lime and the kick from the jalapeño.
For crunch variation, swap the bell pepper for diced cucumber (but scoop out the watery seeds first). For increased depth, sometimes I stir in a teaspoon of finely chopped capers or a dash of hot sauce like Tapatío or Cholula.
make-ahead Magic: How Long Does This Canned Tuna Ceviche Keep?
This is where you need to be realistic. Because of the acid and the freshness required, the ceviche itself (tuna, peppers, onion, lime) can be prepared and chilled for up to 24 hours without the avocado. In fact, it might even taste better the next day!
However, once the avocado is folded in, you need to eat it within a couple of hours. Avocado turns brownish and sad very quickly once exposed to air and acid. Always store any leftovers in an airtight container in the coldest part of the fridge.
Going Further: Creative Ways to Serve Leftover Ceviche Mix
Got some mix left over and you’re tired of chips? No problem. This Best Canned Tuna Ceviche filling is wildly versatile.
- Tuna Ceviche Tostadas: Spread a generous layer onto crispy corn tortillas.
- Stuffed Tomatoes: Hollow out large, ripe beefsteak tomatoes or firm avocado halves and fill them with the mixture.
- Quick Quesadilla Filling: Spread a thin layer on a tortilla with a sprinkle of jack cheese and briefly grill or pan-fry until the cheese melts. The warmth changes the dish completely, creating a lovely contrast with the cool tuna mixture.

Recipe FAQs
Hold on, is Canned Tuna Ceviche actually safe to eat, since the tuna isn't raw?
Absolutely, yes! Since the tuna is already cooked and preserved in the can, this dish is a flavour adaptation rather than true Peruvian ceviche; the lime juice is purely for zesty flavour integration, not for "cooking" the fish.
I've made a big batch; how long does this cheerful dish keep in the fridge?
It’s best eaten fresh within 24 hours while the vegetables are at their crispiest and brightest, though it is technically safe for up to two days; just remember to add the avocado right before serving to stop it going brown and mushy.
Is the 30-minute chilling time strictly necessary, or can I just tuck straight in?
While impatience is understandable, giving it a proper chill is nigh-on essential; it allows the lime and salt to fully integrate with the peppers and onion, transforming the whole dish from a simple mix into a truly cohesive, flavourful experience.
My family aren't huge fans of coriander; what can I use instead for a fresh garnish?
No worries at all! For a similarly bright flavour that doesn't taste like soap to some, try using flat leaf parsley or finely chopped chives; alternatively, a generous sprinkle of smoked paprika offers a lovely, warm contrast.
Why do you recommend soaking the red onion in cold water before I start chopping?
That little soaking trick is a total game changer, expertly mellowing the harsh, aggressive "bite" of the raw red onion, ensuring it adds satisfying crunch and flavour without overpowering the delicate zing of the lime.
Speedy Canned Tuna Ceviche With Avocado
Ingredients:
Instructions:
Nutrition Facts:
| Calories | 254 kcal |
|---|---|
| Protein | 11.8 g |
| Fat | 0.6 g |
| Carbs | 11.6 g |
| Fiber | 2.9 g |
| Sugar | 0.1 g |
| Sodium | 38 mg |
