Oven-Baked Ribs with Garlic and Herbs
- Time: Active 20 mins, Passive 3 hours 15 mins, Total 3 hours 35 mins
- Flavor/Texture Hook: Shatter crisp herb crust with velvety, fall apart pork
- Perfect for: Sunday family dinners or an impressive, low effort weekend feast
- Bake Better Oven Baked Ribs with Garlic and Herbs
- Essential Specs for Savory Results
- Selecting Fragrant Herbs and Pork
- Necessary Gear for Even Cooking
- Mastering Each Flavor Layer Step
- Troubleshooting Your Herb Rib Roast
- Creative Twists and Dietary Swaps
- Keeping Your Leftovers Fresh Longer
- Side Dishes to Enrich Flavor
- Very High in Sodium
- Recipe FAQs
- 📝 Recipe Card
Bake Better Oven Baked Ribs with Garlic and Herbs
I still remember the first time I tried to bake ribs without a plan. I just tossed them in the oven on a high heat, thinking they'd come out like a grilled steak. What I got instead was a piece of leather that even my dog looked at with suspicion.
It was a total disaster, but it taught me the most important lesson in the kitchen: patience and moisture are your best friends.
This article shares a standout recipe for oven baked ribs with garlic and herbs. We're moving away from the sticky, sugary BBQ sauces and leaning into a rustic, Mediterranean vibe. Imagine the scent of toasted rosemary and sizzling garlic filling your kitchen while the meat slowly renders into something truly special.
We’ve all been there, staring at a rack of ribs wondering if they'll actually get tender. Trust me, the secret isn’t in a fancy gadget; it’s in the way we layer the flavors and control the steam. You're going to love how the earthy thyme and sharp garlic cut through the richness of the pork.
Let's get into the "how" and "why" so you can nail this every single time.
Essential Specs for Savory Results
The Science of the Infusion: Low temperatures allow the fat to render slowly, which bastes the meat from the inside out while the garlic oils penetrate deep into the muscle fibers. This gentle heat prevents the protein from tightening into a rubbery texture, ensuring a velvety finish.
| Thickness | Internal Temp | Rest Time | Visual Cue |
|---|---|---|---|
| 1.5 inches | 195°F - 203°F | 15 mins | Meat pulls back 1/2 inch from bone |
| 2.0 inches | 195°F - 203°F | 20 mins | Bones wiggle easily when tugged |
| 2.5 inches | 195°F - 203°F | 25 mins | Surface fat looks translucent and bubbly |
The timing for ribs can be a bit of a moving target because every rack is slightly different. If your ribs are particularly meaty, you might need an extra 20 minutes under the foil.
The goal is to hit that "sweet spot" temperature where the collagen has fully melted into gelatin, giving you that iconic tender texture.
The Collagen Conversion Zone
At around 160°F, the connective tissue in the ribs starts to struggle. But the real magic happens between 190°F and 200°F.
This is when the tough collagen literally turns into liquid gold (gelatin), which coats the meat fibers and makes them feel moist even if the actual water content has decreased.
The Garlic Herb Infusion
By mixing the minced garlic and chopped rosemary with olive oil, we create a fat soluble flavor delivery system. Garlic's pungent compounds, known as allicin, mellow out during the long bake, turning sweet and nutty rather than sharp. This creates a deeply savory profile that lingers on the palate.
The Foil Steam Mechanism
Wrapping the ribs tightly in foil creates a micro environment. The small amount of moisture within the meat turns to steam, which gently breaks down the exterior fibers. This "Texas Crutch" method is what guarantees the meat won't dry out during the three hour journey in the oven.
| Component | Science Role | Pro Secret |
|---|---|---|
| Kosher Salt | Protein Denaturation | Dry brine for 2 hours to season the bone |
| Fresh Rosemary | Aromatic Volatiles | Bruise the leaves before chopping to release oils |
| Extra Virgin Olive Oil | Heat Conduction | Use a high-quality oil to carry herb flavors deeper |
Fresh herbs are non negotiable here because dried herbs just don't have the same floral punch. If you really want to level up, try to find "oily" rosemary the kind that leaves a bit of resin on your fingers. It holds up much better during the long roasting process than the softer, more delicate herbs.
Selecting Fragrant Herbs and Pork
To get the best results, you need to start with high-quality pork. Look for baby back ribs that have good "marbling," which are those little white flecks of fat inside the meat itself. If the rack is too lean, it will end up dry no matter how much you pamper it.
- 2 racks (4 lbs) Baby Back Pork Ribs Why this? They are leaner and more tender than spare ribs.
- 2 tbsp Kosher Salt (such as Diamond Crystal)
- 1 tbsp Coarse Black Pepper
- 1 tsp Onion Powder
- 6 cloves Fresh Garlic, minced
- 2 tbsp Fresh Rosemary, finely chopped
- 1 tbsp Fresh Thyme leaves
- 1/4 cup Extra Virgin Olive Oil
- 1 tsp Smoked Paprika
| Original Ingredient | Substitute | Why It Works |
|---|---|---|
| Baby Back Ribs | St. Louis Style Ribs | More fat and flavor. Note: Requires 45 mins extra cook time |
| Fresh Rosemary | Fresh Sage | Similar earthy/woody profile. Changes the aroma to more autumnal |
| Smoked Paprika | Liquid Smoke (3 drops) | Provides the wood fired scent without the red color |
Using fresh garlic is a huge deal here. Don't even think about using the pre minced stuff in a jar it has a weirdly acidic, metallic aftertaste that will ruin the delicate balance of the herbs. If you're looking for a different vibe, you could check out my Bank Holiday Bliss recipe for a sweeter, smoky rub option.
Necessary Gear for Even Cooking
You don't need a professional smoker to make these, but a few specific tools will make your life much easier. The most important piece of equipment is actually your foil. You want the heavy duty stuff; the thin, cheap foil tends to tear, and if the steam escapes, your ribs will end up tough.
- Large rimmed baking sheet
- Heavy duty aluminum foil
- Small mixing bowl (for the herb paste)
- Sharp paring knife (for the membrane)
- Digital meat thermometer
- Wire cooling rack (optional, for the final crisping)
Chef Tip: If you find your ribs are sitting in too much liquid at the end, place a wire rack on top of your baking sheet. This allows the heat to circulate underneath the meat during the final "uncovered" phase, ensuring the bottom doesn't get soggy.
Mastering Each Flavor Layer Step

1. Prep and Membrane Removal
Lay the 2 racks (4 lbs) Baby Back Pork Ribs on a clean surface. Use a paper towel to grip the thin, white membrane on the bone side and pull it off firmly. Note: This allows the salt and herbs to actually penetrate the meat from both sides.
2. The Savory Seasoning Phase
Combine 2 tbsp Kosher Salt, 1 tbsp Coarse Black Pepper, 1 tsp Onion Powder, and 1 tsp Smoked Paprika in a bowl. Rub this mixture over every inch of the ribs, pressing it into the flesh. Let them sit for 15 minutes while you preheat the oven to 300°F.
3. The Low and Slow Bake
Wrap each rack tightly in a double layer of heavy duty foil. Place them on the baking sheet and bake for 2 hours 45 mins until the meat feels tender when poked through the foil.
4. Creating the Herb Paste
In a small bowl, whisk together 1/4 cup Extra Virgin Olive Oil, 6 cloves minced Fresh Garlic, 2 tbsp chopped Fresh Rosemary, and 1 tbsp Fresh Thyme leaves. Let this sit so the oil becomes aromatic.
5. The Garlic Herb Finish
Carefully open the foil (watch out for the hot steam!). Brush the herb oil generously over the top of the ribs. Increase the oven temp to 425°F or turn on the broiler.
6. The Final Sear
Return the ribs to the oven uncovered for 10-15 minutes until the garlic is golden and the herbs are crackling. Watch them closely so the garlic doesn't burn and turn bitter.
7. The Crucial Rest
Remove the ribs from the oven and let them rest on a cutting board for 15 minutes. Note: This lets the juices redistribute so they don't all run out when you slice.
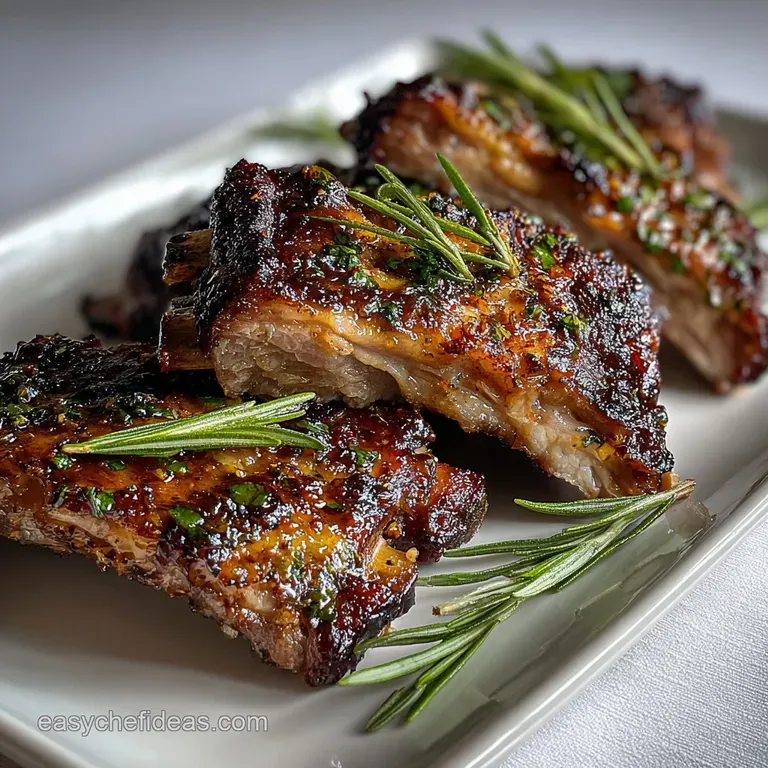
8. Slicing and Serving
Cut between the bones with a sharp knife. The meat should pull away from the bone cleanly with just a slight tug. Serve immediately while the herb crust is still crisp.
Troubleshooting Your Herb Rib Roast
One of the most common issues people face is the "gray meat" syndrome. This happens when the ribs steam perfectly in the foil but don't get enough heat at the end to develop color. If your ribs look pale after the first three hours, don't panic. That final blast of heat is where the flavor lives.
Why Your Ribs Are Tough
If the meat is still clinging tightly to the bone like it's holding on for dear life, they simply haven't cooked long enough. Every oven is different, and some ribs have more connective tissue than others. Just wrap them back up and give them another 30 minutes.
| Problem | Root Cause | Solution |
|---|---|---|
| Dry, Mealy Texture | Oven temp was too high | Keep it at 300°F and ensure the foil seal is airtight |
| Bitter Aftertaste | Garlic burned during broiling | Only broil until golden; move the rack lower if needed |
| Meat is Falling Apart | Overcooked (mushy) | Reduce the initial bake time by 15 mins next time |
Common Mistakes Checklist
- ✓ Always remove the silverskin membrane (it never gets tender)
- ✓ Pat the ribs dry before applying the salt rub to ensure better adhesion
- ✓ Don't skip the resting period; 15 minutes makes a world of difference for juiciness
- ✓ Ensure the garlic is minced very fine so it integrates into the herb crust
- ✓ Check the "pull back" the meat should retreat about half an inch from the bone tips
If you're looking for a different protein method, you might enjoy comparing this to how I handle Pork Chops with recipe which uses a faster pan sear.
Creative Twists and Dietary Swaps
If you're cooking for a crowd, you might need to adjust the quantities. When scaling up to 4 racks, don't just double the salt blindly. Use about 1.5x the salt and spices to avoid over seasoning, but you can definitely double the fresh herbs and garlic for maximum impact.
For a keto friendly version, this recipe is already almost there! Just ensure your onion powder doesn't have added starches. If you want a more "BBQ" feel without the sugar, you could add a teaspoon of mustard powder to the dry rub. This adds a nice tang that mimics a traditional sauce.
| Serving Size | Rib Quantity | Pan Size | Total Cook Time |
|---|---|---|---|
| 2 People | 1 Rack (2 lbs) | Small Sheet | 3 hours 15 mins |
| 4 People | 2 Racks (4 lbs) | Standard Sheet | 3 hours 35 mins |
| 8 People | 4 Racks (8 lbs) | Two Sheets | 3 hours 50 mins |
Flavor Twists
If rosemary isn't your thing, try using a blend of oregano and lemon zest for a "Greek Rib" profile. You'd apply the lemon zest at the very end with the garlic to keep the flavor bright and prevent it from turning bitter in the oven.
Diet Swaps
- Low Sodium: Replace half the salt with smoked paprika and extra onion powder to keep the "punch" without the salt.
- Garlic Breath Fix: If you find fresh garlic too strong, use roasted garlic cloves mashed into the olive oil instead.
Keeping Your Leftovers Fresh Longer
Leftover ribs are actually a secret weapon for weeknight meals. I love stripping the meat off the bones the next day and tossing it into a salad or a quick pasta. The herb flavors actually deepen overnight, making the cold meat surprisingly delicious.
Storage: Keep the ribs in an airtight container in the fridge for up to 4 days. If you want to freeze them, wrap the individual racks in plastic wrap and then foil; they'll stay fresh for up to 3 months.
Reheating: Avoid the microwave! It will turn the pork into rubber. Instead, wrap the ribs in foil with a splash of water or broth and heat in a 300°F oven for about 15 minutes. This gently steams the meat back to life.
Zero Waste: Don't throw away those bones! You can simmer them with some celery, carrots, and onions to make a smoky pork stock. It’s a fantastic base for a bean soup or a hearty lentil stew.
Side Dishes to Enrich Flavor
Because these ribs are quite rich and savory, you want sides that offer a bit of acidity or freshness. A crisp green salad with a lemon vinaigrette works wonders, or you could go for some roasted root vegetables to lean into the earthy rosemary vibes.
If you're in the mood for something heartier, this dish pairs beautifully with a creamy polenta or even a simple potato mash. For those who prefer a more traditional beef based rib experience, you should definitely look at my Oven Baked Beef recipe which uses a similar low and slow approach but with a different flavor profile.
- The Acid Hit: A quick slaw with apple cider vinegar and honey.
- The Comfort Pair: Garlic mashed potatoes using some of that leftover herb oil.
- The Green Balance: Blanched green beans tossed with toasted almonds.
Debunking Rib Myths
Many people think you have to boil ribs before baking to make them tender. Please, don't do this! Boiling just leaches all the flavor out of the meat and into the water. The low and slow oven method achieves the same tenderness while keeping all those savory juices inside the pork where they belong.
Another myth is that "fall off-the bone" is the only sign of a good rib. In the competition world, that's actually considered overcooked! A truly great rib should have a "clean bite" the meat comes off the bone easily when you bite it, but it doesn't just crumble apart when you pick it up.
Of course, at home, we make the rules, so if you like them extra soft, go for it!

Very High in Sodium
1840 mg mg of sodium per serving (80% of daily value)
American Heart Association recommends limiting sodium intake to about 2,300mg per day.
Sodium Reduction Tips for Baby Back Ribs
-
Reduce Salt by Half-25%
Halving the amount of kosher salt will significantly decrease the sodium content. Try using only 1 tablespoon of kosher salt instead of 2. This change can greatly reduce the sodium in the dish without sacrificing flavor.
-
Limit Pepper-10%
While pepper itself is low in sodium, it can sometimes enhance the perception of saltiness. Using only 1/2 tablespoon of Coarse Black Pepper will cut down a bit on sodium, and prevent overwhelming the dish.
-
Consider Garlic Powder-5%
Although fresh garlic is beneficial, using 1/2 tsp of garlic powder can further enhance flavors allowing for further salt reduction. Use it in conjunction with, or as a partial replacement for, the fresh garlic.
-
Fresh Herbs are Your Friend
Continue to use plenty of fresh herbs like rosemary and thyme. They add flavor and complexity without any sodium. Explore other herbs to enhance the dish's taste profile.
Recipe FAQs
How long to cook garlic ribs in the oven?
Generally, 2.5 to 3 hours at 300°F (150°C). This low and slow method allows the connective tissues to break down, resulting in tender, juicy ribs. Always check for tenderness by poking with a fork; the meat should easily pull back from the bone.
Should ribs be cooked covered or uncovered in the oven?
Start covered, finish uncovered. Covering the ribs, typically with heavy duty foil, traps steam and moisture, ensuring they cook through tenderly without drying out. Uncovering them for the last 15-20 minutes at a higher temperature allows for browning and crisping of the herb crust.
What herbs are good on ribs?
Rosemary, thyme, and garlic are excellent. These robust herbs hold up well to the long cooking process and complement the richness of the pork beautifully. For a Mediterranean twist, consider adding a little oregano or sage.
Should I bake ribs at 250 or 275?
250°F (120°C) is preferred for maximum tenderness, but 275°F (135°C) works too. The lower temperature allows fat and collagen to render more slowly, creating an incredibly tender texture. If you're short on time, 275°F will still yield great results, just slightly faster.
Can I use dried herbs instead of fresh for baked ribs?
Yes, but use less. Dried herbs are more concentrated than fresh ones, so use about one-third the amount. For instance, if a recipe calls for 2 tablespoons of fresh rosemary, use about 2 teaspoons of dried. Fresh herbs offer a brighter, more complex flavor.
How do I prevent my oven baked ribs from being tough?
Cook them low and slow, and ensure adequate moisture. Tough ribs usually result from insufficient cooking time or drying out. Always cook at a low temperature (around 250-300°F) and wrap them tightly in foil for the majority of the cooking time to steam them tender. This method is similar to how we ensure tender results in dishes like Corned Beef Brisket: The Chefs Guide to Tender Results.
What's the best way to remove the membrane from ribs?
Use a knife and paper towel. Slide a butter knife under the membrane on the bone side of the ribs to lift an edge. Grip the lifted edge firmly with a paper towel (for better traction) and pull the membrane off in one piece. If it tears, just repeat the process.
Oven Baked Ribs Garlic

Ingredients:
Instructions:
Nutrition Facts:
| Calories | 685 kcal |
|---|---|
| Protein | 47 g |
| Fat | 52 g |
| Carbs | 3 g |
| Fiber | 1 g |
| Sugar | 0 g |
| Sodium | 1840 mg |
