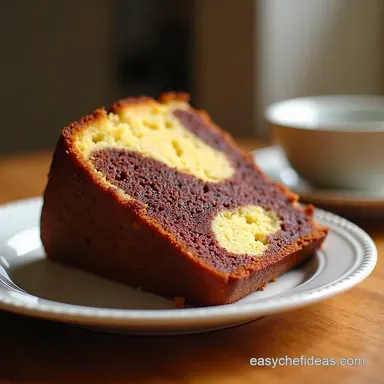
Onebowl Wonder Moist Marble Cake: One-Bowl Method

- Time: 20 min active + 40 min baking + 10 min cooling in the pan
- Flavor & Texture: Rich cocoa and vanilla with a tight, moist crumb
- Perfect for: Afternoon tea or a quick dessert
OneBowl Wonder Moist Marble Cake Guide
Think of that high-contrast swirl and the smell of vanilla and cocoa filling your kitchen. It's a classic look that usually requires a mountain of bowls and endless scrubbing.
You don't need a complex setup to get a bakery result. This recipe uses one main batter to keep things simple, making it a great win for anyone who wants a treat without the stress.
The onebowl wonder moist marble cake delivers a balanced flavor in every slice. You get the creamy sweetness of vanilla and the depth of cocoa in one bite.
Why the Batter Stays Balanced
- Consistent Density: Using one base keeps the chocolate and vanilla portions close in density. This helps keep the heavier chocolate batter from sinking to the bottom.
- Room Temp Ingredients: Soft butter and room-temperature milk blend faster. They prevent the batter from breaking, which keeps the crumb tight and moist.
Gathering Your Ingredients
- 1 cup (225g) unsalted butter, softened Why this? adds richness and a tender crumb
- 1½ cups (300g) granulated sugar
- 3 large eggs, room temperature
- 1 tsp (5ml) vanilla extract
- 2½ cups (310g) all-purpose flour
- 2 tsp (10g) baking powder
- ½ tsp (3g) salt
- 1 cup (240ml) whole milk, room temperature
- 3 tbsp (22g) unsweetened cocoa powder
- 2 tbsp (30ml) whole milk
Essential Baking Tools
You'll only need a few basic tools for this. A large mixing bowl is essential. I suggest using a stand mixer to ensure the butter and sugar are properly aerated and fluffy, but a hand mixer works perfectly well. You will also need a 9-inch (23cm) round cake pan and a sheet of parchment paper.
Step-by-step Baking Process
Phase 1: Creating the Base
- Set your oven to 180°C (350°F). Grease a 9-inch (23cm) round cake pan with butter and line the bottom with parchment paper.
- In a large bowl, cream 225g softened butter and 300g granulated sugar on medium-high speed until the mixture is pale and fluffy.

- Beat in 3 large eggs one by one, ensuring each is well incorporated, then stir in 5ml vanilla extract.
- Sift in 310g all-purpose flour, 10g baking powder, and 3g salt. Slowly stir in 240ml whole milk on low speed until the batter is smooth.
Phase 2: Dividing and Flavoring
- Transfer about 1/3 of the batter into a smaller bowl. Sift 22g unsweetened cocoa powder into this portion and stir in 30ml whole milk.

- Fold the chocolate mixture gently using a spatula until the batter is glossy and uniform.
Phase 3: Marbling and Baking
- Pour the vanilla batter into the ready pan and smooth it over.
- Spoon large portions of the chocolate batter over the vanilla base.
- Create figure-eight swirls using a butter knife or skewer. Note: do not over-mix or the colors will muddy.

- Bake for 35–40 minutes until a tester comes out clean and the edges slightly pull away from the pan.
- Allow 10 minutes of resting time in the pan before moving the cake to a cooling rack to finish cooling.
Common Problems and Fixes
If your swirls look more like a blur than a marble, you likely dragged the knife through the batter too many times. Stick to three or four figure eight motions.
When the cake feels too heavy or dense, it usually comes from over-mixing the flour. Stop the mixer as soon as the streaks of flour disappear.
If the center is still gooey while the edges are done, your oven might be running hot. Check the temperature with an oven thermometer.
| Problem | Fix |
|---|---|
| Blurred Swirls | Reduce the number of swirls to 3-4 |
| Dense Crumbs | Mix flour on low speed only |
| Gooey Center | Lower oven temp by 10 degrees |
Flavor Swaps and Options
For a bit of brightness, try an Orange Vanilla Zest version. Just add the zest of one orange to the main vanilla batter. If you want a deeper cocoa hit, substitute the 30ml of extra milk with a shot of strong espresso.
If you love rich, layered cakes, you might also like this German chocolate cake which uses a different frosting approach.
| Original Ingredient | Substitute | Why It Works |
|---|---|---|
| Whole Milk | Almond Milk | Similar liquid ratio. Note: Slightly less richness |
| Granulated Sugar | Light Brown Sugar | Adds a molasses note. Note: Makes crumb moister |
Storage and Freshness
Keep the cake in a container at room temperature for up to 3 days. You can store it in the fridge for up to 5 days, but the butter makes it firm up. I like to let a slice sit on the counter for 20 minutes before eating so it softens.
This cake freezes well. Wrap individual slices in plastic wrap and put them in a freezer bag for up to 3 months. Thaw them overnight in the fridge.
Plating and Color Accents

The cake has a natural earthy tone, so adding a pop of color makes it look professional. I suggest using a bright red raspberry coulis drizzled over the top for a sharp contrast.
A dusting of white powdered sugar adds a clean, snowy look that highlights the chocolate swirls. For a final touch, add a small sprig of fresh green mint to the side of the plate. These three accents - red, white, and green - make the brown and cream tones of the marble cake stand out in photos.
Good to Know
How long can I store the cake?
Keep the cake in a container on the counter for 3 days. You can also refrigerate it for 5 days or freeze slices for up to 3 months.
How to create the marble swirls?
Drop spoonfuls of chocolate batter on top of the vanilla layer. Use a butter knife or skewer to draw figure-eight patterns without over-mixing.
Can I use melted butter for this recipe?
Softened butter is necessary to beat the mixture until pale and fluffy. Using melted butter would change the cake's structure and make it denser.
Why did my marble patterns disappear?
Over-swirling the batters blends the chocolate and vanilla into one uniform color. Stop drawing patterns as soon as the swirls are visible to keep the contrast.
OneBowl Wonder Moist Marble Cake