Grandmas Best the Truly Oldfashioned Cherry Crumble Pie
- Unearthing the Comfort: Why This OldFashioned Cherry Dish Reigns Supreme
- The Soul of the Crumble: Defining Our Rustic Cherry Pie
- Assembling the Pantry: Essential Components for Perfection
- Sourcing Stellar Fruit for Your OldFashioned Cherry Dish
- The Baker’s Journey: Step-by-Step Assembly
- Baking to Golden Perfection: Oven Strategies
- Maximizing Flavor and Longevity Post-Bake
- Elevating Your OldFashioned Cherry Dish Experience
- Recipe FAQs
- 📝 Recipe Card
Unearthing the Comfort: Why This OldFashioned Cherry Dish Reigns Supreme
When the term "old-fashioned" enters the culinary vocabulary, it evokes images of hearths, handwritten recipe cards, and deep, satisfying flavour profiles that stand the test of time.
Our rendition of the Old Fashioned Cherry Dish , specifically crafted as a Crumble Pie, encapsulates this perfectly. It bypasses modern fussiness in favour of robust texture and pure, unadulterated fruit flavour.
This isn't just dessert; it’s edible nostalgia, a testament to simple ingredients treated with respect. We are aiming for that beautiful balance where the tartness of the cherry shines through the sweetness, supported by layers of buttery texture that signal true, home baked quality.
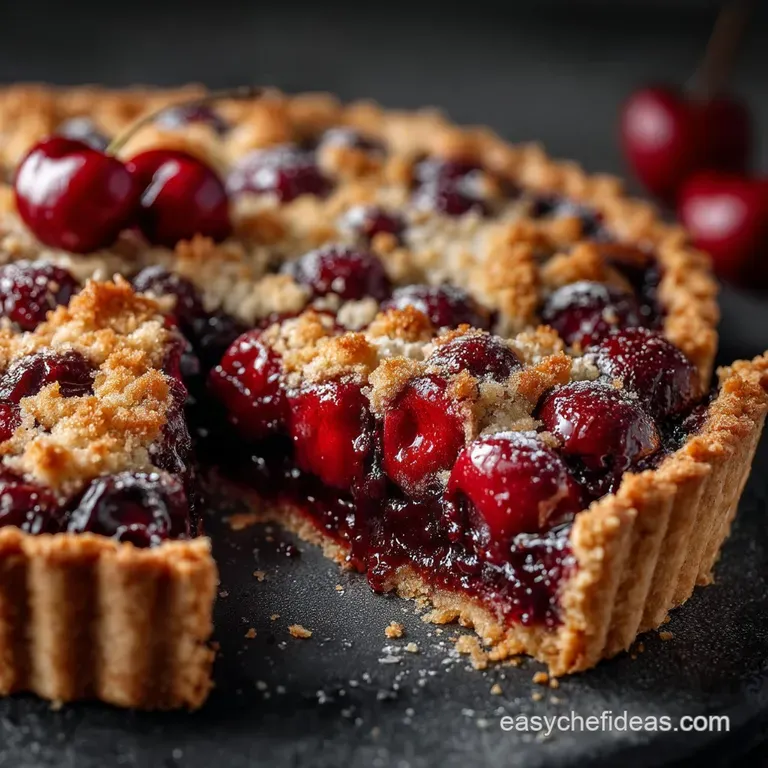
The Soul of the Crumble: Defining Our Rustic Cherry Pie
We’ve decided on a Grandma’s Best: The Truly Old-Fashioned Cherry Crumble Pie . This choice is deliberate. While many turn to intricate lattice work when discussing Fruit Pie , a hearty crumble topping provides superior textural contrast to the rich, jammy filling beneath.
This specific Cherry Cobbler Recipe variation offers a delightful interplay between yielding fruit and a satisfyingly crisp, slightly chewy oat topping. It’s comforting, requires less technical precision than a double crust, yet delivers an immense payoff in rustic charm.
A Nostalgic Taste Test: Beyond the Candy Aisle
Many contemporary cherry desserts rely heavily on processed syrups or unnaturally bright fillings. Our goal here is the authentic taste of preserved summer fruit. To achieve this, we focus intensely on the quality of the fruit itself, using tart varieties which require less added sugar to balance their natural acidity.
This results in a filling that tastes vibrant, not cloying. On top of that,, we include elements that nod to true vintage baking, ensuring the final product echoes those Antique Cherry Dishes beloved generations ago.
Why the Crumble Top Beats the Lattice Every Time
Lattice tops, while visually appealing, can sometimes steam the fruit below, leading to a less set filling. Our oat-laced crumble, however, allows steam to escape freely while developing a gorgeous, deeply browned crust rich with cinnamon. This structure provides an exceptional textural counterpoint.
It’s sturdy enough to stand up to the thick, bubbling cherry centre and contrasts beautifully with the tender Flaky Crust we prepare for the base.
Setting the Scene for Your Sunday Bake
Baking this type of dessert signals relaxation. It requires patience, particularly during the chilling and cooling stages, which are non-negotiable for success. This Old Fashioned Cherry Dish is best undertaken on a slower afternoon, filling your kitchen with the warm aroma of baking sugar and spice.
It’s the kind of bake that invites people to gather around the table, ready for a slice served warm with cream.
Assembling the Pantry: Essential Components for Perfection
Creating depth of flavour in this classic requires attention to the sourcing of every component, from the butter in the crust to the specific cherries chosen for the centre. We are building layers of richness that define this Old Fashioned Cherry Dish .
Sourcing Stellar Fruit for Your OldFashioned Cherry Dish
The heart of any great Fruit Pie is, naturally, the fruit. We call for approximately five cups of pitted cherries. While fresh Bing cherries offer sweetness, tart Montmorency cherries (often found frozen) provide that essential zing.
If using frozen, do not thaw them completely before mixing; this prevents the filling from becoming too watery. We balance the fruit’s inherent tartness with a mix of granulated and light brown sugar, ensuring a complex sweetness rather than a flat one.
This careful sweetening process elevates the natural flavour of the Cherries for Old Fashioned preparation.
Pie Crust Secrets: What You Absolutely Must Have
The foundation of our dessert is an all-butter pastry designed for maximum tenderness and flakiness. Achieving a truly Flaky Crust depends entirely on temperature.
You need 2 ½ cups of all-purpose flour, salt, a touch of sugar, and critically, a full cup of butter cut into cubes and kept ice-cold. The technique involves cutting the butter into the dry ingredients until you see pieces the size of small peas; these pockets of fat create steam during baking, resulting in that desirable lift and layering.
Remember, handling this dough minimally is key to avoiding gluten development that leads to toughness.
Crafting the Perfect Topping: Butter Ratios Matter
Our crumble topping is deceptively simple. It requires flour, brown sugar for that molasses depth, a half cup of rolled oats for chew, and cinnamon. The crucial element here is the butter a full half cup, chilled and cubed, cut into the dry ingredients until you have rough, shaggy clumps.
Over mixing results in a sandy texture; you want defined crumbles that will crisp up beautifully in the oven, providing textural contrast to the soft fruit below.
Sweeteners and Spices: Balancing Tartness in the Filling
To ensure our filling sets beautifully and tastes vibrant, we incorporate cornstarch as the primary thickening agent, about a quarter cup, mixed dry with the sugars before meeting the fruit.
A splash of fresh lemon juice brightens the overall profile, cutting through the richness of the crust and the sweetness of the sugar. While vanilla extract is standard, consider adding a hint of almond extract if you wish to echo the complexity found in certain Dirty Cherries for Old Fashioned cocktails it adds a subtle, nutty perfume.
Related Recipes Worth Trying
- Grandmas OldFashioned Pancakes Fluffy Easy — Craving fluffy OldFashioned Pancakes like Grandma made This easy fromscratch recipe delivers the best Sunday morning breakfast Get ready for golden...
- My OldFashioned DELICIOUS HOMEMADE CHERRY PIE Recipe — Bake the best DELICIOUS HOMEMADE CHERRY PIE Oldfashioned recipe with a flaky crust sweet cherry filling Easy to follow and tastes like summer Get the recipe now
- Cherry Bomb Pie Easiest EASY CHERRY PIE Recipe EVER — Want the BEST EASY CHERRY PIE This Cherry Bomb recipe is foolproof delicious using storebought crust Juicy sweettart and ready in an hour Get the secret
The Baker’s Journey: step-by-step Assembly
Once your pastry discs have chilled sufficiently (at least an hour), the assembly moves quickly. Preheat your oven, as the pastry needs cold dough hitting a hot environment immediately. Roll out one disc thinly and gently line your 9 inch pie plate, leaving an overhang to flute later.
Next, gently combine your filling ingredients cherries, sugars, cornstarch, lemon, and vanilla and pour this luscious mixture into the crust. Dot the top of the fruit with small knobs of cold butter; these melt down to enrich the juices as they cook.
Baking to Golden Perfection: Oven Strategies
Baking a pie successfully involves managing heat distribution to ensure the bottom crust sets before the filling overwhelms it, and the top develops a deep, appealing colour.
Preparing the Foundation: Blind Baking the Shell
For this crumble topped variant, we are foregoing a full blind bake, relying instead on placing the pie dish directly onto a preheated baking sheet. This sheet radiates intense heat upwards, rapidly cooking the bottom pastry.
If you were making a double crust pie, a 15-minute partial blind bake would be necessary, but here we trust the heat transfer from the sheet.
Mixing the Heart: Achieving Optimal Cherry Thickness
As the pie bakes, the cornstarch must absorb the liquid released by the cherries and heat up sufficiently to gelatinize. This is why we start high. We initiate the bake at a robust 400° F ( 200° C) for the first 15 minutes.
This sets the crust and begins the deep caramelization process on the crumble topping.
Layering and Sealing: Building the Crumble Structure
After the initial blast of heat, we drop the oven temperature down to 375° F ( 190° C). Now, generously spoon the chilled crumble mixture over the entire surface of the cherries, ensuring it falls naturally into rustic clusters.
Lightly brush the exposed edges of the bottom crust with a simple egg wash (one beaten egg mixed with a teaspoon of water) to encourage browning right up to the edge.
Temperature Checks: Knowing When to Pull It Out
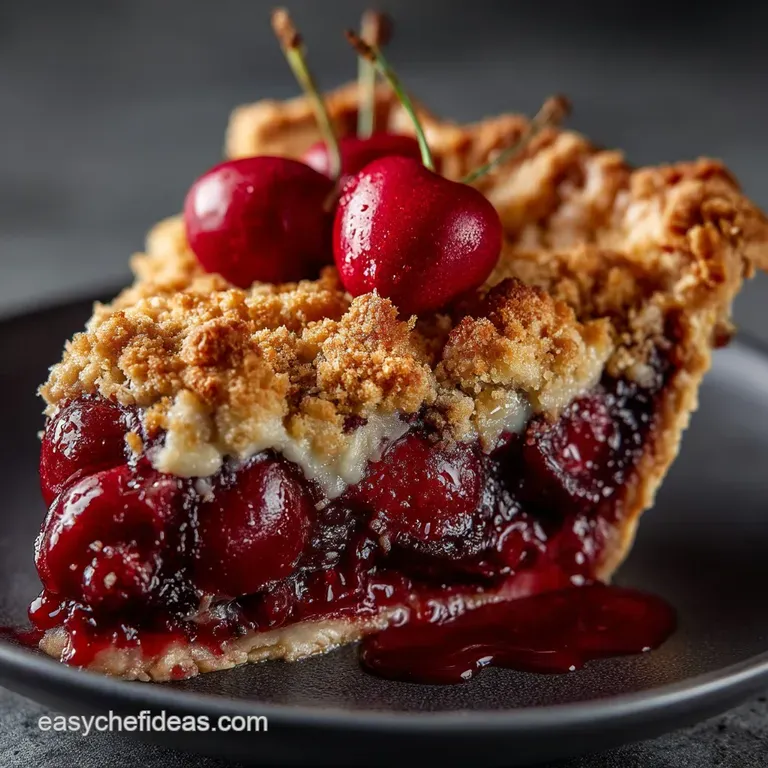
Do not rely solely on time. A pie is done when the filling is not merely simmering, but actively boiling thick bubbles through the topping or vents. This eruption confirms that the internal temperature of the filling is high enough for the starches to fully activate, guaranteeing a perfect set.
This usually takes another 45 to 55 minutes.
Maximizing Flavor and Longevity Post Bake
The temptation to slice into this masterpiece immediately after it exits the oven is overwhelming, but it would be disastrous. The Old Fashioned Cherry Dish needs time to transition from molten fruit lava to sliceable dessert.
Elevating Your OldFashioned Cherry Dish Experience
Cooling Curves: Why Patience is Key to Slicing
This is perhaps the single most critical step for any set fruit pie. The cornstarch or flour thickener requires at least four hours at room temperature ideally longer to fully hydrate and lock the juices into a cohesive structure. Cutting it warm means a soupy mess, regardless of how perfectly you baked it.
Cooling slowly on a wire rack ensures air circulates evenly around the entire dish.
Storage Solutions for Leftovers
If, by some miracle, you have leftovers, cover the cooled pie loosely with foil and store it on the counter for up to two days. The filling is preserved by its cooked sugar content. If storing longer than that, transfer it to the refrigerator, though be aware the crust may soften slightly upon chilling.
Flavor Modifications: Adding Depth to the Classic Cherry Profile
To take this recipe beyond basic nostalgia, try infusing the butter used in the crust. Gently melt the butter cubes with a few sprigs of fresh thyme or rosemary, chill it until solid again, and then use it in the pastry recipe.
This subtle herbaceous note pairs unexpectedly well with the dark fruit profile inherent in Vintage Cherry Dishes .
Nutritional Snapshot: Understanding the Indulgence
While this is undoubtedly a treat, it provides real nutritional benefits from the fruit itself vitamins A and C, and antioxidants. However, given the generous amount of butter in the Flaky Crust and the added sugars, it remains an indulgence best enjoyed in moderation.
Slicing it into eight modest portions helps keep the indulgence in check while maximizing the flavour experience in every bite.

Recipe FAQs
What is the secret to stopping the bottom crust of this Old-Fashioned Cherry Crumble Pie from going soggy?
Ah, the dreaded soggy bottom a true culinary catastrophe! The key here is twofold: ensure your pastry butter is absolutely freezing cold, and bake the pie on a preheated baking sheet. This blasts heat straight to the base crust, helping it set up beautifully before the cherry juices have a chance to seep in.
Resist the urge to slice it too soon, too!
Can I use canned cherries instead of fresh or frozen for the Old-Fashioned Cherry Dish?
While fresh or frozen tart cherries are highly recommended for the best texture and flavour balance, canned sweet cherries will work in a pinch. If you use canned cherries, drain them thoroughly and significantly reduce the added sugar in the filling, as canned varieties are often preserved in heavy syrup.
You may still need a touch of cornstarch to ensure it sets right.
My filling looks runny even after it's cooled down a bit. Should I have used more cornstarch?
Don't fret just yet; patience is your best friend with fruit pies! The filling needs a good four hours or even longer at room temperature to fully set up as the starch thickens upon cooling.
If you are positive it's still watery after cooling completely, you might need to increase the cornstarch next time, or try adding a tablespoon of quick cook tapioca powder for extra insurance.
How should I store any leftover Old-Fashioned Cherry Crumble Pie? Does it need to be in the fridge?
For the first couple of days, you can absolutely keep the pie covered loosely at cool room temperature, provided your kitchen isn't too warm or humid. After that, covering it tightly and popping it in the fridge will keep it good for up to four days.
Reheat slices gently in a low oven for that 'freshly baked' feel before serving!
I'm not very confident with pastry. Can I skip the bottom crust and just use the crumble topping?
That’s a smashing idea if you’re short on time or pastry confidence! You can definitely make this as a deep dish cherry crisp instead of a pie. Simply grease your pie dish well, pour the filling straight in, and generously layer on the oat crumble topping.
Just ensure you still bake it on a tray, as the juices will bubble up more readily without a bottom crust barrier.
Oldfashioned Cherry Crumble

Ingredients:
Instructions:
Nutrition Facts:
| Calories | 1080 kcal |
|---|---|
| Protein | 8.2 g |
| Fat | 38.6 g |
| Carbs | 114.7 g |
| Fiber | 8.2 g |
| Sodium | 5145 mg |
