Chocolate Covered Cheesecake Bites the Easiest Nofuss Truffle Recipe
- Bypassing the Baker's Dread: Why Truffles Trump Slicing
- A Gourmet Guide to Homemade Chocolate Covered Cheesecake Bites
- Essential Components for the Ideal Cheesecake Filling and Coating
- Prepping Your Mise En Place for Quick Assembly
- Crafting the Silky and Smooth No and Bake Cheesecake Core
- Ensuring Longevity: Storage and Make and Ahead Tips
- Flavor Enhancements and Creative Coating Variations
- Recipe FAQs
- 📝 Recipe Card
Bypassing the Baker's Dread: Why Truffles Trump Slicing
Look, I love a traditional baked cheesecake as much as the next person, but let’s be honest. The faff? The water bath? The hours spent crossing your fingers hoping that baby doesn't crack right down the middle? It’s stressful. It is pure baker's dread.
That is why I am completely obsessed with these Chocolate Covered Cheesecake Bites. They give you all the intense, tangy, rich creaminess of a New York style cheesecake without the oven, the risk, or the complicated slicing process.
They are essentially cheesecake truffles, perfectly portable little Mini Cheesecake Bites that require only one main skill: patience while chilling.
If you’re hosting a large gathering, these are an absolute game and changer. No plates, no forks, just elegant little pops of dessert that vanish instantly. I promise you, once you ditch the springform pan and go for the truffle approach, you’ll never look back.
A Gourmet Guide to Homemade Chocolate Covered Cheesecake Bites
This recipe isn't really a "baking" recipe; it's an assembly and chilling operation. We’re taking the best parts of a no and bake filling and stabilising it so heavily that it can stand up to being rolled and fully submerged in glorious, snappy chocolate.
We want dense, fudge and like richness here, not cake-y fluff.
The Secret to a Perfect, No and Crack Cheesecake Finish
The secret is you don't use an oven. Seriously. The main risk factor for cracking a traditional cheesecake is rapid temperature change. By making these Chocolate Covered Cheesecake Bites a no and bake wonder, we sidestep the whole issue.
Our “finish” is the chocolate shell, which is inherently crack and free if you treat the chocolate right (more on that later). The internal cheesecake core stays unbelievably smooth because we only rely on the structural integrity of full and fat cream cheese and sugar for stability.
Understanding the Cheesecake Truffle Texture
A perfect cheesecake truffle should feel weighty. It shouldn’t be bouncy like a cake pop. It should be dense, melt and in-your and mouth, and incredibly creamy. To achieve that density, we integrate our biscuit base into the filling, rather than layering it beneath.
This gives the truffle a lovely, subtle crunch and that familiar buttery richness throughout. Think of it less as a ball of filling and more like a compacted, highly stable little fudge bomb.
Prep Time and Equipment Checklist
The biggest mistake people make here is thinking they can skip the cookie scoop. Don't do it. Uniformity is key for professional and looking truffles, and a small cookie scoop (about 1.5 inches) guarantees every single one is the same size.
| Essential Tools | Why You Need Them |
|---|---|
| Small Cookie Scoop | Ensures uniform size for aesthetic dipping. |
| Parchment Paper | Prevents sticking during chilling and dipping. |
| Double Boiler Setup | Gives the most controlled, gentle chocolate melt. |
| Dipping Tools (Forks) | Allows excess chocolate to drain completely. |
Scaling the Recipe for Large Gatherings
This recipe scales beautifully. I often triple it for holiday parties. The only thing you need to worry about when scaling is the chill time. If you triple the batch, you’ll have significantly more truffle mixture, so you’ll need to allow an extra 30– 60 minutes for the bulk mixture to firm up initially before you start rolling.
And definitely work in small batches when dipping, keeping the rest of the Mini Cheesecake Bites in the freezer.
Essential Components for the Ideal Cheesecake Filling and Coating
We are not messing around with low and fat ingredients here. If you are going to put in the effort to make Chocolate Covered Cheesecake Balls, you need that full and fat, tangy goodness.
Crucial Warning: Do not use tubs of spreadable cream cheese. You must use the block cream cheese (Philadelphia or equivalent). The tub kind contains too much water and additives, which will make the filling too loose to roll.
For the chocolate, quality matters immensely. Don’t use cheap chocolate chips that are full of stabilizers they don’t melt smoothly. Choose a good quality baking bar or couverture wafers (70% cocoa is my favourite balance of bitter and sweet).
Related Recipes Worth Trying
- Levain Bakery Chocolate Chip Cookies Giant Fudgy Copycat Recipe — Master the perfect Levain Bakery Chocolate Chip Cookies at home This copycat recipe delivers enormous dense cookies with that signature gooey fudgy center A...
- Chocolate Chip Scones The Secret to Light and Tender BakeryStyle Fluff — Chocolate Chip Scones made with cold heavy cream are unbelievably light and tall This easymedium recipe uses grated butter for guaranteed fluffy chocolate...
- Safe Ultimate Chocolate Covered Cookie Dough Bites NoBake Truffles — Our foolproof Chocolate Covered Cookie Dough Bites are completely edible and eggfree Enjoy rich buttery dough covered in a crisp chocolate shell Perfect...
Prepping Your Mise En Place for Quick Assembly
The actual assembly time for these is ridiculously quick, but only if you have everything ready to go. "Mise en place" (everything in its place) is never more critical than when working with melted chocolate and very cold filling.
Choosing the Right Cream Cheese and Stabilizers
As mentioned, full and fat block cream cheese is non and negotiable. Our primary stabilizer is the powdered sugar (icing sugar). Because powdered sugar contains a small amount of cornstarch, it helps absorb any residual moisture from the cream cheese, making the final filling dense and rollable.
The tiny bit of heavy cream helps achieve ultimate smoothness without adding so much liquid that we ruin the texture.
Upgrading the Crumb Base (Beyond the Digestive Biscuit)
I love Digestive biscuits for their slight malty flavour (a very British touch), but if you’re in the US and Graham Crackers are easier, use those. Just make sure they are crushed super, super finely. I chuck them into a food processor until they look like coarse sand.
Here are a few tasty base variations:
- Oreo Crumbs: Use the dark cookie part only (toss the cream filling). Gives a rich black forest vibe.
- Ginger Snaps: Perfect for autumn or winter. Pair these with a hint of cinnamon in the filling.
- Biscoff (Speculoos): Incredibly warm and buttery. My personal favorite base upgrade.
Recommended Melting Methods for Dipping Chocolate
For coating your Mini Cheesecake Bites, temperature control is everything. If the chocolate gets too hot, it will seize or become thick and dull.
I only recommend using a double boiler (a heatproof bowl sitting over a saucepan of gently simmering water). Microwave melting is too risky for beginners; it’s easy to scorch the chocolate and ruin the temper.
Stir constantly and remember that once about 80% of the chocolate is melted, you should remove it from the heat and let the residual heat finish the job. This helps keep it glossy.
Ingredient Swaps and Dietary Adjustments
If you need to make changes, here’s what works and what doesn't:
- For a Vegan/Dairy and Free Version: Use vegan block cream cheese and vegan butter. Note that vegan cream cheese is often softer, so you may need to add an extra tablespoon of powdered sugar and chill for longer.
- Substitution for Powdered Sugar: Granulated sugar will make the mixture grainy. If you only have granulated, blitz it in a coffee grinder until fine, or just buy powdered sugar.
Crafting the Silky and Smooth No and Bake Cheesecake Core
This stage is surprisingly fast. Get your room and temperature cream cheese into the mixer and beat it scrape the bowl often until it’s absolutely lump and free. It should look like smooth, creamy frosting.
Blending the Filling to Avoid Lumps
The secret to lump and free cream cheese balls? Warm cheese and sifted sugar. If the cream cheese is cold, it won’t incorporate the sugar evenly. Sift your powdered sugar before adding it, especially if it’s been sitting in the cupboard for a while, as it clumps easily.
Beat on low to medium speed, and stop mixing as soon as everything is combined. Overmixing incorporates too much air, which can make the finished product spongy instead of dense.
The Mandatory Deep Chill: Shaping Prep
Once the filling and the biscuit base are combined, the mixture needs to become dense enough to hold a shape. I scrape it into a bowl, cover it tightly (plastic wrap pressed directly against the surface helps prevent a skin from forming), and put it in the fridge for at least 60 minutes.
If you’re in a rush, 30 minutes in the freezer works, too. If the mixture is still tacky and sticky when you go to roll it, just put it back in for 15 more minutes. Trust me on this.
Rolling Uniform Truffles Every Time
Use that cookie scoop! It’s your friend. Portion out all the balls first onto your lined sheet, then go back and roll them quickly.
My pro tip for non and stick rolling: Keep a shallow dish of water nearby. Lightly dampen your hands, shake off the excess, and roll the balls quickly. The slight moisture prevents the creamy mixture from sticking to your warm hands.
Pop them straight into the freezer for the final mandatory deep chill (another 60 minutes). They must be nearly frozen solid before dipping.
Setting the Chocolate Shell Quickly
If the chocolate is at the correct working temperature (warm, but not hot) and your cheesecake balls are frozen, the chocolate should set almost instantly upon contact. This is brilliant.
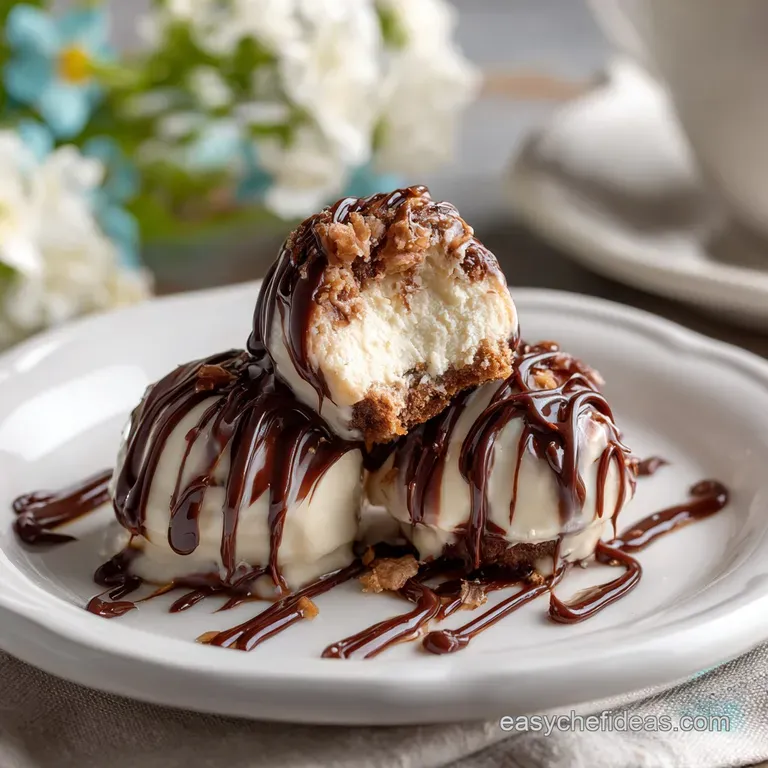
Dip the ball completely, lift it out with a dipping fork, and tap it gently on the edge of the bowl. This allows excess chocolate to drip back in. Place the coated Chocolate Covered Cheesecake Bite onto the parchment paper.
If you’re adding sprinkles or cocoa dusting, do it immediately , because that shell is going to firm up fast.
Ensuring Longevity: Storage and Make and Ahead Tips
These are fantastic make and ahead desserts. They taste best when stored cold.
Optimal Freezing Practices for Cheesecake Bites
You can easily freeze the fully coated Chocolate Covered Cheesecake Bites for up to three months. To do this without them sticking together, first let the chocolate shell set completely on the baking sheet. Then transfer them to an airtight container, separating layers with parchment paper.
When you want to serve them, pull them out about 15 minutes before serving so they soften slightly, but are still delightfully chilled.
Troubleshooting Common Cheesecake Truffle Issues (Why they Crack or Melt)
- They Melt/Collapse: The core wasn't cold enough. It needs to be very firm, ideally straight from the freezer.
- The Chocolate Cracks: This usually happens when the cheesecake core is too cold (frozen) and the coating chocolate is too thick or too hot. As the cheesecake warms up, it expands slightly, causing the too and rigid chocolate shell to crack. Solution? Ensure your melted chocolate is glossy and thin (use a tiny bit of coconut oil if needed) and that the bites aren't absolute rock and hard ice blocks.
Flavor Enhancements and Creative Coating Variations
Infusing the Filling (Citrus, Spice, or Coffee)
You can easily change the flavour of your cheesecake core simply by tweaking the vanilla extract.
- Lemon Zing: Add 1 teaspoon of finely grated lemon zest and half a teaspoon of lemon juice.
- Mocha Delight: Replace the heavy cream with 1 tablespoon of strong, cooled espresso, or a coffee liqueur like Kahlua.
- Spiced: Add 1/2 teaspoon of ground cinnamon and a pinch of nutmeg alongside the vanilla.
Decoration Ideas: Drizzles, Dusts, and Toppings
Once the chocolate shell is set, you can go wild. Don’t limit yourself to basic sprinkles!
- Drizzle with contrasting chocolate (dark drizzle on white chocolate bites, or vice versa).
- Lightly dust with sifted cocoa powder for a classic truffle look.
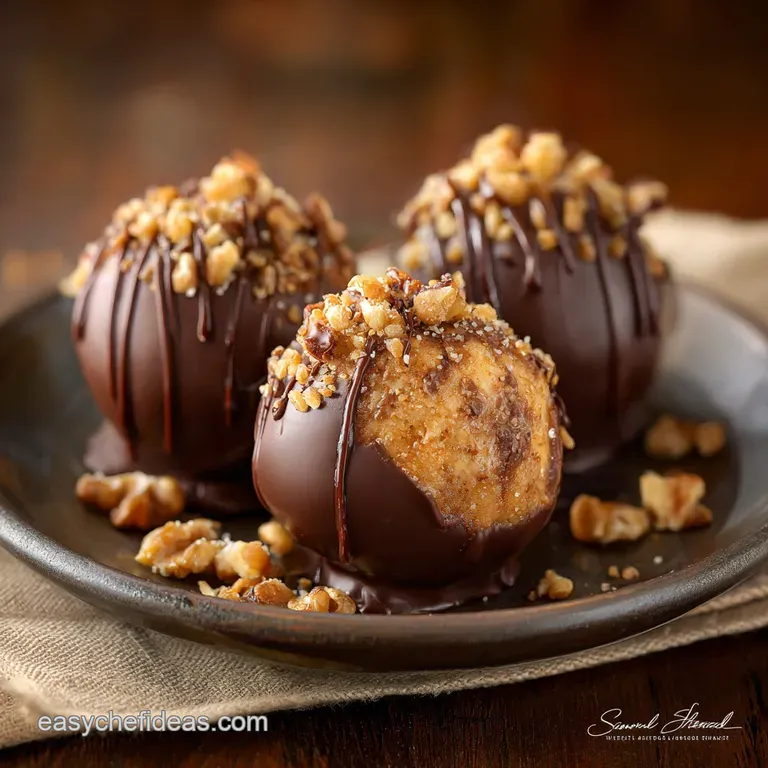
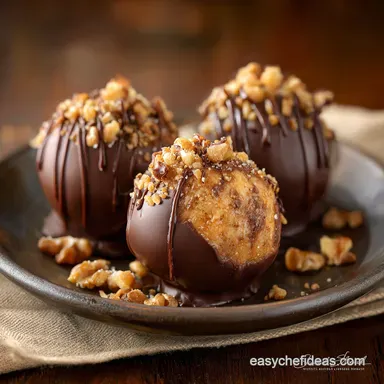
- Press crushed pecans or pistachios onto the tops before the chocolate sets.
- Use a very light brush of edible gold dust for pure elegance.

Recipe FAQs
Why are my cheesecake balls falling apart or melting when I try to coat them?
Ah, the temperature conundrum! The secret is ensuring the bites are absolutely rock solid ideally frozen for 60 minutes before dipping. This temperature contrast helps the chocolate set instantly and prevents your lovely cheesecake centres from collapsing or mixing into the warm chocolate.
These look fiddly; can I make Chocolate Covered Cheesecake Bites ahead of time for a party?
Absolutely, they are brilliant for prepping in advance! You can prepare the entire batch up to 5 days ahead, storing them in an airtight container in the refrigerator, or freeze them for up to a month if you're planning a proper showstopper spread.
I’m in the US what's the best substitute for those British Digestive Biscuits in the base?
Graham crackers are your closest equivalent, providing that crisp, mildly sweet backdrop. Alternatively, if you fancy something richer and darker, crushed Oreo cookies (sans the cream filling) work a treat.
Do I need to worry about tempering the chocolate to get a nice, glossy finish?
If you're using high-quality bar chocolate, gentle tempering helps prevent streaking and bloom; however, if that sounds like too much faff, simply use chocolate melting wafers or stir a teaspoon of coconut oil into your melted chocolate for an easy, guaranteed gloss.
I fancy jazzing them up what are some easy flavour variations?
Go for it! For a citrus lift, add a teaspoon of lime or orange zest to the filling, or for a grown-up treat, substitute the heavy cream with a dash of Baileys or coffee liqueur before chilling and rolling.
Nobake Chocolate Cheesecake Bites Truffles
Ingredients:
Instructions:
Nutrition Facts:
| Calories | 280 calories |
|---|---|
| Fat | 20 g |
| Fiber | 2 g |
