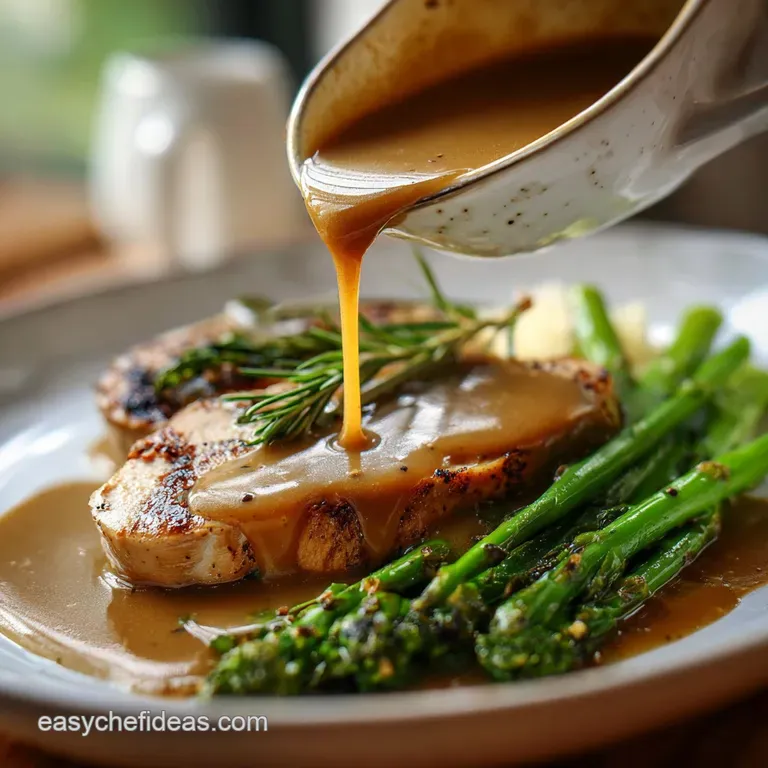
How to Make Brown Gravy from Scratch
- Time: Active 8 minutes, Passive 2 minutes, Total 10 minutes
- Flavor/Texture Hook: Velvety, nutty, and deeply savory
- Perfect for: Weeknight mashed potatoes or elevating Store-Bought rotisserie chicken
- Guide to How to Make Brown Gravy
- Science of the Perfect Pour
- Essential Recipe Quick Facts
- Ingredient Deep Dive
- Core Ingredients and Substitutes
- Necessary Tools for Results
- Simple Step by Step Guide
- Fixing Any Texture Problems
- Adjusting the Recipe Size
- Unique Flavor Profile Twists
- Storing and Reheating Advice
- Best Pairings for Meals
- Kitchen Wisdom and Myths
- Recipe FAQs
- 📝 Recipe Card
Guide to How to Make Brown Gravy
Do you remember the first time you tried to make a sauce and it ended up looking more like grey wallpaper paste than a rich accompaniment? I certainly do. It was a chilly Tuesday night, and I was determined to make a "proper" poutine for my friends.
I thought I could just whisk flour into cold broth and hope for the best. The result was a lumpy, floury disaster that we eventually just laughed over while ordering pizza. That humbling experience was my gateway into the obsession with the perfect roux.
Now, my kitchen smells like a dream whenever I start this process. The moment that butter begins to foam and the flour hits the pan, there is this incredible shift in the air. It starts with the scent of melted cream, then quickly transforms into a toasted, popcorn like aroma that signals something nourishing is on the way.
It is a smell that brings people into the kitchen, asking, "Is it ready yet?" even before the main course is out of the oven.
I want to share this version with you because it is the one I rely on when there are no roast drippings in sight. We often think we need a whole turkey or a prime rib to get that deep mahogany color and complex flavor, but that is simply not true.
By understanding how to toast your starch and layer your seasonings, you can create a sauce that feels like it took hours, even though it only took ten minutes of your time. Let's get into the details so you never have to deal with a lumpy sauce again.
Science of the Perfect Pour
The magic behind this recipe lies in the transformation of simple starches into a complex flavor carrier. When we cook the butter and flour together, we are not just creating a thickener; we are initiating a series of chemical changes that define the final character of your dish.
- Maillard Magic: Toasting the flour in butter creates new flavor compounds that mimic the deep, roasted notes found in seared meat.
- Starch Gelatinization: Heating the flour with liquid causes the starch granules to swell and burst, creating a stable, silky network that thickens the broth.
- Emulsification Stability: The fat in the butter helps to suspend the flavorful broth particles, ensuring the sauce stays smooth rather than separating on the plate.
| Feature | From Scratch (This Recipe) | store-bought Packet |
|---|---|---|
| Flavor Depth | Rich, buttery, authentic | Salty, one dimensional |
| Texture | Silky and customizable | Often thin or gelatinous |
| Ingredients | Simple pantry staples | Preservatives and fillers |
The difference between a mediocre sauce and a great one often comes down to the quality of the base. If you're dealing with pan drippings from a Sunday roast, you might prefer this How to Make Gravy recipe which utilizes those natural fats. However, for a reliable everyday option, the method we are discussing today is unbeatable.
Essential Recipe Quick Facts
Before we start whisking, it helps to see how this fits into your meal planning. This recipe is designed to be fast, but the steps must be followed with intention to get that signature velvety texture.
| Servings | Broth Volume | Butter Weight | Cook Time |
|---|---|---|---|
| 6 People | 475 ml (2 cups) | 60 grams | 8 minutes |
| 12 People | 950 ml (4 cups) | 120 grams | 12 minutes |
| 3 People | 235 ml (1 cup) | 30 grams | 6 minutes |
Chef's Tip: If you want a darker color, continue cooking your flour and butter mixture until it reaches the color of an old penny, but be careful - it can burn in a heartbeat once it reaches that stage.
Ingredient Deep Dive
Understanding the "why" behind each component helps you become a more intuitive cook. We aren't just throwing things in a pot; we are building a foundation of flavor.
| Ingredient | Science Role | Pro Secret |
|---|---|---|
| Unsalted Butter | Fat medium for roux | Use high fat European style for a richer mouthfeel |
| All Purpose Flour | Primary thickening agent | Sift it first to ensure no clumps enter the pan |
| Low Sodium Beef Broth | Flavorful liquid base | Warm it slightly before adding to prevent the roux from seizing |
Core Ingredients and Substitutes
The beauty of a home cooked meal is the ability to adapt. While the official list below is my gold standard, you can certainly pivot based on what is in your pantry.
- 4 tablespoons (60g) unsalted butter: Why this? Provides the fat needed to cook the flour and adds a creamy, nourishing finish.
- Substitute: Beef drippings or high-quality tallow for an even meatier profile.
- 1/4 cup (30g) all purpose flour: Why this? The starch structure that creates the necessary thickness.
- Substitute: Whole wheat flour (adds a nuttier taste) or a 1:1 gluten-free baking blend.
- 2 cups (475ml) low sodium beef broth: Why this? The liquid body of the sauce; low sodium allows you to control the saltiness.
- Substitute: Mushroom broth for a vegetarian friendly umami boost.
- 1 teaspoon Worcestershire sauce: Why this? Adds fermented depth and a hint of acidity to balance the fat.
- Substitute: Soy sauce or tamari for a similar salt and umami kick.
- 1/2 teaspoon onion powder: Why this? Provides a savory baseline without the texture of chopped onions.
- Substitute: Very finely grated fresh onion (squeezed of excess juice).
- 1/4 teaspoon freshly cracked black pepper: Why this? Cuts through the richness with a subtle heat.
- Substitute: White pepper if you want a cleaner look without the black specks.
- 1/4 teaspoon fine sea salt: Why this? Enhances every other flavor in the pan.
- Substitute: Kosher salt (use slightly more as the grains are larger).
Necessary Tools for Results
You don't need a professional kitchen, but a few specific tools make the process of how to make brown gravy much more enjoyable.
- Heavy Bottomed Saucepan: This ensures even heat distribution so your roux doesn't burn in spots. A stainless steel or enameled cast iron pan works best.
- Fine Mesh Whisk: A balloon whisk or a flat "roux whisk" is essential for breaking up flour clumps and keeping the liquid moving.
- Measuring Spoons and Cups: Precision matters when balancing fat and starch.
- Heat Resistant Spatula: Useful for scraping the edges of the pan where the whisk might miss some flour.
Simple step-by-step Guide

Right then, let's get cooking. Focus on the smells and the visual cues at each stage - they will tell you more than a timer ever could.
- Melt the butter. Place the 4 tablespoons of butter in your saucepan over medium heat until it is fully liquid and just beginning to foam.
- Incorporate the flour. Sprinkle the 1/4 cup of flour over the melted butter. Note: Adding it all at once prevents uneven cooking.
- Cook the roux. Whisk the butter and flour constantly for about 3 minutes until the mixture smells nutty and turns a light golden brown.
- Add the seasonings. Stir in the onion powder, black pepper, and sea salt. Note: Toasting the spices for 30 seconds helps release their essential oils.
- Stream in the broth. Slowly pour in the 2 cups of beef broth, whisking vigorously with your other hand. The aroma will shift from toasted flour to a savory meatiness.
- Add the Worcestershire. Stir in the 1 teaspoon of sauce. Note: This is where the color deepens significantly.
- Simmer and thicken. Continue whisking over medium heat for about 5 minutes until the sauce thickens enough to coat the back of a spoon.
- Final taste test. Dip a clean spoon in and check the seasoning. It should taste balanced, savory, and silky.
- Remove from heat. The sauce will continue to thicken slightly as it cools, so don't over reduce it in the pan.
Fixing Any Texture Problems
Even the best of us run into trouble sometimes. The difference between a cook and a chef is knowing how to fix the "oops" moments.
The Dreaded Lumpy Texture
This usually happens if the liquid is added too quickly or if the roux wasn't fully incorporated. If you see lumps forming, don't panic. You can often whisk them out with some elbow grease over low heat. If they persist, simply pour the finished sauce through a fine mesh strainer into a clean bowl.
The Floury Aftertaste
If your sauce tastes like raw flour, it means the roux wasn't cooked long enough before the broth was added. To fix this, you'll need to simmer the sauce on very low heat for an additional 5 to 10 minutes.
In the future, make sure the butter flour mixture smells like toasted nuts before moving to the next step.
Gravy is Too Thin
If you've simmered for five minutes and it still looks like soup, you might have had a heavy hand with the broth. You can continue to simmer it to reduce the water content, or mix a "slurry" of 1 teaspoon cornstarch and 1 tablespoon cold water and whisk it in.
| Problem | Root Cause | Solution |
|---|---|---|
| Too salty | Over reduced broth | Add a splash of water or unsalted stock to balance |
| Too thick | Excessive simmering | Whisk in more broth, 1 tablespoon at a time |
| Oily surface | Sauce separated | Whisk in a teaspoon of warm water to re emulsify |
Common Mistakes Checklist
- ✓ Never add cold flour directly to hot broth (instant lumps).
- ✓ Don't leave the pan unattended; roux can go from golden to burnt in 30 seconds.
- ✓ Avoid using a high sodium broth; the flavors concentrate as the sauce reduces.
- ✓ Use a whisk, not a spoon, to ensure the smoothest possible texture.
- ✓ Ensure the broth is at least room temperature to prevent the butter from clumping.
Adjusting the Recipe Size
Scaling this recipe is straightforward, but you need to be mindful of the surface area of your pan.
- To Halve (3 servings): Use a smaller butter melter or small saucepan. Reduce the simmer time by about 2 minutes since there is less liquid to heat.
- To Double (12 servings): Use a wide skillet or large pot. You might need an extra 2-3 minutes of simmering time. Only increase the salt and pepper to 1.5x the original amount, then taste and adjust at the end to avoid over seasoning.
- For Large Crowds: If you're doubling or tripling, I highly recommend the "whisk and wait" method - add half the liquid, get it smooth, then add the rest.
Unique Flavor Profile Twists
Once you've mastered the basic technique, you can start expressing your own kitchen culture through variations.
The Herbaceous Twist
Stir in a teaspoon of fresh minced thyme or rosemary during the last minute of simmering. This is particularly lovely when serving over roasted poultry or pork chops. The heat from the sauce will gently release the herbal oils without making them bitter.
Creamy Mushroom Variation
Sauté 100g of finely diced cremini mushrooms in the butter before adding the flour. Proceed with the recipe as normal, but add a splash of heavy cream at the very end. It adds a wonderful diversity of texture and a "nourishing" forest like aroma.
Storing and Reheating Advice
If you have leftovers, you are in luck. This sauce stores beautifully and can even taste better the next day as the spices have more time to meld.
- Fridge: Store in an airtight container for up to 4 days. A skin might form on top; this is normal and will whisk back in during reheating.
- Freezer: You can freeze this for up to 3 months. I like to freeze it in silicone muffin liners for perfect individual portions.
- Reheating: Place in a saucepan over low heat. Add a tablespoon of water or broth to loosen it up, as it will naturally thicken in the fridge. Whisk constantly until it reaches a simmer.
- Zero Waste: Never toss the dregs! Use leftover sauce as a base for a quick beef stew or stir it into a shepherd's pie filling to keep the meat moist.
For those big holiday spreads where you need to save time, The Get Ahead homemade recipe is a total lifesaver and follows many of these same storage principles.
Best Pairings for Meals
This sauce is a universal donor in the world of comfort food. It brings a sense of community to the table, turning a few separate ingredients into a cohesive meal.
- The Classic: Poured generously over fluffy mashed potatoes.
- The Comfort: Served alongside a thick slice of meatloaf or Salisbury steak.
- The Unexpected: Use it as a dip for crusty sourdough bread or even as a base for a hot roast beef sandwich.
- The Nourishing: Drizzled over roasted root vegetables like carrots and parsnips to add a savory counterpoint to their natural sweetness.
Decision Shortcut If you want a darker color, cook the roux until it looks like milk chocolate. If you want a thicker sauce, simmer for an extra 3 minutes on low heat. If you want a silkier mouthfeel, whisk in a cold pat of butter at the very end.
Kitchen Wisdom and Myths
There is a lot of noise out there about what makes a "real" sauce. Let's clear some of that up so you can cook with confidence.
One common misconception is that you cannot make a deep brown sauce without meat drippings. While drippings are fantastic, the "brown" in brown gravy actually comes from the toasted flour and the quality of your broth.
By focusing on the Maillard reaction in your roux, you achieve that professional look and taste every single time.
Another myth is that you must use cornstarch for a glossy finish. While cornstarch does provide a high shine look, a well emulsified butter and flour roux provides a much better mouthfeel and a more complex, nourishing flavor profile. Don't sacrifice taste for a bit of shine!
Finally,, some people think you have to whisk for twenty minutes straight. While you do need to stay active during the initial broth addition, once the liquid is incorporated and smooth, you only need to give it a occasional stir to prevent sticking. Cooking should be a joy, not a chore!

Recipe FAQs
What are the ingredients in brown gravy?
The core ingredients are fat, flour, and beef broth. You will need unsalted butter to create the roux, all-purpose flour for thickening, and low-sodium beef broth for the liquid base, plus seasonings like Worcestershire sauce, pepper, and salt.
How to make your own gravy easy?
Melt butter, whisk in flour, and cook until nutty brown for 3 minutes. Slowly stream in warm beef broth while whisking constantly until smooth, then simmer until the sauce coats the back of a spoon.
What can I use if I don't have brown gravy mix?
You can easily make it from scratch using pantry staples. The key is to toast the flour and fat together (the roux) to build the deep color and flavor missing from packets, often enhanced with Worcestershire sauce for umami depth.
Can you make gravy with just flour and water?
No, this will result in a very bland, thin sauce lacking richness. You need fat, typically butter or drippings, to properly cook the flour into a roux and create a stable emulsion; water alone won't build the necessary flavor foundation.
What if my gravy is lumpy?
Strain the sauce through a fine mesh sieve. If whisking vigorously over low heat doesn't release the clumps, passing the mixture through a strainer is the fastest way to achieve a silky texture.
How do I get a very dark brown color without drippings?
Cook your flour and butter roux longer until it reaches a dark amber or peanut butter color. If you enjoyed mastering the sensory doneness cues here, apply them to our How to Cook recipe to nail the browning stages for great flavor depth.
Can I make this vegetarian?
Yes, substitute beef broth with a dark mushroom or vegetable stock. Ensure you use butter or oil for the fat component, and consider adding a splash of soy sauce or Marmite to boost the savory umami flavor you lose from the meat base.
Homemade Brown Gravy In 10 Minutes

Ingredients:
Instructions:
Nutrition Facts:
| Calories | 92 kcal |
|---|---|
| Protein | 1.2 g |
| Fat | 7.8 g |
| Carbs | 4.4 g |
| Fiber | 0.1 g |
| Sugar | 0.4 g |
| Sodium | 195 mg |
