Healthy Baked Chicken Nuggets: Super Crispy, Oven-Made, No Fuss
- The Ultimate Guide to Healthy Baked Chicken Nuggets
- Achieving Maximum Crunch: The Science Behind Our Breading Technique
- Ingredients Needed for Healthy Baked Chicken Nuggets
- How to Bake Perfect, Super Crispy Chicken Nuggets (The Method)
- Troubleshooting and Expert Tips for Perfect Nuggets
- Make Ahead, Storage, and Reheating Baked Chicken Nuggets
- Essential Sides and Homemade Dips for Nuggets Night
- Recipe FAQs
- 📝 Recipe Card
The Ultimate Guide to Healthy Baked Chicken Nuggets
Can we just talk about that moment? You pull these healthy baked chicken nuggets out of the oven, and the aroma of smoky paprika and toasted Panko hits you. That sound that magnificent, crackling sound when you tap one with a fork that’s the sound of victory, my friend.
We are talking truly super crispy, oven chicken nuggets that taste exactly like the ones we loved as kids, maybe even better.
Life is busy, and sometimes you just need a reliable, quick win that makes everyone happy. These healthy homemade chicken nuggets are exactly that lifesaver, ditching the deep fryer entirely without sacrificing texture or flavour.
They are lean, easy on the wallet, and ready in just over an hour (including a critical chilling step, which we will absolutely not skip). Trust me, once you master this recipe, the frozen box version will be dead to you.
So, let’s stop wasting time and dive into the secrets that transform humble chicken breast into the ultimate comfort food powerhouse. I’m going to share all the tricks I’ve learned and the mistakes I’ve made to ensure your next batch of healthy homemade chicken nuggets is perfect, golden, and supremely crunchy.
Achieving Maximum Crunch: The Science Behind Our Breading Technique
Reinventing the Comfort Classic: Baked vs. Deep Fried
The classic nugget is deep fried, meaning it absorbs a ton of oil and feels heavy. We are baking these bad boys, cutting down dramatically on unnecessary fats, but we can't just throw breaded chicken into the oven and hope for the best.
To achieve proper crispness, baking requires strategic preparation and high heat, mimicking the flash cooking that frying provides. This recipe is specifically designed to maximize surface area crisping.
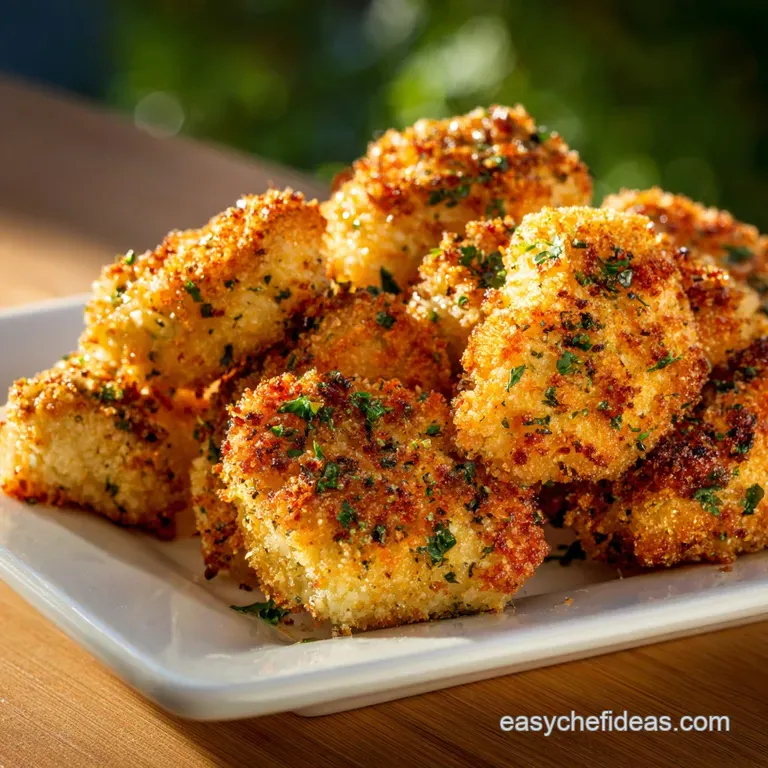
The Secret to Super Crispy, Never Dry Nuggets
It’s a combination of three things: Panko, thorough chilling, and a high oven temperature. Panko is essentially large, airy bread flakes, absorbing less oil and yielding a far superior shatter factor compared to standard breadcrumbs.
The key ingredient is patience; chilling the coated nuggets for 30 minutes prevents the breading from steaming and falling off as soon as it hits the heat.
Nutrition Highlights: Why This Recipe is Better for You
Compared to store-bought, heavily processed options, these homemade baked nuggets are fantastic. We use whole chicken breast, which is lean protein, and our fat comes primarily from a light spritz of heart healthy olive oil, not a vat of vegetable shortening.
This is a genuinely healthy baked chicken nuggets recipe you can feel great about serving your family, including fussy little eaters who usually demand the processed stuff.
The Role of Panko and Parmesan in Crisping
Panko is the star here; its structure provides tiny little pockets that crisp up beautifully in the oven. When we mix in the grated Parmesan cheese and the paprika, we achieve two things: phenomenal flavour and an incredible golden colour.
The cheese actually helps the crust brown faster and provides that satisfying, salty depth that makes these totally addictive.
Preventing the Soggy Bottom: Proper Pan Preparation
There is nothing worse than biting into a wonderfully crisp crust only to find the bottom is wet and steamed. How do we fix this? You absolutely must use a wire rack set over a parchment lined baking sheet.
That rack lifts the healthy oven chicken nuggets off the solid pan surface, allowing the 425°F heat to circulate completely underneath. No air circulation equals guaranteed sogginess, every single time.
The Perfect Internal Temperature for Moist Chicken
Nobody wants dried out, tough chicken nuggets. Because we are using high heat, the nuggets cook quickly, so precision matters. Always aim for an internal temperature of 165°F (74° C) , which is the food safe standard.
Using an instant read thermometer ensures the chicken is tender and juicy inside while the Panko coat remains flawlessly crisp on the outside.
Ingredients Needed for Healthy Baked Chicken Nuggets
| Ingredient | Substitution Tip |
|---|---|
| Chicken Breast | Boneless, skinless turkey breast is a seamless swap. |
| All-Purpose Flour | Use oat flour, rice flour, or a 1:1 gluten-free blend. |
| Panko Breadcrumbs | Use certified gluten-free Panko or finely crushed corn flakes for GF options. |
| Eggs | A milk/buttermilk dip or a flax egg wash (1 tbsp flax meal + 3 tbsp water) works in a pinch, though the egg wash adheres best. |
| Smoked Paprika | Use sweet paprika mixed with a pinch of cayenne for that smoky flavour. |
Choosing the Right Cut: Best Chicken for Nuggets
I prefer boneless, skinless chicken breast for these healthy baked chicken nuggets . Why? It’s incredibly lean and holds its shape well. Thigh meat works too, offering a richer flavour, but remember it has a higher fat content and can sometimes become slightly tougher when cut into small pieces and baked quickly.
Whatever you choose, make sure to trim off any gristle or excess fat first!
Breading Alternatives: gluten-free and Keto Options
If you’re catering to dietary restrictions, this recipe is super flexible. For a fully gluten-free option, simply swap the AP flour and regular Panko for their GF counterparts.
For my low-carb friends, try finely crushed pork rinds mixed with Parmesan and seasonings for a surprisingly crisp, Keto -friendly crust.
Our Signature Seasoning Blend Profile
This blend is simple but punchy: garlic powder, salt, pepper, and crucially, smoked paprika. The paprika adds a depth that screams 'comfort food' and helps provide that beautiful, deep orange gold colour that makes the nuggets look fried. I once tried to skip the paprika, and honestly?
The results looked pale and boring. Don't make my mistake!
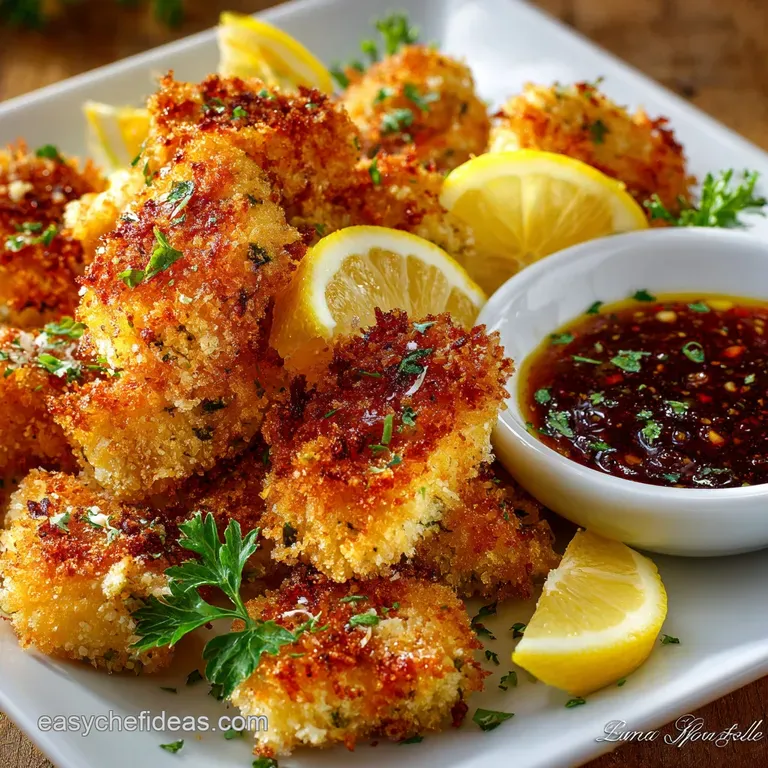
Essential Dipping Sauce Pairings (Preparation Separate)
What's a perfect nugget without the perfect dip? We need tang, spice, and coolness.
- Homemade Ranch (Greek yogurt based for extra health points)
- Classic BBQ Sauce (the smokier, the better)
- Spicy Honey Mustard (my personal favourite)
Chef's Note: If you want a fun, light dinner, serve these alongside some crispy Mini Bell Pepper Turkey Nachos: Healthy, Loaded Low Carb Dinner for the ultimate party platter experience.
How to Bake Perfect, Super Crispy Chicken Nuggets (The Method)
Prepping the Chicken and Cutting Uniform Pieces
Slice your chicken breast into pieces roughly 1.5 inches long. They don't need to be perfect squares, but uniformity is non-negotiable . If you have varied sizes, the small ones will dry out while the large ones are still cooking.
Before seasoning, pat them aggressively dry with paper towels; moisture on the surface is the enemy of adherence.
The Triple Dip Method: Egg Wash and Breading Stations
This is an assembly line, and organization is key. Use three separate shallow dishes: flour, egg wash, then Panko mix. Keep one hand designated the 'wet' hand (for the egg wash) and the other the 'dry' hand (for flour and Panko). This stops your fingers turning into giant, gooey, breaded monstrosities! If you’ve ever tried to coat chicken when it's damp, you know exactly what I mean about the coating falling off it's like trying to get the coating for a Buttermilk Marinated Air Fryer Whole Chicken: Ultra Crispy Recipe to stick when the skin is still wet; it just won't work.
Baking Instructions: Optimal Temperature and Flipping Strategy
We are using a high heat, 425°F (220°C). This shocks the Panko and starts the crisping process immediately. Bake for 9 minutes on one side, then carefully flip every single piece . Bake for another 9– 11 minutes.
Flipping ensures even browning and prevents that base from getting too hard or dark.
Troubleshooting and Expert Tips for Perfect Nuggets
Why Your Breading Is Falling Off (And How to Fix It)
This is usually caused by two things: damp chicken or skipping the chilling stage. Fix one by patting the meat dry before seasoning. Fix the second by always chilling the fully coated nuggets for a minimum of 30 minutes before they go into the hot oven.
This allows the proteins in the egg and the moisture in the flour to form a sticky, cohesive bond with the Panko.
Maximizing Oven Heat for Golden Browning
Preheat your oven for a full 20 minutes before baking. You want that oven scorching hot when the nuggets go in. If you want truly incredible colour, lightly mist the tops of the nuggets with cooking spray or a brush of oil before baking.
This small amount of fat helps transfer heat to the breadcrumbs, accelerating the Maillard reaction and turning them beautifully golden.
Do I Need to Oil the Baking Sheet? Yes, But Sparingly
You don't need to oil the parchment paper itself. Instead, lightly oil or spray the wire rack you set on top of the sheet. This prevents sticking, guarantees that non-soggy bottom, and allows us to use minimal fat overall.
make-ahead, Storage, and Reheating Baked Chicken Nuggets
Freezing Nuggets Raw vs. Cooked (Best Practice)
I strongly recommend freezing these healthy homemade chicken nuggets raw and coated . Arrange the fully breaded nuggets on a sheet pan and freeze them solid (about 2 hours). Once frozen, transfer them to a freezer bag or airtight container.
This preserves the moisture and crisping potential much better than freezing them cooked.
Safe Refrigeration and Shelf Life
Cooked nuggets store perfectly well in an airtight container in the refrigerator for up to 3 or 4 days. If you’re meal prepping for lunchboxes, they are absolutely ideal. Just make sure they cool completely before sealing the container to prevent condensation and sogginess.
The Best Way to Reheat for Maximum Crispness
Microwaves are forbidden they turn perfectly crisp nuggets into rubbery sadness. The best way to regain that intense crunch is by using an air fryer at 375°F (190°C) for 4– 6 minutes, or using your oven at 400°F (200°C) for 8– 10 minutes.
They come out tasting fresh and crunchy, just like the first time.
Essential Sides and Homemade Dips for Nuggets Night
Dips and sides are where you can really make nugget night shine! Since the nuggets are lean and baked, you can afford to indulge a little bit in your side dishes, or keep the health trend going.
- The Comfort Route: We love serving these with a side of creamy comfort. If you want to sneak in some hidden veggies, try my recipe for Cauliflower Mac and Cheese: The Creamiest, Secretly Healthy Upgrade .
- Freshness Factor: A simple mixed green salad with shredded carrots and a sharp lemon dressing cuts through the richness beautifully.
- The Classic Fry: Baked sweet potato wedges dusted with cinnamon and a touch of salt. Yum.

Recipe FAQs
Why did my baked chicken nuggets turn out dry or rubbery?
Dryness usually occurs due to overcooking, especially when using lean chicken breast. Ensure your internal temperature reaches exactly 165°F (74°C) using a reliable meat thermometer, and avoid exceeding that temperature.
Pounding the chicken slightly before breading also helps them cook evenly and retain vital juices, resulting in a much more tender nugget.
How can I guarantee the breading stays super crispy when baking?
The secret lies in proper setup: always use a wire rack placed over a standard baking sheet.
This rack elevates the nuggets, allowing hot air to circulate entirely around them, preventing the bottoms from steaming and becoming soggy, which maximizes the overall crunch.
Can I use boneless, skinless chicken thighs instead of breast meat?
Yes, absolutely! Chicken thighs offer more natural fat, which results in a slightly juicier nugget with a richer flavor profile.
However, be mindful that thighs are denser and might require an extra 2-3 minutes of baking time compared to leaner breast meat to ensure they are fully cooked.
How should I store and reheat leftover baked nuggets?
Store cooled leftovers in an airtight container in the refrigerator for up to four days.
To regain maximum crispiness, reheat them in a toaster oven or standard oven at 350°F (175°C) for 8-10 minutes, as a microwave will make the coating soft.
Can I freeze these nuggets, and should I freeze them before or after baking?
It is best practice to freeze the nuggets after they have been fully baked and completely cooled down.
Flash freeze them individually on a parchment lined sheet pan until solid, then transfer them to a freezer bag or container for up to three months.
How can I adapt this recipe to be completely gluten-free?
To achieve a gluten-free nugget, simply replace the standard breadcrumbs with certified gluten-free alternatives like finely ground rice crisp cereal, almond flour, or gluten-free panko.
Also ensure your initial dredging step uses a gluten-free all-purpose flour blend or cornstarch instead of traditional wheat flour.
What are the best healthy dipping sauces to pair with these baked nuggets?
For healthier options, try a homemade honey mustard made with Greek yogurt for protein, or a lightened-up BBQ sauce based on tomato paste and vinegar.
A simple avocado lime crema also provides a refreshing, creamy, and nutritious pairing that complements the crispy texture beautifully.
Healthy Crispy Baked Chicken Nuggets

Ingredients:
Instructions:
Nutrition Facts:
| Calories | 188 kcal |
|---|---|
| Protein | 26.0 g |
| Fat | 4.5 g |
| Carbs | 8.0 g |
