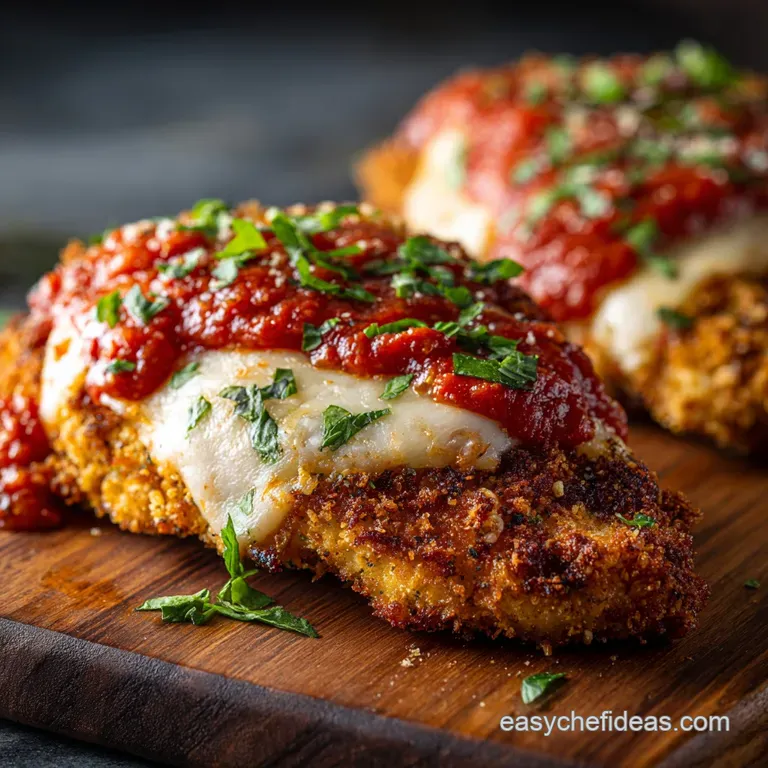
Crisp Cheesy Air Fryer Chicken Parmesan the Weekday Hero

- Ditching the Deep Fryer: Why the Air Fryer Method Wins
- Essential Components for the Perfect Air Fryer Chicken Parmesan
- Step-by-Step: Constructing and Cooking the Cutlets
- Troubleshooting and Technique Tips (Optimizing the Results)
- Serving Suggestions and Future Meal Planning
- Frequently Asked Questions About Air Fryer Chicken Parmesan
- Recipe FAQs
- 📝 Recipe Card
Ditching the Deep Fryer: Why the Air Fryer Method Wins
For decades, the standard way to achieve that quintessential, crunchy coating on Chicken Parmesan involved standing over a sputtering vat of hot oil. That method is messy, labour intensive, and leaves the final dish saturated in far more fat than necessary.
The air fryer has swooped in as the true weeknight hero, fundamentally changing how we approach classic comfort food. By utilizing rapid air circulation, we eliminate the need for deep frying entirely, yielding a beautifully crisp result that is significantly air fryer chicken parmesan healthy .
This efficiency dramatically cuts down on the overall 35-minute time commitment needed for this specific air fryer chicken parmesan recipe compared to traditional frying or even the often slower Baked Chicken Parmesan , allowing this satisfying meal to easily fit into a busy schedule.
The Secret to Supreme Crunch (It’s All About Panko)
The textural integrity of the crust is paramount, and the secret lies in one key ingredient: Panko. Unlike standard fine breadcrumbs, which compact and often turn dense or soggy in low-oil environments, the distinct, flaky structure of air fryer chicken parmesan panko resists moisture absorption.
This unique shape allows the high speed air to circulate and toast every corner, ensuring a lighter, shatteringly crisp exterior. We further enhance this crunch and flavour by incorporating finely grated Parmesan cheese and Italian herbs directly into the Panko mixture.
Comparing Cook Times: Speed vs. Sizzle
While some might argue that deep frying is technically faster, the total process including heating the oil, managing splatter, and lengthy clean-up adds significant time.
Our Air Fryer Chicken Parmesan method requires just 15 minutes of active cooking time, split into two short stages. The focused heat of the appliance means we achieve a deeply satisfying, golden brown finish almost as quickly as deep frying, allowing you to get dinner on the table without delay.
Essential Components for the Perfect Air Fryer Chicken Parmesan
Achieving culinary excellence in this dish relies on precision, starting with the preparation of the primary components before they even touch the breading station.
Choosing the Right Chicken Cutlet Thickness
The foundation of a successful chicken parm is a uniform cutlet. We begin with two large chicken breasts, which should be butterflied horizontally to create four thinner pieces. It is absolutely crucial that these pieces are then pounded to a consistent thickness of about 1/2 inch (1.25 cm).
This not only drastically speeds up the cooking but guarantees that the chicken is tender and cooked through precisely when the exterior crust is finished, preventing uneven doneness.
Mastering the Triple Dredge Stations (Wet and Dry Mixes)
To ensure maximum adhesion and a robust crust, we rely on the classic triple dredge technique, setting up three shallow dishes. The first dish holds the all-purpose flour seasoned with garlic and onion powder, which acts as the initial moisture absorber.
The second dish contains the binding agent: two whisked large eggs combined with a tablespoon of milk. The third and final dish is the Panko mixture where the cutlet receives its final, crucial coating. Proper sequencing and firm pressing during this stage are key to preventing the crust from peeling off later.
Best Marinara Sauces for Topping and Serving
The quality of the marinara sauce matters, as it provides both moisture and flavour during the final melt stage. Aim for a rich, good quality sauce, and critically, slightly pre-heat the cup of sauce before applying it.
Applying a cold sauce to the nearly cooked chicken causes the internal temperature to drop sharply, requiring a longer air fry time and potentially drying out the meat. Pre-warming the sauce ensures the final 2– 3 minutes of cooking are dedicated entirely to bubbling the cheese and bringing the meat safely up to 165°F (74°C).
step-by-step: Constructing and Cooking the Cutlets
The preparation phase is the most active part of this 35-minute meal. Once the four thin, seasoned cutlets are prepared, they move swiftly through the three dredging dishes flour, then egg wash, then pressed firmly into the Parmesan Panko blend.
A non-negotiable step for maximum crispness is the chill: the breaded cutlets must rest for 10– 15 minutes in the refrigerator to allow the coating to fully set. The air frying is executed in two batches at 375°F (190°C).
The initial cook runs for about 10– 11 minutes total (with a flip halfway) until the crust is golden. Only after achieving that perfect crunch are the cutlets topped with warm marinara and low-moisture mozzarella for a final 2 3 minute melt stage, resulting in a perfectly cooked and cheesy Air Fryer Chicken Parmesan .
Related Recipes Worth Trying
- Golden Air Fryer Beef Picadillo Empanadas Crisp Snack Sensation — Ban the deep fryer Get perfectly golden flaky Air Fryer Beef Picadillo Empanadas without the faff Savoury spiced beef filling meets crisp pastryan easy...
- Our Juicy Grilled Chicken Salad with Strawberries and Spinach — This vibrant Grilled Chicken Salad with Strawberries and Spinach is a delicious summer stunner Featuring juicy chicken ripe berries and a tangy dressing...
- Air Fryer Chicken Breast The Juicy Foolproof Weeknight Recipe — Stop making chicken chalk This definitive Air Fryer Chicken Breast recipe guarantees perfectly juicy boneless skinless chicken every time Quick healthy and...
Troubleshooting and Technique Tips (Optimizing the Results)
These crucial tips address common pitfalls and ensure your Air Fryer Chicken Parmesan reaches its highest potential for crispness and flavour.
Pounding the Chicken for Even Cooking
If your cutlets are thicker on one end, they will cook unevenly. Utilize a meat tenderizer or a rolling pin to ensure every part of the chicken is about 1/2 inch thick before seasoning. This deliberate consistency is fundamental to achieving a tender interior without overcooking the edges.
Achieving Maximum Adhesion During Breading
Success here hinges on the "dry hand, wet hand" rule during the triple dredge process. Use one hand solely for the dry flour and Panko stages, and the other hand only for the wet egg wash. This prevents the formation of sticky clumps on your fingers and ensures the Panko adheres evenly and robustly.
Remember the 10-15 minute refrigeration period; it is the most effective way to lock that coating onto the chicken surface.
The Initial Air Fryer Cook: Locking in Crispness
Before the cutlets enter the preheated 375°F (190°C) basket, they must be thoroughly coated with oil spray. Do not use a light mist; use a generous, even coating of canola or olive oil spray on both sides. This added fat is what interacts with the circulating air to generate the golden, fried like surface.
Cook for 6 minutes, flip, re-spray the second side, and finish for 4– 5 minutes before adding toppings.
The Critical Cheese Melt (Adding the Sauce and Mozzarella)
Once the chicken is nearly done (around 160°F / 71°C), remove the basket and perform the topping quickly. Spoon the pre-warmed marinara sauce primarily over the center of the cutlet, consciously avoiding the crisp, exposed edges, which should remain crunchy.
Layer with the low-moisture mozzarella slices or shreds and return the chicken immediately to the air fryer for the brief final melt.
Preventing the Dreaded Soggy Bottom
The number one cause of sogginess is steam trapped by overcrowding. You must cook the four cutlets in two separate batches, giving the hot air ample space to circulate around each piece.
On top of that,, once finished, transfer the Air Fryer Chicken Parmesan directly onto a wire rack to rest for a minute or two before serving. This allows any residual moisture to evaporate, preserving the hard earned crunch.
Safely Monitoring Internal Chicken Temperature
While the golden exterior looks appealing, the only reliable measure of doneness is an instant read meat thermometer. Insert the thermometer into the thickest part of the cutlet before adding the sauce, ensuring it registers 160°F (71°C).
Once topped and melted, the final reading should confirm a minimum safe temperature of 165°F (74°C).
Serving Suggestions and Future Meal Planning
This Air Fryer Chicken Parmesan is hearty and comforting, making it a spectacular standalone dish, but it truly shines when paired thoughtfully. The classic serving method involves placing the cutlets over a generous portion of spaghetti or linguine tossed lightly with additional warm marinara sauce.
For those aiming for a lighter or low-carb meal, the dish pairs wonderfully with steamed zucchini noodles (zoodles) or a side of simply roasted broccoli. The richness of the cheese also benefits from a fresh, acidic counterpoint, such as a peppery arugula salad dressed simply with olive oil and lemon juice.
When considering future meals, note that preparing the cutlets ahead of time and storing them chilled (Phase 1, Step 4) means you are only 15 minutes away from a hot, crispy meal.
Frequently Asked Questions About Air Fryer Chicken Parmesan
Creative Side Dishes to Complement Chicken Parm
To keep the menu balanced, look beyond traditional pasta. A refreshing side like a light Arugula salad, dressed only with a vinaigrette, offers a clean, bright contrast to the heavy cheese and sauce.
For a more robust side that maintains the air fryer chicken parmesan low carb profile, consider serving garlic sautéed green beans or asparagus.
Storing Leftovers and Reheating for Maximum Crispness
Leftover cutlets should be stored in an airtight container in the refrigerator for up to three days. To restore the golden crunch of your Air Fryer Chicken Parmesan , you must reheat it using dry heat.
Place the chicken back in the air fryer at 350°F (175°C) for 5– 7 minutes, or use a conventional oven. Avoid the microwave at all costs, as it will inevitably result in soggy breading and rubbery meat.
Dietary Twists: gluten-free and Low-Carb Variations
If you need a low-carb alternative, the air fryer chicken parmesan no breading option works well by replacing the Panko with a mixture of ground pork rinds and Parmesan cheese.
For those sensitive to egg, a useful air fryer chicken parmesan no egg substitution involves using buttermilk or a heavy cream mixture for the wet station. While chicken breasts are ideal, you can easily use boneless air fryer chicken parmesan thighs ; they are generally more forgiving but require an extra 2– 3 minutes of cook time to reach 165°F (74°C).
If you are working with air fryer chicken parmesan from frozen pre-cooked portions, reduce the oven temperature slightly to 350°F (175°C) and add about 5- 7 minutes to the total cooking time.
How Long Does Prep Take (Time Estimation)?
While the total time from start to finish is a quick 35 minutes, the active preparation phase pounding the chicken, seasoning, setting up the triple dredge, and fully coating the four cutlets requires approximately 20 minutes.
This essential 20 minutes also incorporates the chef recommended 10 15 minute chilling period, ensuring that when the chicken enters the air fryer, the coating is perfectly set for ultimate success.

Recipe FAQs
Why does my breading sometimes peel off, and how do I guarantee a proper crunch on the cutlets?
The secret weapon here is patience a quick stint in the fridge after breading, like waiting for a proper cuppa to cool! Chilling the raw, breaded cutlets for 10 15 minutes sets the coating, dramatically improving its adhesion during cooking.
Crucially, always use Panko breadcrumbs for maximum surface area and don't be shy with the oil spray before cooking; the coating needs that fat to achieve a brilliant, deep golden crisp.
I'm planning ahead for a busy evening. Can I prepare the Air Fryer Chicken Parmesan cutlets the day before?
Absolutely, prepping ahead is a true weekday hero move! You can pound and fully bread the raw cutlets, then keep them wrapped loosely in the fridge overnight. When you’re ready to cook, proceed directly to the air fryer step (Phase 2).
However, only add the marinara sauce and mozzarella during the final 5 minutes of cooking to ensure the breading stays wonderfully crisp.
I’ve only got huge chicken breasts; do I have to pound them thin?
Oh, you definitely should! Pounding them to a uniform half inch thickness isn't just about speed; it ensures the chicken cooks evenly and quickly at the same rate as the breading, preventing a burnt crust and a raw middle a culinary disaster we must avoid.
It’s a crucial step for achieving that perfectly safe internal temperature (165°F / 74°C) reliably throughout the cutlet.
I fancy a change from the classic. Are there any easy variations for this Air Fryer Chicken Parmesan?
Yes, loads of fun variations are available once you’ve nailed the basic technique! Try swapping the mozzarella for a sharper cheese like Provolone or even thinly sliced smoked Gouda for a richer profile.
For a lovely, herbaceous kick, use a thin smear of pesto instead of marinara sauce, or mix a pinch of chilli flakes into your sauce for a spicy Calabrian twist.
What's the best way to reheat leftover chicken parm without it going rubbery?
The air fryer truly shines here; it’s miles better than a microwave for leftovers. Set your air fryer to a lower temperature, around 325°F (160°C), and warm the leftover cutlets for about 5 to 7 minutes.
This gentle heat warms the chicken through while perfectly re-crisping the breading, avoiding the sad fate of a soggy or rubbery reheat.
Crispy Air Fryer Chicken Parm In 35 Mins
Ingredients:
Instructions:
Nutrition Facts:
| Calories | 2188 kcal |
|---|---|
| Protein | 47.4 g |
| Fat | 72.3 g |
| Carbs | 91.5 g |
| Fiber | 7.4 g |
| Sodium | 1924 mg |
