Velvety Cinnamon Roll Icing Recipe
- Time: Active 5 minutes, Passive 0 minutes, Total 5 minutes
- Flavor/Texture Hook: Velvety, tangy, and luxuriously thick
- Perfect for: Holiday brunches, weekend baking, or gifting to neighbors
- Mastering the velvety cinnamon roll icing recipe
- The Secret to the Satin Finish
- Core recipe specs and timing
- The seasonal pantry essentials
- Tools for a silky finish
- Whisking the clouds together
- Fixing common texture hurdles
- Creative seasonal flavor variations
- Scaling for crowds or couples
- Debunking common icing myths
- Storing and saving every drop
- Plating for visual impact
- Recipe FAQs
- 📝 Recipe Card
Mastering the velvety cinnamon roll icing recipe
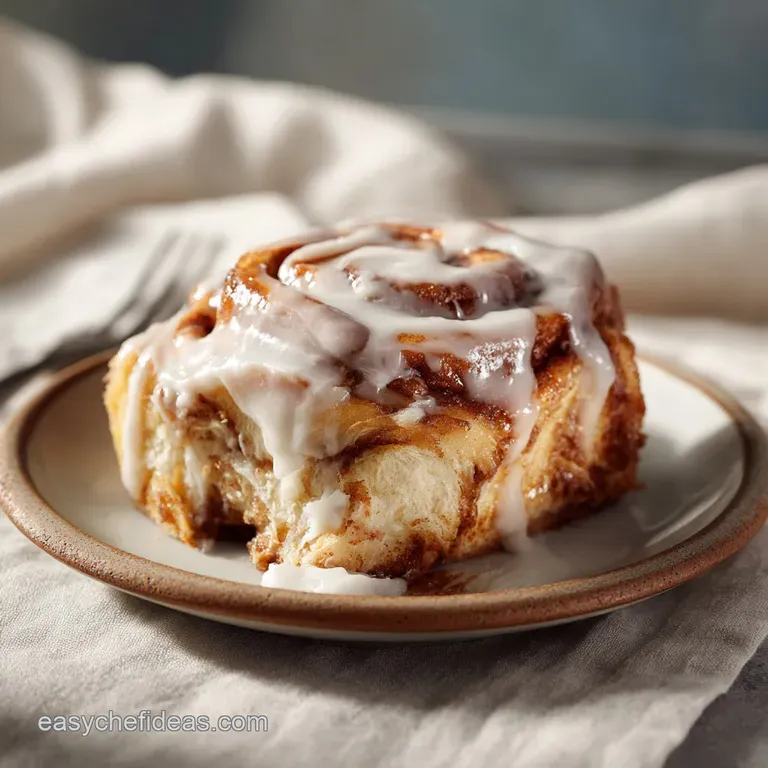
Picture this: it is a slow Sunday morning, and the house smells like toasted sugar and spicy yeast. You have just pulled a tray of golden buns from the oven, and they are doing that soft, huffing steam thing. But then comes the moment that actually defines the bake.
You take a spatula, scoop up a heavy glob of white frosting, and watch it hit the warm dough. It does not just run off like water. It grips the swirls, softening slightly at the edges while staying thick and pillowy in the center.
I remember my first attempt at a homemade topping. I was impatient, used cold butter, and ended up with something that looked like lumpy cottage cheese. It was a disaster. I tried to fix it by adding more sugar, then more milk, and eventually, I had a bowl of sweet soup that soaked into the rolls and made them soggy.
Since then, I have obsessively tested ratios to find that "just right" consistency that you see in high end bakeries.
We are going for that iconic, thick coverage that makes every bite feel like a treat. This is not just a sugary glaze. It is a structured, creamy finish that balances the heavy spices of the cinnamon. Whether you are topping a batch of my The Overnight Sourdough recipe or a quick store-bought hack, this is the element that stops people in their tracks.
The Secret to the Satin Finish
Lactic Acid Balance: The cream cheese provides a sharp acidity that cuts through the cloying sweetness of the powdered sugar, preventing "sugar fatigue."
Emulsion Stability: Beating the room temperature fats together before adding liquid creates a stable fat in-water emulsion that stays glossy and resists weeping.
Sugar Suspension: Sifting the powdered sugar ensures the tiny particles distribute evenly without clumping around the moisture in the butter.
| Method | Prep Time | Texture Result | Best For |
|---|---|---|---|
| Classic Cream Cheese | 5 minutes | Velvety and thick | Traditional bakery style |
| Fast Milk Glaze | 2 minutes | Translucent and thin | Quick breakfast snacks |
| Whipped Frosting | 8 minutes | Airy and mousse like | Dessert style rolls |
Right then, let's talk about the actual ingredients. You probably have most of this in your kitchen already, but the quality of your butter and the temperature of your cream cheese will make or break the final texture. If you are looking for a fruitier vibe for a different bake, you might see similar flavor balancing in my Cinnamon Apple Crisp recipe.
Core recipe specs and timing
| Ingredient | Science Role | Pro Secret |
|---|---|---|
| 4 oz Cream Cheese | Structural base | Use full fat brick style for the stiffest peaks and richest mouthfeel. |
| 1/4 cup Butter | Flavor carrier | Salted butter can be used, but skip the extra pinch of sea salt if you do. |
| 1.5 cups Powdered Sugar | Bulk and sweetness | Sift twice if your kitchen is humid to prevent those tiny white lumps. |
| 1 tsp Vanilla Extract | Aromatic depth | Use vanilla bean paste if you want those beautiful little black specks. |
When you are looking at these specs, remember that the environment matters. On a hot day, your icing will naturally be a bit runnier. On a cold morning, it might feel like cold clay.
The 2 tablespoons of whole milk in the recipe are your "adjustment knob." I always start with one tablespoon, whisk it through, and then decide if I need that second splash.
Chef's Tip: Freeze your butter for exactly 10 minutes before you start if your kitchen is very warm. This keeps the fats from becoming oily during the high speed whipping process.
The seasonal pantry essentials
For this cinnamon roll icing recipe, we are using specific amounts to ensure it covers exactly 12 large rolls. If you are making a smaller batch, you can halve this easily, but honestly, having extra in the fridge is never a bad thing. It is basically a fruit dip if you get desperate.
- 4 oz cream cheese: Full fat, brick style. Why this? Tub style cream cheese has more water and will make your icing runny. (Substitute: Mascarpone for a milder, creamier taste)
- 1/4 cup unsalted butter: Softened to room temperature. Why this? This allows for perfect aeration during the creaming stage. (Substitute: Vegan butter sticks for a dairy-free version)
- 1.5 cups powdered sugar: Sifted. Why this? Removes lumps that a whisk can't break. (Substitute: Cornstarch free powdered sugar for a cleaner finish)
- 1 tsp vanilla extract: high-quality. Why this? This provides the classic "bakery" aroma. (Substitute: Maple extract for an autumnal twist)
- 1/8 tsp fine sea salt: Just a pinch. Why this? It amplifies the vanilla and tames the sugar. (Substitute: Table salt, but use half the amount)
- 2 tbsp whole milk: Cold or room temp. Why this? The liquid that bridges the gap between paste and pourable icing. (Substitute: Heavy cream for a more decadent, ganache like texture)
| Original Ingredient | Substitute | Why It Works |
|---|---|---|
| Whole Milk (2 tbsp) | Heavy Cream (2 tbsp) | Higher fat content creates a thicker, richer coating. Note: Makes it harder to drizzle. |
| Vanilla Extract | Bourbon | Adds a smoky, woodsy depth that pairs well with dark cinnamon. |
| Powdered Sugar | Monkfruit Powder | Provides sweetness without the glycemic spike. Note: Can leave a slight cooling aftertaste. |
If you are out of cream cheese entirely, you can lean into a more traditional glaze, though you will lose that iconic tang. For those who love a bit of a crunch with their cinnamon, try drizzling this over my Homemade Brown Sugar recipe tarts for a fun weekend project.
Tools for a silky finish
You don't need a massive stand mixer for this, though it does help if you are doubling the batch. A simple handheld electric mixer is usually my go to because it gives me more control over the bowl.
I like to use a stainless steel bowl because it stays cool and helps the butter maintain its structure while I am beating it.
If you don't have a mixer, a sturdy balloon whisk and some serious elbow grease will work. Just make sure your fats are incredibly soft almost to the point of being greasy otherwise, you will never get the lumps out. I also recommend a small offset spatula for the actual application.
It lets you swirl the icing into the crevices of the roll without deflating the dough.
Whisking the clouds together

- Prep the fats. Place 4 oz cream cheese and 1/4 cup butter in a medium bowl. Note: Both must be soft to avoid a grainy texture.
- Cream the base. Beat the butter and cream cheese together on medium high until the mixture looks pale and fluffy. This usually takes about 2 minutes.
- Sift the sugar. Gradually add 1.5 cups powdered sugar to the bowl. Note: Adding it all at once will result in a sugar cloud in your face.
- Incorporate slowly. Start the mixer on the lowest setting until the sugar is mostly dampened by the fats.
- Add aromatics. Pour in 1 tsp vanilla extract and 1/8 tsp fine sea salt.
- Drizzle the milk. Add 1 tbsp whole milk and beat on high until the icing is smooth and glossy.
- Check consistency. If the icing is too thick to spread, add the remaining 1 tbsp milk. Note: Stop once it reaches the texture of thick Greek yogurt.
- Final whip. Beat for one final minute until the volume has slightly increased.
- Apply to rolls. Spread the icing over warm (not hot) rolls until it begins to slightly melt into the swirls.
- Set. Let the rolls sit for 5 minutes until the icing develops a slight skin on top but remains soft underneath.
| Premium Choice | Budget Alternative | Flavor Impact | Savings |
|---|---|---|---|
| Real Vanilla Bean | Vanilla Extract | Massive aromatic boost | Save $4.00 |
| Organic Cultured Butter | Store Brand Butter | Slightly more tang | Save $2.50 |
| Brand Name Cream Cheese | Generic Brick | Generic can be softer | Save $1.50 |
Fixing common texture hurdles
One mistake I once made was icing the rolls the second they came out of the oven. The heat was so intense that the butter in the icing split, leaving a greasy, clear film on top and a puddle of sugar at the bottom. It was devastating. Always wait about 5 to 10 minutes.
You want the roll to be warm enough to encourage the icing to settle, but not so hot that it destroys the emulsion.
Why Your Icing is Lumpy
If you see tiny white specks, your cream cheese was likely too cold. When cold fats hit the sugar, they seize up into little pearls that no amount of whisking can fully smooth out. If this happens, you can try microwaving the bowl for exactly 5 seconds no more and whisking again.
The tiny bit of heat can sometimes help the fats integrate.
Why the Icing is Too Runny
This usually happens if you add the milk too early or if you used tub style cream cheese. Liquid measurements are tricky. If it's too thin, don't just keep adding sugar, or it will become sickly sweet. Instead, try adding another tablespoon of softened butter.
The fat will help thicken it without changing the flavor profile too much.
| Problem | Root Cause | Solution |
|---|---|---|
| Gritty Texture | Sugar wasn't sifted or mixed long enough | Beat for an extra 2 minutes on high speed. |
| Yellowish Color | Too much butter or low quality vanilla | Add a tiny drop of purple food coloring (toning) or use clear vanilla. |
| Separating | Rolls were too hot | Let the rolls cool to 150°F before applying the icing. |
Common Mistakes Checklist
- ✓ Ensure cream cheese is at room temperature for at least 2 hours.
- ✓ Sift the powdered sugar to remove all lumps before it hits the bowl.
- ✓ Use the "paddle" attachment if using a stand mixer to avoid over aerating.
- ✓ Add milk one teaspoon at a time if you are unsure of the final thickness.
- ✓ Let the rolls "breathe" for 10 minutes post bake before frosting.
Creative seasonal flavor variations
This cinnamon roll icing recipe is a fantastic canvas. During the autumn months, I love to swap the vanilla for a bit of maple syrup and a pinch of nutmeg. It makes the whole house smell like a forest.
If you are serving these in the summer, try adding a tablespoon of fresh lemon zest and replacing the milk with lemon juice. The brightness is incredible against the heavy dough.
For a coffee shop vibe, you can dissolve a teaspoon of espresso powder into the milk before adding it to the icing. This "Dirty Chai" style icing is a game changer for those who find traditional recipes a bit too sweet. You might even find it works beautifully on my How to Bake recipe for a quick breakfast bread.
- The Nutty Roll
- Fold in 1/4 cup of toasted, crushed pecans at the very end.
- The Boozy Brunch
- Replace the milk with Irish Cream or Bourbon.
- The Chocolate Swirl
- Sift in 2 tablespoons of cocoa powder with the sugar.
Scaling for crowds or couples
Scaling this up is a breeze. If you are doing a double batch (24 rolls), you can simply double everything. However, I suggest only using 1.5x the salt and vanilla at first, then tasting. Sometimes aromatics can become a bit overwhelming when doubled perfectly.
If you are scaling down for just 4 or 6 rolls, it can be hard to get the mixer to catch such a small amount of cream cheese. In that case, use a small bowl and a fork to cream the fats first.
You will need to beat 1 egg if you are scaling a dough recipe, but for this icing, just use half of the measurements provided in the schema.
Debunking common icing myths
Many people think you need to use "special" powdered sugar for a professional look. That's a myth. Standard store brand powdered sugar is fine as long as you sift it. The "fancy" stuff often just has more cornstarch, which can actually make the icing taste a bit chalky if you use too much.
Another myth is that you can't freeze cream cheese icing. You absolutely can. While the texture might change slightly if you eat it plain, once it's spread on a roll and warmed up, you won't notice the difference. The fat content is high enough to protect the structure from ice crystals.
Storing and saving every drop
If you have leftovers, put them in an airtight glass jar. This icing will pick up the "fridge smell" very quickly because of the high fat content in the butter and cheese. It stays fresh for about 5 days. When you are ready to use it again, let it sit on the counter for 30 minutes.
Do not microwave it to soften it, or you will end up with a yellow puddle. Just a quick stir with a spoon will bring back that velvety fluffiness.
For zero waste, if you have just a few tablespoons left, use it as a filling for crepes or spread it on a piece of toasted brioche. I have even used a dollop in my morning oatmeal when I was feeling particularly decadent.
Plating for visual impact
Now, this is where my love for photography kicks in. How you put the icing on the roll changes the entire vibe of the meal. I like to think of it in three levels.
Level 1: The Rustic Smear
This is for those cozy mornings where you just want to eat. Use a butter knife and just glob it on. Let it be messy. The uneven peaks and valleys catch the light beautifully in photos and give that "homemade with love" feel.
It is simple, honest, and allows the brown sugar filling of the rolls to peek through the white clouds.
Level 2: The Polished Drizzle
Put your icing into a piping bag (or a Ziploc with the corner snipped off). Pipe the icing in a tight zig zag pattern across the entire tray. This looks very "bakery chic" and ensures everyone gets the exact same amount of icing. It is great for brunch parties where you want the tray to look uniform and clean.
Level 3: The Restaurant Swirl
Wait for the rolls to cool completely. Pipe a large, circular mound of icing right in the center of the roll, then use the back of a spoon to create a deep swirl, like a whirlpool. Garnish with a tiny sprig of mint or a dusting of fresh cinnamon.
This creates a high contrast look that is perfect for seasonal photography.
| Plating Level | Tool Needed | Visual Vibe |
|---|---|---|
| Simple | Butter Knife | Homey / Cozy |
| Polished | Piping Bag | Professional / Clean |
| Restaurant | Offset Spatula | Artistic / High End |
The way the light hits the glossy surface of the icing is what makes it look mouthwatering. If you are taking photos, try to capture the icing while it is still slightly "wet" looking. Once it sets and the skin forms, it loses some of that photographic luster.
Whether you are serving these on a vintage wooden board or a modern white platter, the contrast between the dark, spicy roll and the bright, velvety icing is always a winner. It truly is the crowning glory of the bake. Enjoy every creamy, tangy bite!

Recipe FAQs
What is the icing on cinnamon rolls traditionally made of?
It is primarily made of powdered sugar, butter, and cream cheese. This combination creates the signature thick, tangy, and sweet frosting that defines a classic bakery style cinnamon roll.
What are the three main ingredients required for a rich cinnamon roll frosting?
Powdered sugar, cream cheese, and butter are the core three components. The fat ratio from the butter and cheese provides structure, while the sugar provides the bulk of the sweetness.
What ingredients create the signature Cinnabon style frosting?
Cinnabon frosting relies heavily on cream cheese, butter, and vanilla. It is known for being exceptionally thick, slightly tangy, and very rich, achieved by using high-quality, room temperature fats.
Is buttercream or cream cheese frosting inherently better for cinnamon rolls?
Cream cheese frosting is generally considered superior for traditional cinnamon rolls. The tanginess of the cream cheese cuts through the richness of the sweet dough, balancing the flavor profile far better than plain buttercream.
How do I achieve a thick, non-runny consistency when making my icing?
Start with softened but cool fats and sparingly add milk or liquid. Over beating the fats slightly before adding sugar also helps incorporate air, leading to a fluffier, more structured final product, much like the stable emulsion we aim for when mastering flavor balancing in our Hot Toddy Recipe.
What is the role of salt in an otherwise sweet cinnamon roll icing recipe?
Salt amplifies the other flavors and prevents the frosting from tasting flatly sweet. It acts as a critical flavor contrast, similar to how a pinch of salt balances sweetness when preparing desserts like our How to Make recipe for pumpkin cheesecake balls.
How long can I store homemade cinnamon roll icing once it is prepared?
Store the icing airtight in the refrigerator for up to 5 days. To revive it, allow it to sit on the counter for about 30 minutes to soften, then stir vigorously to restore its creamy texture.
Creamy Cinnamon Roll Icing

Ingredients:
Instructions:
Nutrition Facts:
| Calories | 127 kcal |
|---|---|
| Protein | 0.7 g |
| Fat | 7.1 g |
| Carbs | 15.8 g |
| Fiber | 0 g |
| Sugar | 15.2 g |
| Sodium | 62 mg |
