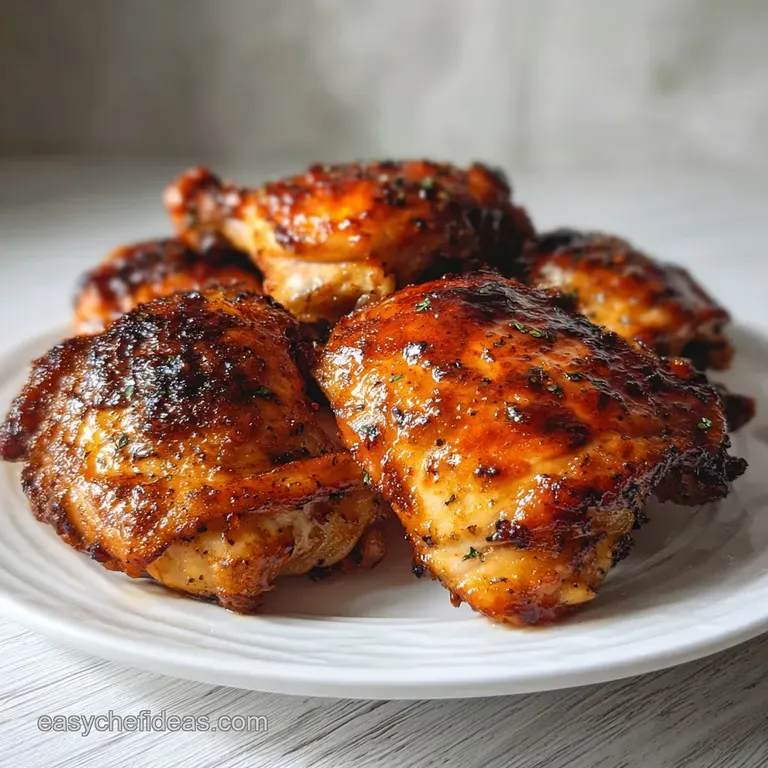
Chicken Thighs Oven Bbq: Sticky Caramelized Glaze
- Time: Active 15 minutes, Passive 35 minutes, Total 50 minutes
- Flavor/Texture Hook: Shatter crisp skin meets a velvety, mahogany BBQ glaze
- Perfect for: Nourishing Sunday family dinners or high protein meal prep
- Mastering These Chicken Thighs Oven BBQ
- The Science of High Heat Roasting
- Understanding Key Recipe Performance Specs
- Selecting Nourishing Components and Substitutes
- Essential Tools for Perfect Results
- Precise Oven Roasting Step Sequence
- Preventing Kitchen Mishaps and Disasters
- Adjusting Portions for Larger Crowds
- Exploring Global Flavor Profile Variations
- Debunking Common Poultry Roasting Myths
- Guidelines for Storing and Leftovers
- Best Ways to Serve and Enjoy
- High in Sodium
- Recipe FAQs
- 📝 Recipe Card
Mastering These Chicken Thighs Oven BBQ
The first time I pulled a tray of these out of the oven, the aroma hit me before I even opened the door. It wasn't just the smell of roasting meat; it was the intoxicating scent of smoked paprika and caramelized sugars mingling with the sharp tang of apple cider vinegar.
I remember watching the fat bubble and sizzle around the edges of the pan, turning the skin into a golden, crackling landscape that looked like it belonged in a professional smokehouse.
I used to think that real BBQ was impossible without a backyard rig and eight hours of patience. I struggled with rubbery skin and meat that was either bone dry or swimming in a watery sauce.
But after a few experiments with temperature and timing, I discovered that the secret lies in the 400 degree oven and a balanced dry rub. This dish has become a staple in my home because it nourishes the soul and brings that sense of community and culture to the table, even on a busy Tuesday night.
We often talk about food as fuel, but this is about more than that. It's about the diversity of flavors we can create with just a few pantry staples. When you bite into that first piece and hear the skin shatter, followed by the tender, juicy meat inside, you'll understand why I'm so obsessed.
It’s a reliable way to get that deep, smoky satisfaction without any of the fuss. Let's get into how you can recreate this in your own kitchen.
The Science of High Heat Roasting
The Maillard Reaction: At 400 degrees, the proteins and sugars on the skin undergo a chemical transformation that creates hundreds of different flavor compounds and that characteristic mahogany crust.
Collagen Breakdown: Chicken thighs are rich in connective tissue which, when cooked to an internal temperature of 165°F, transforms into silky gelatin, ensuring the meat stays incredibly moist.
Lipid Rendering: The high heat causes the subcutaneous fat to liquefy and escape, essentially frying the skin from the underside to create a brittle, crispy texture rather than a flabby one.
| Thickness | Internal Temp | Rest Time | Visual Cue |
|---|---|---|---|
| Standard (1.5 inch) | 165°F | 5 mins | Juices run clear when pierced |
| Thick (2 inch) | 165°F | 8 mins | Meat pulls away from the bone |
| Thin/Small | 160°F | 5 mins | Skin is taut and dark amber |
Carryover cooking will bring it to the safe 165°F mark.
Understanding Key Recipe Performance Specs
Achieving the perfect chicken thighs oven bbq requires a balance of thermal precision and ingredient harmony. Unlike leaner cuts, thighs thrive under intense heat because the fat protects the muscle fibers from seizing up and becoming tough.
This recipe is designed to maximize that relationship between the high heat and the sugar vinegar balance of the glaze.
| Ingredient | Science Role | Pro Secret |
|---|---|---|
| Bone in Thighs | Thermal Conductor | The bone acts as a heat sink, cooking the meat evenly from the inside out. |
| Smoked Paprika | Flavor Foundation | Provides the "wood fired" aroma without the need for actual combustion or charcoal. |
| Apple Cider Vinegar | pH Balancer | Breaks down surface proteins slightly to help the dry rub adhere and penetrate. |
| Avocado Oil | High Smoke Point | Prevents the spices from burning before the chicken fat has a chance to render. |
If you are looking for a different profile but love the reliability of the oven, you might want to try this How to Bake recipe which focuses on a more herb forward comfort style. Both methods rely on the same fundamental principles of heat management to ensure your protein stays succulent.
Selecting Nourishing Components and Substitutes
To build a truly diverse flavor profile, we start with high-quality spices. The goal is to nourish our bodies with real ingredients while celebrating the bold, smoky culture of BBQ.
- 2 lbs bone in, skin on chicken thighs: Why this? The skin provides essential fats and the "crunch" factor for texture.
- Substitute: Boneless skinless thighs (Note: Reduce cook time by 10 mins; expect less "crunch").
- 1 tbsp avocado oil: Why this? Neutral flavor with a high smoke point (520°F) to prevent acrid smoke.
- Substitute: Ghee or light olive oil.
- 1 tbsp smoked paprika: Why this? This is the primary driver of the "BBQ" smoky aroma.
- Substitute: Sweet paprika mixed with a pinch of cumin.
- 1/2 cup low sugar BBQ sauce: Why this? Keeps the glycemic impact lower while providing the necessary tackiness.
- Substitute: Regular BBQ sauce (Note: Will caramelize and burn faster due to higher sugar).
- 1 tbsp apple cider vinegar: Why this? Adds a brightness that cuts through the richness of the dark meat.
- Substitute: White wine vinegar or lemon juice.
- 1 tsp liquid smoke: Why this? Concentrates the outdoor flavor profile into a single, potent teaspoon.
- Substitute: Smoked sea salt (omit regular salt if using this).
Essential Tools for Perfect Results
You don't need a professional kitchen, but a few specific tools will make your life much easier. I always reach for a heavy rimmed baking sheet or a cast iron skillet. These materials hold heat exceptionally well, which is vital for getting that underside of the thigh to cook through without steaming in its own juices.
A wire cooling rack set inside your baking sheet is another trick I've learned. It allows the hot air to circulate 360 degrees around the meat. If you place the chicken directly on a flat pan, the bottom often ends up soggy.
By elevating it, you ensure that every square inch of that skin gets the chance to crisp up beautifully.
Finally,, never underestimate the power of an instant read thermometer. Guessing the doneness of bone in poultry is a recipe for disappointment. Since we are aiming for that 165°F sweet spot, having a digital tool takes the anxiety out of the process and ensures you never serve undercooked or over dry meat to your community.
Precise Oven Roasting Step Sequence
- Prep the poultry. Pat the 2 lbs chicken thighs completely dry with paper towels. Note: Moisture is the enemy of crispiness; any water left on the skin will create steam.
- Apply the binder. Coat the pieces evenly with 1 tbsp avocado oil.
- Mix the rub. Combine the smoked paprika, garlic powder, onion powder, chili powder, sea salt, and black pepper in a small bowl.
- Season thoroughly. Sprinkle the dry rub over both sides of the meat, pressing it gently into the skin.
- Preheat and position. Set your oven to 400 degrees and place the meat on a rack lined tray, skin side up.
- Initial roast. Bake for 25 minutes until the skin looks tight and the fat is visibly sizzling.
- Whisk the glaze. Mix the BBQ sauce, apple cider vinegar, Dijon mustard, and liquid smoke until velvety.
- First glaze. Brush a thin layer of sauce onto each piece. Note: Applying sauce too early will cause the sugars to burn before the meat is cooked.
- Final blast. Roast for another 10 minutes until the sauce is bubbly and dark amber.
- Rest period. Let the tray sit for 5 minutes before serving to allow the juices to redistribute.
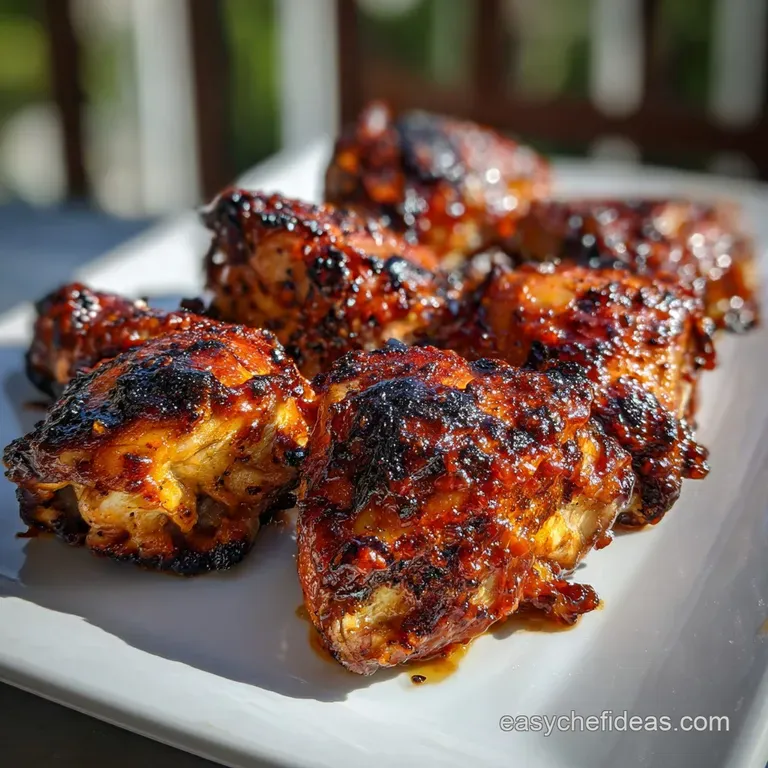
Chef's Tip: For an even deeper color, turn on the broiler for the last 90 seconds. Keep a close eye on it, as the transition from "caramelized" to "charred" happens in a heartbeat. You are looking for those tiny black "flavor freckles" on the edges.
Preventing Kitchen Mishaps and Disasters
The biggest heartbreak in the kitchen is spending time on a dish only to have it come out with rubbery skin or a scorched bottom. Most of these issues stem from temperature control. If your oven runs cool, the fat won't render, leaving you with a greasy mess.
If it's too hot, the rub will burn before the meat hits its safe internal temperature.
Why Your Sauce Is Burning
If your glaze looks black and tastes bitter rather than sweet and smoky, you likely applied it too early. BBQ sauce, even the low sugar varieties, contains sugars that carbonize quickly.
By waiting until the final 10 minutes of cooking, you allow the chicken to do the heavy lifting of roasting first, using the sauce only as a finishing lacquer.
| Problem | Root Cause | Solution |
|---|---|---|
| Soggy Bottoms | Meat sat in juices | Use a wire rack to elevate the chicken from the pan. |
| Rub is Grainy | Spices didn't hydrate | Ensure you use enough oil as a binder before applying the rub. |
| Meat is Tough | Under cooked | Check internal temp; bone in thighs need exactly 165°F to soften. |
Common Mistakes Checklist
- ✓ Skipping the "pat dry" step (leads to steamed, flabby skin).
- ✓ Crowding the pan (prevents air circulation and slows down rendering).
- ✓ Using "cold" chicken straight from the fridge (causes uneven cooking).
- ✓ Forgetting to rest the meat (all the juices will run out on the plate).
- ✓ Applying the BBQ sauce at the very beginning of the roast.
Adjusting Portions for Larger Crowds
When you're cooking for a larger community gathering, you can't just double everything and hope for the best. For 8-12 servings, you'll need to use two separate baking sheets. If you try to cram 4 lbs of chicken onto one tray, the moisture released will lower the oven temperature and prevent that shatter crisp texture we're after.
If you are scaling down for a solo dinner, using a small toaster oven works surprisingly well, provided it can reach 400 degrees. Just remember to reduce the spice mix proportionally, but don't worry about being too precise with the liquid smoke a tiny drop always goes a long way. For those looking for a different sweet savory balance, I often recommend my Sticky Sweet Honey recipe as a great alternative for smaller batches.
| Aspect | Stovetop Searing | Oven Roasting |
|---|---|---|
| Active Time | High (Must flip/watch) | Low (Set it and forget it) |
| Texture | Very crispy skin | Evenly cooked, juicy meat |
| Cleanup | Splatter on counters | One pan/tray only |
Exploring Global Flavor Profile Variations
The beauty of the "chicken thighs oven bbq" technique is its versatility. Once you master the heat and timing, you can swap the flavor profiles to reflect different culinary traditions. BBQ doesn't have to be limited to the American South; it’s a global language of fire and sauce.
- The Mediterranean Twist: Replace the BBQ sauce with a mixture of pomegranate molasses, balsamic glaze, and dried oregano. Use lemon juice instead of apple cider vinegar for a bright, sun drenched flavor.
- The Asian Inspired Glaze: Swap the dry rub for ginger and five spice powder. Use a glaze made of hoisin, soy sauce, and a touch of honey to get that deep red, Char Siu style finish.
- The Smoked Chipotle Kick: Increase the chili powder and add a tablespoon of adobo sauce from a can of chipotle peppers to the glaze. This creates a slow burning heat that pairs beautifully with the natural sweetness of the thighs.
If you enjoy these bolder, spicy profiles, you should check out my Smoky Tinga Chicken recipe. It uses similar flavor building blocks but focuses on a shredded texture that is perfect for tacos or bowls.
Debunking Common Poultry Roasting Myths
Many people believe that washing chicken under the tap is necessary for "cleaning" the meat. In reality, this only spreads bacteria around your sink and counters. The heat of a 400 degree oven is the only thing that actually makes the food safe to eat.
Plus, adding water to the surface of the skin is the fastest way to guarantee it never gets crispy.
Another common misconception is that you must sear the meat in a pan first to "lock in the juices." Science tells us that searing creates flavor via the Maillard reaction, but it doesn't actually create a moisture proof barrier.
You can achieve a spectacular crust in the oven alone by using high heat and the right dry rub, saving you the extra step and the messy stovetop cleanup.
Finally, don't be afraid of the pink color near the bone. In bone in thighs, the marrow can sometimes pigment the surrounding meat even when it's fully cooked to a safe 165°F. Trust your thermometer over your eyes when it comes to the color of the meat itself.
Guidelines for Storing and Leftovers
Leftovers are a gift to your future self. These thighs hold up remarkably well because the dark meat stays moist even after a trip to the fridge. Store them in an airtight container for up to 4 days. When you're ready to eat, skip the microwave it will turn that beautiful skin into a rubbery layer.
Instead, pop them back into a 350 degree oven or an air fryer for 5-8 minutes to restore the crunch.
For zero waste cooking, don't throw away those bones! Once you've finished the meat, toss the bones into a freezer bag. When you have a few pounds of them, you can simmer them with onion skins, carrot tops, and celery ends to make a rich, smoky chicken stock.
This stock is incredible as a base for bean soups or a hearty ramen, carrying that faint hint of BBQ smoke into a completely new dish.
You can also freeze the cooked thighs for up to 3 months. I suggest wrapping them individually in foil and then placing them in a freezer bag. This allows you to pull out just one or two pieces for a quick, nourishing lunch whenever you need it.
Best Ways to Serve and Enjoy
To truly honor the diversity of this dish, I love serving it with contrasting textures. A crunchy, acidic coleslaw provides the perfect foil to the rich, fatty chicken. Or, if you want something heartier, a side of roasted sweet potatoes or a simple corn salad can round out the meal beautifully.
If you’re hosting a larger community dinner, try making a "BBQ Board." Lay the chicken thighs in the center and surround them with different pickles, charred scallions, and maybe some jalapeño cornbread. It encourages people to dig in and share, which is what real cooking is all about.
- If you want maximum crunch: Ensure the chicken is bone in and skip the sauce entirely on half of the pieces.
- If you want a "sticky" experience: Double the glaze and apply it in two thin layers during the last 15 minutes of cooking.
- If you want a lighter meal: Serve the thighs sliced over a large bed of bitter greens like arugula or radicchio.
The sound of the skin crackling under your knife and the sight of that glossy, mahogany glaze is enough to make anyone a believer in the power of the oven. This isn't just a recipe; it's a reliable method for bringing people together over a meal that feels special but remains deeply rooted in simple, nourishing ingredients.
Enjoy every bite!

High in Sodium
840 mg mg of sodium per serving (37% % of daily value)
The American Heart Association recommends limiting sodium intake to about 2,300mg per day for overall cardiovascular health.
Tips to Reduce Sodium in Your Chicken Recipe
-
Reduce Added Salt-25%
Decrease the sea salt from 1 tsp to 1/2 tsp or less. Reducing added salt even slightly can make a significant difference.
-
DIY BBQ Sauce-20%
Make your own BBQ sauce from scratch using low-sodium ingredients like tomato paste, unsalted spices, and a touch of honey. Commercial BBQ sauces are often high in sodium.
-
Spice it Up!-15%
Instead of relying on salt for flavor, enhance the dish with more smoked paprika, chili powder, garlic powder, and onion powder. These spices add depth without the sodium.
-
Fresh Herbs
Incorporate fresh herbs like thyme, rosemary, or oregano to boost flavor naturally without adding any sodium. Experiment with different herb combinations to find your favorite.
Recipe FAQs
How long do barbecue chicken thighs take in the oven?
Total cook time is about 35 to 40 minutes at 400°F. Start with 25 minutes uncovered for rendering, then apply the BBQ sauce for the final 10 to 15 minutes of baking until the internal temperature hits 165°F.
Do you put barbecue sauce on chicken before or after baking?
No, apply the sauce only during the final 10 15 minutes of baking. If you apply sugary sauces too early, the sugars will carbonize and burn before the meat is fully cooked.
Is it better to bake chicken thighs at 350 or 400?
Yes, 400°F is significantly better for BBQ thighs. The higher heat ensures the fat renders quickly, leading to crispy skin, whereas 350°F often results in steamed, flabby skin.
How long do chicken thighs take to cook on a barbeque?
Indirect heat grilling generally takes 30 to 40 minutes total. Sear them over direct heat briefly to start the crust, then move them to the cooler side (indirect heat) to finish cooking to 165°F.
Can I substitute bone-in for boneless chicken thighs in this recipe?
Yes, but you must significantly reduce the cooking time. Boneless thighs cook much faster; reduce the total baking time by about 10 minutes to prevent them from drying out.
Why is my chicken thigh skin still rubbery after baking?
No, this is usually due to moisture retention, not lack of heat. Make sure you pat the skin completely dry before seasoning, and use a wire rack to elevate the thighs so air circulates underneath them.
What is the best way to ensure the inside meat stays juicy?
Yes, the key is temperature precision and resting time. Pull the thighs when they hit an internal temperature of 165°F and let them rest uncovered for 5 minutes so the juices redistribute throughout the meat fibers.
Chicken Thighs Oven Bbq
Ingredients:
Instructions:
Nutrition Facts:
| Calories | 442 kcal |
|---|---|
| Protein | 36.8 g |
| Fat | 29.4 g |
| Carbs | 7.2 g |
| Fiber | 1.1 g |
| Sugar | 4.3 g |
| Sodium | 840 mg |
