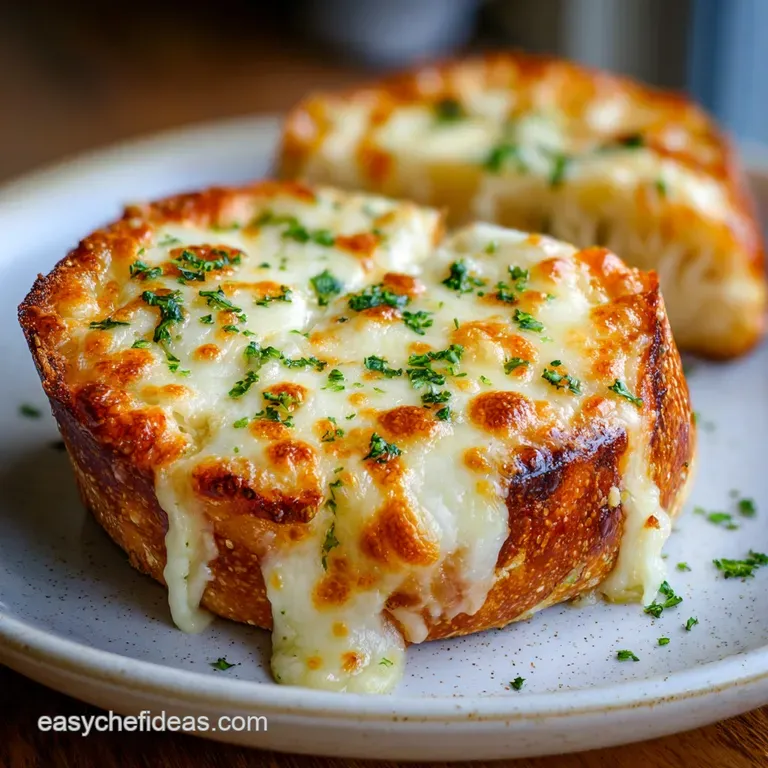
Cheesy Garlic Bread: Shattering Crust
- Time: Active 10 minutes, Passive 15 minutes, Total 25 minutes
- Flavor/Texture Hook: Shattering golden crust with a molten, garlic rich center
- Perfect for: Community gatherings, family Sunday dinners, or a comforting side for pasta night
- Finding the Soul of Cheesy Garlic Bread
- Why This Recipe Works
- Essential Specs for Your Loaf
- Selecting Your Flavor Building Elements
- Tools for a Golden Crust
- Steps for a Flawless Sizzle
- Troubleshooting Your Soggy Middle
- Variations to Nourish Your Community
- Storage for Lasting Crunch
- Pairings for Culinary Diversity
- Recipe FAQs
- 📝 Recipe Card
Finding the Soul of Cheesy Garlic Bread
There is a specific sound that defines a successful Sunday afternoon in my kitchen: the sharp, musical crack of a knife slicing through a warm, toasted loaf. I remember the first time I truly understood the power of this dish.
It wasn't at a fancy restaurant, but in the cramped kitchen of my neighbor, Sofia, who moved here from a small village near Naples. She didn't use a recipe; she used her senses. She taught me that bread isn't just a side dish - it's a vessel for community and a way to nourish the soul.
The aroma of those six cloves of garlic hitting the warm butter is a sensory trigger that brings everyone into the kitchen before the timer even goes off. For years, I struggled with bread that was either too soggy in the middle or so hard it scraped the roof of your mouth.
I realized I was rushing the process, treating it as an afterthought. This Cheesy Garlic Bread represents everything I've learned about patience, flavor layering, and the simple joy of sharing a warm slice with friends.
We aren't just melting cheese on bread here. We are building a foundation of flavor, starting with the fat soluble compounds of the garlic and finishing with the sharp, salty punch of Parmigiano Reggiano.
It's about finding that balance between the soft, pillowy interior and the crispy, golden edges that make people reach for a second (or third) piece. Let's look at how we build those layers.
Why This Recipe Works
- Lipid Infusion: Fat is the primary carrier for garlic flavor, and by softening the butter first, we ensure the garlic oils distribute evenly across every pore of the bread.
- Maillard Staging: We use two types of heat - the ambient heat of the oven and the direct radiation of the broiler - to create a complex brown crust that simple baking cannot achieve.
- Moisture Management: The high fat content in the 1.5 cups of whole milk mozzarella acts as a barrier, preventing the bread from drying out while it toasts to a shatter crisp finish.
- Acid/Salt Balance: Using kosher salt and fresh parsley cuts through the heavy fats, providing a bright finish that keeps the palate refreshed.
The Garlic Butter Infusion Barrier
The secret to avoiding a soggy center lies in the science of fats. When we spread the softened butter mixture onto the crumb, the lipids coat the starch molecules, creating a hydrophobic layer that prevents the moisture from the melting cheese from seeping too deep into the loaf.
Cook Method Comparison
| Method | Time | Texture | Best For |
|---|---|---|---|
| Oven Bake | 15 minutes | Uniformly crispy with a soft, steamed center | Dinner parties and large loaves |
| Stovetop | 8 minutes | Deeply fried, buttery exterior; very soft top | Small batches or individual slices |
| Air Fryer | 6 minutes | Intense crunch; very fast results | Quick cravings and small loaves |
Choosing between the oven and the stovetop depends on the crowd you are feeding. While the oven provides that classic, communal experience of slicing a whole loaf, the stovetop method (using a heavy skillet) creates a "fried bread" texture that is incredibly indulgent.
For this recipe, we focus on the oven method to ensure that 16 oz French loaf gets the attention it deserves.
Essential Specs for Your Loaf
Before we pick up the knife, we need to understand the structural integrity of our ingredients. Not all bread is created equal, and when you're loading on 1.5 cups of cheese, you need a foundation that can hold the weight without collapsing.
Component Analysis
| Ingredient | Science Role | Pro Secret |
|---|---|---|
| French Bread | Provides the "aerated" crumb structure | Use bread that is 1 day old for a sturdier toast |
| Whole Milk Mozzarella | High fat content for the "cheese pull" | Shred it yourself from a block to avoid anti caking starch |
| Fresh Garlic | Contains allicin for pungent aroma | Mince it 10 mins before using to let the flavor develop |
Selecting the right cheese is a cultural nod to the importance of quality. In many Mediterranean communities, the cheese isn't just a topping; it's a source of protein and fat that nourishes the body. Using a mix of mozzarella and Parmigiano Reggiano provides both the stretch and the savory depth we crave.
Selecting Your Flavor Building Elements
To make this Simple Cheesy Garlic Bread, you'll need ingredients that prioritize quality over quantity. Each element plays a specific role in the flavor hierarchy.
- 1 large loaf (16 oz) French bread: Look for a loaf that feels light for its size, indicating a good air pocket structure.
- 0.5 cup unsalted butter: Must be softened to room temperature, not melted. Why this? Melted butter soaks in too fast; softened butter sits on top for better browning.
- 6 cloves fresh garlic: Finely minced. Why this? Pre minced jarred garlic has a metallic aftertaste that ruins the delicate butter.
- 1 tbsp fresh parsley: Finely chopped. This provides a necessary herbal lift.
- 0.5 tsp kosher salt: Enhances the natural sweetness of the roasted garlic.
- 1.5 cups whole milk mozzarella: Freshly shredded for the best melt.
- 0.25 cup Parmigiano Reggiano: Grated finely to add a salty, nutty crust.
- 0.25 tsp red pepper flakes: Adds a subtle back of-the throat warmth.
| Original Ingredient | Substitute | Why It Works |
|---|---|---|
| French Bread | Sourdough Loaf | Adds a tangy contrast to the rich butter and cheese |
| Fresh Parsley | Fresh Basil | Changes the profile to a more traditional Caprese style |
| Red Pepper Flakes | Smoked Paprika | Provides a mild, earthy heat without the sharp spice |
If you are looking for a different vessel for these flavors, you might consider how the same garlic butter mixture would taste on The Soft Homemade recipe. It's a great way to use the same flavor profile in a more portable format.
Tools for a Golden Crust

You don't need a high end kitchen to make this, but a few specific tools will help you achieve that precision sizzle.
- Large Serrated Knife: Essential for slicing the bread without crushing the airy interior.
- Microplane or Garlic Press: For getting that garlic into a fine paste that melds with the butter.
- Baking Sheet: A heavy rimmed sheet helps distribute heat evenly.
- Parchment Paper: Prevents the cheese from sticking to the pan when it inevitably bubbles over.
- Box Grater: For that fresh shredded mozzarella. Honestly, don't even bother with the pre shredded stuff in a bag; it's coated in potato starch and won't melt into that velvety pool we want.
Chef Tip: Freeze your mozzarella block for 10 minutes before grating. It firms up the fat, making it much easier to shred without it turning into a clump of mush in your hands.
Steps for a Flawless Sizzle
1. The Preparation Phase
Preheat your oven to 400°F (200°C). This high temperature is vital for getting the exterior of the bread to shatter while keeping the inside soft. Line your baking sheet with parchment paper to catch any stray cheese.
2. The Butter Infusion Phase
In a small bowl, combine the 0.5 cup softened butter, 6 cloves of minced garlic, 1 tbsp parsley, and 0.5 tsp salt. Use a fork to cream them together until you have a uniform, pale green paste.
3. The Slicing Technique
Slice the 16 oz French bread loaf in half lengthwise. Place both halves cut side up on the baking sheet. Use an offset spatula or a spoon to spread the garlic butter generously over the entire surface, making sure to reach the very edges.
4. The First Bake
Place the buttered bread in the oven for 8 minutes until the edges are just starting to turn golden. Note: This "par baking" ensures the bread is toasted before the cheese melts, preventing the dreaded sogginess.
5. The Cheese Crown
Remove the tray and sprinkle the 1.5 cups of mozzarella and 0.25 cup of Parmigiano Reggiano evenly over both halves. Add the 0.25 tsp red pepper flakes on top for a bit of visual flair and heat.
6. The Melting & Finishing Phase
Return to the oven for another 5-7 minutes until the cheese is bubbling and showing small brown spots.
7. The Broil (Optional)
If you want an extra crispy top, turn on the broiler for 1-2 minutes. Watch it like a hawk, as it can go from golden to burnt in seconds.
8. The Resting Period
Let the bread sit for 3 minutes before slicing. This allows the cheese to set slightly so it doesn't all slide off when you cut into it.
9. The Final Cut
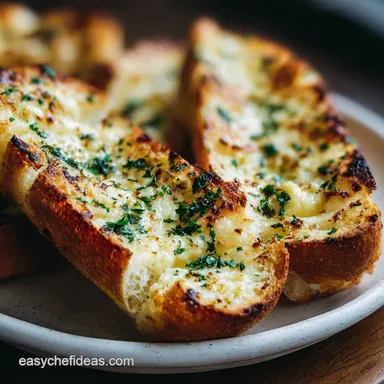
Slice the bread into 2 inch wide strips. You should hear a distinct "crunch" as the knife hits the board.
10. The Serving
Transfer to a warm platter and serve immediately. This is the moment where the community gathers, and you see the joy that a simple, homemade loaf can bring.
Troubleshooting Your Soggy Middle
We've all been there: you pull the bread out, and the center is a damp, buttery sponge instead of a crisp delight. This usually happens because of "moisture migration," where the water in the cheese or butter sinks into the bread fibers before they have a chance to toast.
Why Your Bread Is Soft
If your bread isn't providing that satisfying shatter, you likely skipped the par bake or used bread that was too fresh. Fresh bread has a high internal moisture content; using a loaf that is a day old (or "stale") actually works better because the drier crumb acts like a thirsty sponge for the garlic butter without getting weighed down.
| Problem | Root Cause | Solution |
|---|---|---|
| Burnt Garlic | Mincing too large or broiling too long | Mince garlic into a fine paste and mix thoroughly with butter |
| Soggy Center | Too much butter or skipping the first bake | Par bake the bread for 8 mins before adding cheese |
| No Cheese Pull | Using pre shredded or low-fat cheese | Use whole milk mozzarella and shred it fresh from the block |
Common Mistakes Checklist
- ✓ Pat the parsley dry before chopping to prevent a "grassy" moisture bleed.
- ✓ Preheat your oven for at least 15 minutes to ensure a consistent 400°F.
- ✓ Don't use "whipped" butter; it has too much air and won't brown correctly.
- ✓ Use a serrated knife for the final cut to avoid compressing the fluffy interior.
- ✓ Avoid over mincing the garlic into a liquid; you want tiny bits for texture.
Variations to Nourish Your Community
Food is a universal language, and while this Cheesy Garlic Bread Recipe is a classic, you can adapt it to reflect different cultural flavors. For example, adding a drizzle of honey and some chili oil can give it a modern, spicy sweet twist that's becoming a favorite in fusion kitchens.
If you are looking for a more "bite sized" version for a party, you could try the techniques used in How to Make recipe. It uses a similar flavor profile but wraps it in dough for a hidden surprise.
1. Air Fryer Cheesy Garlic Bread
If you're only making a few slices, the air fryer is your best friend. Set it to 360°F (180°C) and cook for 5-6 minutes. The circulating air creates an incredible "shatter" on the crust that is hard to beat in a traditional oven.
2. The "Pull Apart" Twist
Instead of slicing the loaf in half lengthwise, cut a grid pattern into the top of the loaf, about 1 inch deep. Stuff the garlic butter and cheese into the crevices. This is the ultimate "community" loaf because everyone can just grab a piece and pull.
3. dairy-free Swap
You can nourish your vegan friends by using a high-quality plant based butter and a cashew based mozzarella. Note: Plant based cheeses often need a higher heat to melt, so use the broiler for an extra minute at the end.
Storage for Lasting Crunch
The tragedy of garlic bread is how quickly it can lose its magic. Once the bread cools, the starches begin to re crystallize (a process called retrogradation), which makes the bread feel tough or rubbery.
Fridge Storage: Store any leftovers in an airtight container for up to 3 days. To reheat, avoid the microwave at all costs! It will turn your beautiful crust into a chewy mess.
Instead, pop it back into a 350°F (180°C) oven or toaster oven for 5 minutes until the cheese re bubbles.
Freezer Tips: You can actually freeze the unbaked, buttered bread for up to 2 months. Wrap it tightly in foil. When you're ready to eat, bake it directly from frozen at 400°F, adding about 5-8 minutes to the total bake time.
This is a great way to have a "nourishing" side ready for a busy weeknight.
Zero Waste Tip: If you have leftover scraps that are truly too hard to eat, don't throw them away. Pulse them in a food processor to create the most incredible, cheesy, garlicky breadcrumbs you've ever tasted. Use them to top a mac and cheese or as a coating for chicken.
Pairings for Culinary Diversity
This dish is a bridge between cultures. While we often associate it with Italian American "red sauce" joints, the concept of garlic and fat on toasted bread exists globally - from the garlic naan of India to the toasted baguette of France.
For a rustic, comforting meal, serve this alongside Heavenly Homemade Bread Recipe turned into a thick ribollita soup. The way the bread soaks up the broth while maintaining its cheesy lid is pure magic.
Myth: Searing Garlic in Butter First
Many people believe you should cook the garlic in the butter on the stovetop before spreading it on the bread. In reality, this often leads to overcooked, bitter garlic. By letting the garlic "roast" inside the butter while it's on the bread in the oven, you get a much sweeter, more mellow flavor profile.
Myth: More Cheese is Always Better
It's tempting to pile on three cups of cheese, but this actually traps steam against the bread, making it soggy. The 1.5 cups suggested in the schema is the "golden ratio" for maintaining a crispy base while still getting that satisfying pull.
This Cheesy Garlic Bread From Scratch is more than just a recipe; it's a way to bring people together. Whether you're making it for a holiday or just a random Tuesday, remember that the most important ingredient is the intention to nourish those you love. Enjoy that first, shattering bite!

Recipe FAQs
What kind of cheese do you put on garlic bread?
Use a blend of Mozzarella and Parmigiano Reggiano. Whole milk mozzarella provides the essential melt and stretch, while the Parmigiano Reggiano adds necessary salinity and a nutty depth to the crust.
How to make the perfect cheesy garlic bread?
Par bake the buttered bread for 8 minutes before adding cheese. This initial bake toasts the crumb and creates a barrier against moisture, ensuring a crispy bottom layer despite the heavy topping.
What is the ultimate cheesy garlic bread add-on?
Finely grated smoked paprika or a drizzle of honey. For a complex flavor, use the same technique of layering fat and flavor you master in [Classic Comfort: The Ultimate Grilled Cheese Recipe You'll Love] for a savory sweet contrast.
How do you make garlic bread toast with cheese?
Slice the loaf lengthwise, spread generously with garlic butter, and bake at 400°F for 8 minutes. After that, top with cheese and return to the oven until the cheese is bubbly, finishing with a quick 1-2 minute broil if desired.
Should I cook the garlic in the butter first to prevent bitterness?
No, this is a common misconception. Cooking the garlic separately often leads to scorching and bitterness; instead, mix raw minced garlic into softened butter and let it roast gently on the bread in the oven for a sweeter flavor.
Can I make the garlic butter ahead of time?
Yes, prepare the garlic butter up to three days in advance. Ensure the butter is softened when mixing to properly infuse the garlic oils; if you mastered stable emulsions in other recipes, the creaming action here is similar.
Why does my cheesy garlic bread always end up soggy in the middle?
You likely used very fresh bread or skipped the initial toasting step. Dry, slightly stale bread handles moisture better, and the crucial step is baking the bread before the cheese melts to set the structure.
Cheesy Garlic Bread Recipe
Ingredients:
Instructions:
Nutrition Facts:
| Calories | 268 kcal |
|---|---|
| Protein | 8.9 g |
| Fat | 15.1 g |
| Carbs | 23.8 g |
| Fiber | 1.1 g |
| Sugar | 1.2 g |
| Sodium | 481.5 mg |
