Chefs Perfect Fresh Cherry Cobbler Flaky Top Tart Filling
- The Definitive Guide to Summer Cobblers
- Mastering the Perfect Fresh Cherry Cobbler in Under an Hour
- Gathering Your Cobbler Arsenal: Key Ingredients and Tools
- Prepping the Fruit: Building the Gorgeously Tart Foundation
- Crafting the Light and Tender Buttermilk Scone Topping
- Achieving the Perfect Golden-Brown Bubble: Baking Timeline
- The Essential Serving Suggestions and Flavor Pairings
- Smart Substitutions and Seasonal Cobbler Variations
- Recipe FAQs
- 📝 Recipe Card
The Definitive Guide to Summer Cobblers
There is arguably no dessert that captures the warmth and abundance of summer quite like a freshly baked cobbler. Unlike crisps, crumbles, or buckles, a true cobbler features a fruit filling topped with a distinct, usually rustic, biscuit or scone like crust, dropped over the fruit like cobblestones.
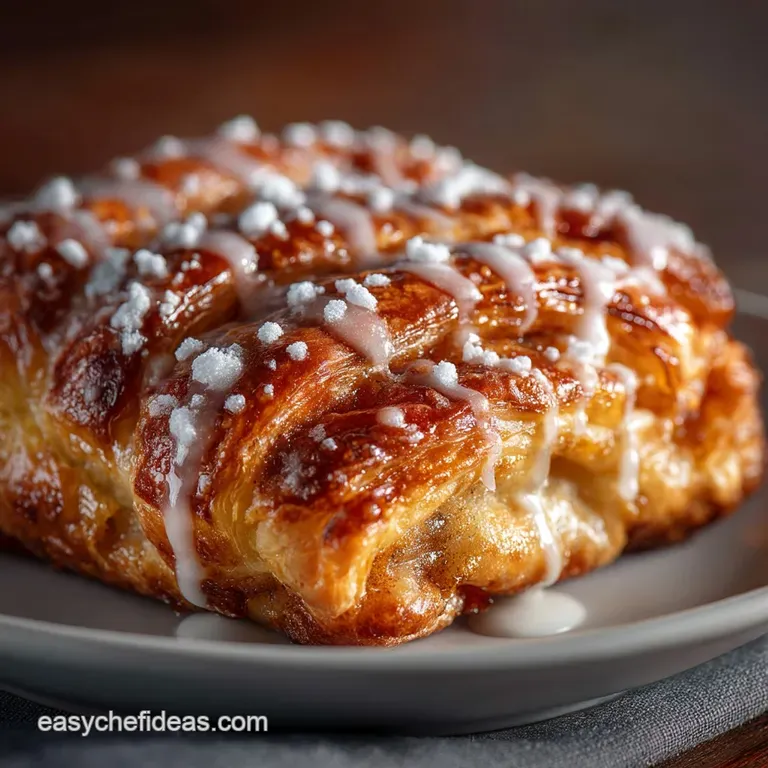
This structure ensures that the fruit underneath steams perfectly while the crust achieves a tender yet beautifully crisp exterior. Our objective here is to create the ultimate expression of this dessert: the Fresh Cherry Cobbler .
Using seasonal stone fruit delivers a brightness that canned ingredients simply cannot match, resulting in a Homemade Cherry Cobbler that is deeply satisfying and remarkably easy to execute once you master a few key techniques.
Mastering the Perfect Fresh Cherry Cobbler in Under an Hour
While the total process, including crucial cooling time, requires about an hour and forty minutes, the active preparation and cooking clock in well under the ninety minute mark, making this recipe a surprisingly quick weekend project.
Achieving the title of the Best Cherry Cobbler Recipe means balancing speed with quality, focusing heavily on ingredient preparation and assembly precision rather than complicated layering. This method ensures a consistently bubbly, thick filling crowned with a light, golden crust every time.
Balancing Sweetness and Tartness in the Cherry Filling
The foundation of any great cobbler is the fruit filling. We utilize six generous cups of freshly pitted cherries ideally Bing or a similarly Sweet Cherry Cobbler variety to maximize the fruit-to-crust ratio. Even with naturally sweet cherries, balance is essential.
We incorporate just half a cup of granulated sugar, adjustable based on the sweetness of your harvest, alongside one tablespoon of fresh lemon juice and one teaspoon of lemon zest.
This acid component prevents the filling from becoming cloyingly sweet, adding a necessary brightness that truly makes the fruit flavor pop.
Why a Buttermilk Topping Beats Standard Biscuit Dough
While many traditional cobblers use a plain biscuit dough or sometimes even a Bisquick base, this recipe elevates the topping by using cold buttermilk. Buttermilk is mildly acidic and reacts beautifully with the baking powder, producing a noticeably lighter and more tender texture than standard milk or cream.
When mixed gently, the resulting dough is shaggy and cohesive, expanding perfectly during baking to create a flaky, scone like topping that provides the perfect contrast to the hot, syrupy fruit beneath.
Essential Tips for Choosing and Pitting Fresh Cherries
The most time consuming part of preparing this dessert is handling the fruit. You will need six cups (approximately 900g) of pitted cherries. Look for firm, shiny, deep colored fruit.
The key to making the Fresh Cherry Cobbler Recipe Easy is investing time upfront in efficient pitting a process that should take about 20 minutes.
While a dedicated cherry pitter is the ideal tool, a clever kitchen hack involves using the narrow end of a sturdy metal piping tip or a chopstick to push the pit through the stem end of the fruit, keeping the cherries relatively intact.
Gathering Your Cobbler Arsenal: Key Ingredients and Tools
Creating a flawless cobbler starts with ensuring you have the precise ingredients and equipment ready. Unlike complicated pastry work, cobblers are forgiving, but quality components make a huge difference in the final taste and texture.
Ingredient Deep Dive: Selecting the Best Cherries for Baking
As noted, we require six cups of pitted fresh cherries. To ensure the filling sets into a gorgeous, thick syrup rather than a watery mess, we rely on three tablespoons of cornstarch (or tapioca starch).
The secret flavor boost that transforms this recipe into a truly memorable dessert lies in one teaspoon of pure almond extract, which enhances the natural cherry notes without overwhelming them. A small pinch of salt completes the filling, ensuring all flavors are heightened.
The Secret to Flaky Topping: Cold Butter and Fine Grinding
For the perfect topping, temperature is non-negotiable. Two cups of all-purpose flour are combined with a quarter cup of sugar, a tablespoon of baking powder, and a half teaspoon of salt. The crucial element is one stick (half cup) of unsalted butter, which must be cubed and kept absolutely ice-cold.
Using a pastry blender or two knives, the butter is "cut in" until it resembles coarse, pea-sized crumbs. This ensures pockets of butter remain, which melt during baking to release steam and create layers of desired flakiness.
Enhancing Cherry Depth with Almond and Lemon Zest
The delicate pairing of cherry and almond is a classic for a reason. That teaspoon of almond extract, combined with the bright aroma of lemon zest, provides complexity that pushes this beyond a simple fruit dessert.
This minor addition is what truly distinguishes this Fresh Cherry Cobbler from simpler recipes.
Required Kitchen Equipment for Zero Faff Baking
While the recipe is versatile, it is best suited for a 9x13 inch baking dish for a shallower, faster baking cobbler, or a deep 9x9 inch dish for a thicker pudding. If you prefer a rustic look and better heat retention, preparing the Fresh Cherry Cobbler in Cast Iron Skillet is an excellent alternative.
Beyond the dish, ensure you have a whisk, rubber spatula, and a method for cutting the butter into the flour (pastry blender recommended).
Prepping the Fruit: Building the Gorgeously Tart Foundation
With your cherries pitted and prepped, it's time to build the filling. In a large mixing bowl, gently combine the six cups of pitted cherries with the half cup of sugar, three tablespoons of cornstarch, one tablespoon of fresh lemon juice, the almond extract, lemon zest, and the small pinch of salt.
It is vital to toss this mixture thoroughly yet gently until the cornstarch is completely dissolved and evenly coats all the fruit. This ensures even thickening as it bakes. Once mixed, pour the entire contents into your prepared baking dish, spreading the fruit evenly across the base.
Related Recipes Worth Trying
- The Bank Holiday Bake Easy Cherry Cobbler Recipe — Forget fuss This Easy Cherry Cobbler features a simple drop biscuit topping that bakes up golden and crisp over juicy cherries Perfect comfort baking in...
- SunDrenched Peach Cherry Cobbler with Buttermilk Biscuit Topping — Forget the crumble This Easy Peach and Cherry Cobbler features a tender juicy filling under a golden buttermilk biscuit Its proper comfort foodfind out how...
- The Best OldFashioned Cherry Crumble Pie Recipe — Forget fussy lattices This OldFashioned Cherry Dish features a flaky crust and a crisp oat topping Taste pure nostalgia today
Crafting the Light and Tender Buttermilk Scone Topping
The second stage involves creating that gorgeous crust. In a separate bowl, whisk together your dry ingredients: the two cups of flour, sugar, baking powder, and salt. Introduce the extremely cold, cubed butter and quickly cut it into the dry ingredients until the mixture resembles coarse crumbs the size of small peas.
Finally, pour in the three quarters cup of cold buttermilk all at once. Using a rubber spatula or fork, mix gently, only until the ingredients just come together into a shaggy dough.
The golden rule here is to stop mixing as soon as the last streaks of flour disappear, ensuring the topping remains light and tender, not tough.
Achieving the Perfect Golden Brown Bubble: Baking Timeline
The oven should be preheated to $375^{circ}text{F}$ ($190^{circ}
text{C}$). The cobbler requires approximately 40 to
45
minutes of baking time to achieve perfection.
Combining the Cherries and Starch Binder
Before assembling, confirm that your cornstarch has fully integrated with the cherry juices. A uniform coating is key to the texture of the filling; it transforms the fruit’s liquid into that rich, glossy syrup we desire.
Transferring the Filling to the Baking Dish
Once the filling is distributed in the dish, it is ready to receive the topping. Whether you are using a glass baker or preparing your Fresh Cherry Cobbler in Cast Iron Skillet , ensure the oven is fully heated before proceeding.
The 'Rough Mix' Method for Maximum Flakiness
The slightly rough, shaggy nature of the buttermilk dough is what guarantees maximum flakiness. Overmixing would develop the gluten, leading to a chewy, bread like crust rather than a light, crisp one.
Arranging the Topping for Even Expansion
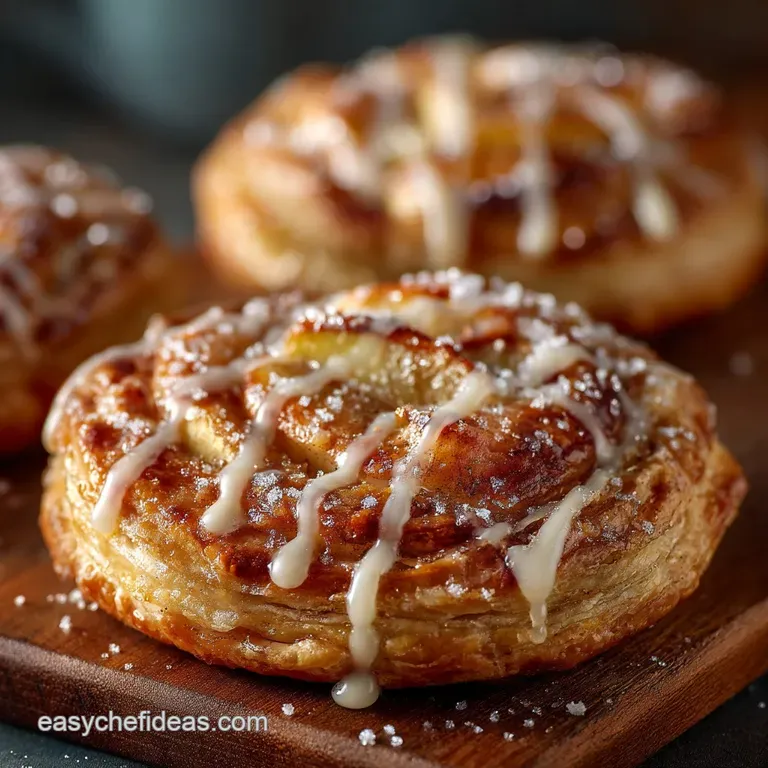
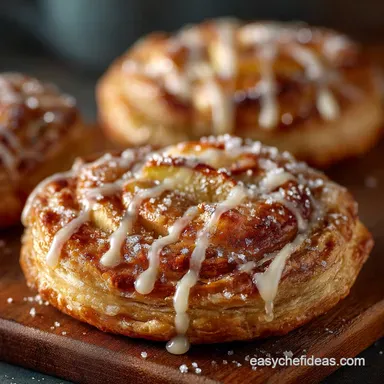
Using a large spoon or ice cream scoop, dollop the dough evenly over the cherry filling, being careful to leave small gaps between the drops. These gaps are crucial, as they allow steam to escape and, critically, allow the sweet cherry filling to bubble up and caramelize around the edges of the golden crust.
Brush the dough with an egg wash (one egg whisked with a teaspoon of water) for shine, and sprinkle generously with turbinado sugar for a delightful crunch.
How to Tell When Your Fresh Cherry Cobbler is Perfectly Done
Bake for 40 to 45 minutes. The topping must be a deep golden brown, but the ultimate indicator of success when learning How To Make Cherry Cobbler is observing the filling: it must be visibly bubbling vigorously, not just around the very edges, but deep into the centre of the dish.
This bubbling confirms the cornstarch has activated and thickened the sauce. If the top browns too quickly, cover it loosely with foil for the final 10– 15 minutes.
Once removed, allow the cobbler to cool for a non-negotiable 20 minutes; this cooling time allows the filling to fully set, guaranteeing a perfect, spoonable consistency.
The Essential Serving Suggestions and Flavor Pairings
A warm slice of this Fresh Cherry Cobbler is magnificent on its own, but its perfect partner is cold and creamy. The contrast between the hot, tart fruit and a rich dairy accompaniment elevates the entire experience.
While a scoop of proper, high-quality vanilla bean ice cream is the standard bearer, a dollop of thick, chilled clotted cream offers a wonderful density, while a generous drizzle of chilled Crème Anglaise (thin custard sauce) provides a delicate richness.
Pair this dessert with a refreshing glass of sparkling rosé or a light Moscato to complement the fruit's sweetness.
Smart Substitutions and Seasonal Cobbler Variations
One of the greatest virtues of a cobbler is its flexibility and adaptability to seasonal changes and dietary needs.
Best Complementary Ice Cream Flavors (Beyond Vanilla)
For those looking for an exciting twist, try serving the cobbler with salted caramel or butter pecan ice cream, which introduces a savory, nutty complexity. A scoop of bourbon infused ice cream also pairs exceptionally well, highlighting the subtle depth provided by the almond extract in the filling.
Storing Leftovers and Reheating for Next Day Crispness
Leftover cobbler should be covered tightly and stored in the refrigerator for up to four days. To regain the delightful crispness of the crust, avoid the microwave. Instead, reheat individual servings in a toaster oven or the main dish in a conventional oven at $300^{circ}text{F}$ ($150^{circ}
text{C}$) for 10–
15
minutes.
Adapting the Recipe for Dietary Needs
This recipe is simple to adapt. For a dairy-free version, substitute plant based butter sticks and use a homemade "buttermilk" made from non-dairy milk (like almond or oat) mixed with a teaspoon of vinegar.
If you are looking for an extremely fast method, some home cooks substitute the scratch topping with a prepared mix, such as making Fresh Cherry Cobbler with Bisquick —though the results will lack the textural superiority of the homemade buttermilk topping described here.
Swapping Cherries: Using Frozen or Other Stone Fruits
If fresh cherries are unavailable, you can use five cups of frozen cherries; however, do not thaw them first. Baking them from frozen helps maintain their shape.
Because frozen fruit releases more liquid during baking, increase the cornstarch in the filling from three tablespoons to four tablespoons. Alternatively, swap out half of the cherries for sliced peaches or nectarines for a delicious mixed stone fruit cobbler.

Recipe FAQs
My filling is always a bit runny, like soup! How do I ensure my Fresh Cherry Cobbler filling sets up properly?
Ah, the dreaded runny pudding! The secret here is patience and temperature. You must let the cobbler cool for the full 20 minutes after it comes out of the oven; this gives the cornstarch enough time to fully hydrate and set the juices.
Secondly, make sure the filling is truly bubbling vigorously in the centre, not just around the edges, before you pull it out that means the thickener has done its job.
I can't get hold of fresh cherries. Can I use frozen ones, and do I need to thaw them first?
Absolutely, frozen fruit is a perfectly acceptable substitution if you’re in a pinch. The key bit of genius here is to use the frozen cherries straight from the freezer do not thaw them!
As frozen fruit holds extra moisture, increase your cornstarch slightly (by about 1 tablespoon) to compensate for the additional liquid released during baking, otherwise, you might end up with that aforementioned soupy mess.
My topping came out tough, not light and flaky like a proper scone. What did I muck up?
It sounds like you might have overmixed the dough, mate. For a cobbler topping (which is essentially a biscuit or scone dough), the butter needs to be ice-cold and you should stop mixing as soon as the wet and dry ingredients are just combined.
Overmixing activates the gluten, resulting in a dense, rubbery texture instead of that lovely, tender flakiness we’re aiming for.
What is the best way to store leftover cobbler, and can I crisp the topping up again later?
Leftovers keep beautifully! Covered tightly, the cobbler is fine at room temperature for a day, or up to four days in the refrigerator. To bring that crunchy top back to life, cover the dish with foil (to prevent the topping from scorching) and reheat in a 300°F (150°C) oven for about 15-20 minutes.
It’ll taste nearly as good as the first bake.
Aside from vanilla ice cream, what's a proper British accompaniment for this warm pudding?
For a true indulgence, skip the ice cream and serve it with a generous dollop of proper Clotted Cream it’s the height of luxury and pairs fantastically with the tart cherries.
If you want something a bit more sophisticated, a warm, thin custard sauce (Crème Anglaise) poured over the top is a brilliant counterpoint to the buttery crust.
Best Flaky Fresh Cherry Cobbler
Ingredients:
Instructions:
Nutrition Facts:
| Calories | 506 kcal |
|---|---|
| Protein | 3.2 g |
| Fat | 10.6 g |
| Carbs | 67.4 g |
| Fiber | 0.6 g |
| Sodium | 10016 mg |
