Chocolate Mummy Cupcakes: the Ultimate Spooky Halloween Dessert
- Unwrapping the Secret of the Ultimate Halloween Treat: Chocolate Mummy Cupcakes
- Baking Alchemy: Why These Chocolate Mummy Cupcakes Are Supremely Moist
- Essential Provisions for Your Mummy Bake: Ingredients and Expert Substitutions
- From Crypt to Kitchen: Detailed Step-by-Step Assembly Guide
- Tomb Raiders’ Secrets: Chef's Tips and Avoiding Common Baking Catastrophes
- Preserving Your Pharaoh’s Feast: Storage, Shelf Life, and Freezing
- Complete the Halloween Spread: Pairing and Presentation Ideas
- Recipe FAQs
- 📝 Recipe Card
Unwrapping the Secret of the Ultimate Halloween Treat: Chocolate Mummy Cupcakes
When these Chocolate Mummy Cupcakes bake, the smell alone is enough to send shivers down your spine in a good way, I promise. It’s that deep, intense, dark chocolate aroma that signals a truly fudgy, moist crumb underneath.
Forget those pale, dry sponges you sometimes find; this recipe delivers serious chocolate intensity every single time.
Halloween is hectic, and the last thing you need is a tricky bake. These mummy treats are pure genius because the decorating is messy on purpose! They look complicated, but they are deceptively simple to assemble, making them a high impact, low-stress centerpiece for any party.
It's the perfect easy win when you need something spooky fast.
So grab your mixing bowls and summon your inner crypt keeper. We are going to dive headfirst into the science of the ultra moist chocolate base, nail that perfect tangy cream cheese frosting, and learn the trick to the fastest, most effective white chocolate bandages. Let's crack on.
Baking Alchemy: Why These Chocolate Mummy Cupcakes Are Supremely Moist
The secret to these cupcakes isn't magic; it's chemistry, baby. We ditch the standard melted butter approach for oil and use two specific liquids buttermilk and hot coffee to activate our cocoa powder, resulting in a cake that stays tender for days.
This combination delivers moisture and deep, deep color.
Why Deep Dark Chocolate is the Best Base for Mummies
We are using a Dutch process cocoa powder here, which has been treated to reduce its acidity. This treatment results in a much darker, richer color that is essential for contrast when you slap on those white bandages. It's the difference between a weak, brown cake and a truly sinister, graveyard worthy dark base.
The flavor is intense, and the texture is dense and luxurious.
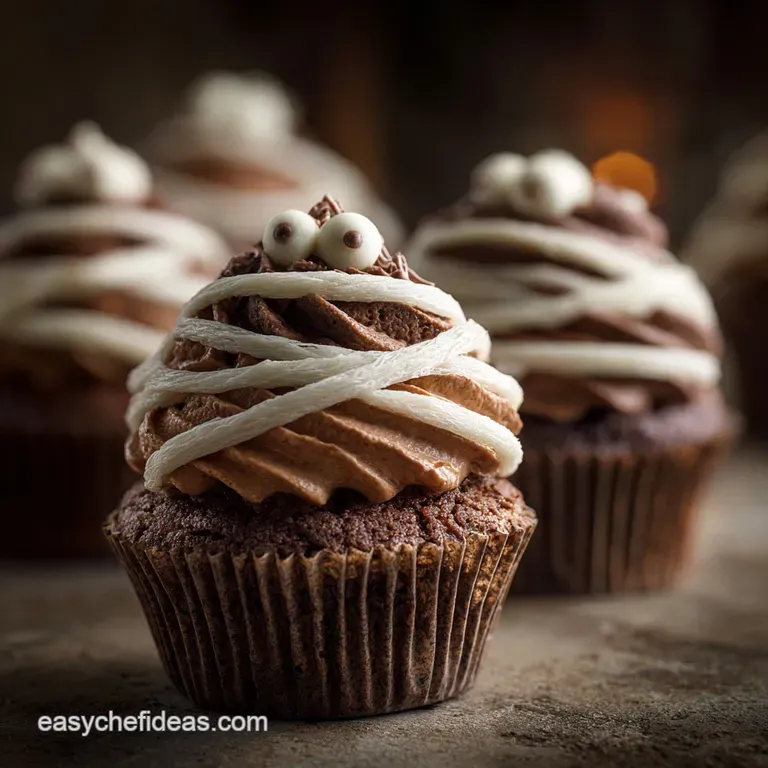
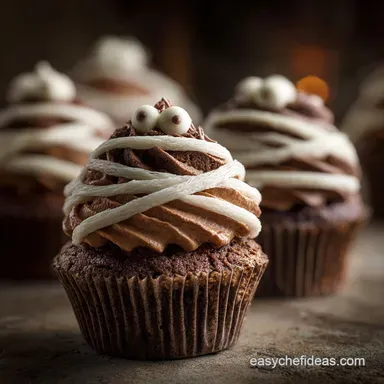
The Anatomy of a Perfect Mummy Cupcake (Cake, Frosting, Bandages)
A great mummy cupcake isn't just one component; it’s the trio working in perfect harmony. You need the intensely moist chocolate cake as the foundation, providing depth and weight.
Then comes the tangy cream cheese frosting, which must be stable enough to act as the rounded 'head' and the sticky glue for the decorations. Finally, the ragged white chocolate bandages provide the contrast and texture.
What You Need to Begin Your Crypt Keeper's Baking Project
Listen, don’t even think about starting this without having your eggs and milk at room temperature. Cold ingredients are the enemy of emulsion, and if your batter breaks, your final cake will be dense and sad.
A reliable stand mixer is a godsend for the frosting stage, but a sturdy hand mixer will absolutely get the job done too.
The Role of Buttermilk and Hot Coffee in Dark Chocolate Cake Structure
The hot liquid is non-negotiable! Pouring piping hot coffee directly over the cocoa powder "blooms" it, releasing maximum flavor potential. Meanwhile, the slight acidity of the buttermilk reacts gently with the baking soda, lifting the cupcake just enough without causing a huge, overflowing dome.
The Tangy Counterpoint: Mastering Cream Cheese Frosting Stability
The cream cheese frosting shouldn't just be sweet; it needs a little tang to cut through the richness of the dark chocolate. The key to stability is ensuring your butter is perfectly softened, but the cream cheese is still slightly chilled.
If the cream cheese is too warm, the frosting will turn into a runny puddle trust me, I learned that the hard way one disastrous summer afternoon.
Achieving the Perfect White Chocolate 'Bandage' Drip and Texture
For the bandages, you need melting wafers or high-quality compound chocolate, not regular chocolate chips. Chips contain stabilizers that make them hard to melt smoothly for piping.
We want thin, uneven lines piped quickly over the frosting base; that raggy, overlapping pattern is what screams "ancient mummy" rather than "neatly wrapped gift."
Essential Provisions for Your Mummy Bake: Ingredients and Expert Substitutions
Baking is predictable when you use the right stuff. Don't cheap out on the cocoa!
Selecting the Right Cocoa Powder for Intense Color and Flavor
I always reach for a high-quality, unsweetened Dutch process cocoa powder for ultimate color. It delivers that nearly black hue we need.
| Ingredient | My Top Choice | Substitute If You're Out |
|---|---|---|
| Buttermilk | Full fat cultured buttermilk | Whole milk + 1 tsp white vinegar/lemon juice (let stand 5 mins) |
| Cocoa Powder | Dutch process | Natural cocoa powder (increase baking soda by ¼ tsp) |
| Vegetable Oil | Canola or Sunflower Oil | Melted unsalted butter (will change texture slightly) |
| Cream Cheese | Full fat block cream cheese | Mascarpone (less tangy, but creamy) |
Dairy Decisions: Best Practices for Cream Cheese and Butter Temperature
I know I’ve said it before, but let’s hammer this home: butter for the frosting must be truly room temperature (soft enough to indent easily). The cream cheese, however, should be slightly cooler to start.
If you mix the two when they are both piping hot, the frosting will split, and you’ll end up with a sweet, grainy mess.
Alternative Bandaging Materials (Beyond Standard White Chocolate)
If white chocolate is giving you grief, or if you have allergy concerns, you can totally pivot.
- Marshmallow Fluff: Warm a bit of fluff gently and pipe it using a thick round tip for a slightly fluffier, less defined bandage look.
- Fondant: Roll white fondant paper thin and use a pizza cutter to make jagged, uneven strips. Stick them to the frosted cupcakes.
Scaling Down or Up: Adjusting Basic Ratios
This recipe yields 12 standard cupcakes, but it doubles beautifully if you're hosting a massive spookfest. If you need fewer, simply halve all measurements, but be precise with the leaveners (baking soda/powder) don't just eyeball those!
From Crypt to Kitchen: Detailed step-by-step Assembly Guide
This process is straightforward, but speed is key when working with the chocolate drizzle.
Stage 1: Preparing the Ultra Moist Chocolate Cake Batter
- Preheat your oven to 350°F (175°C) and line your muffin tin.
- In a big bowl, whisk together all your dry ingredients: flour, sugar, cocoa, baking soda, and salt. Make sure that cocoa powder gets thoroughly incorporated.
- In a separate bowl, whisk the room temperature eggs, milk, oil, and vanilla. Gently pour this wet mix into the dry mix and beat on low speed until just combined. Stop immediately when no dry streaks remain.
- Crucial Step: Pour the hot coffee or water directly into the batter. It will look alarmingly thin, but this is exactly right. Mix until smooth, then fill your liners two-thirds full.
- Bake for 18– 20 minutes. Test with a toothpick it should come out with a few moist crumbs attached, not totally clean. Cool them completely on a rack.
Stage 2: Whipping Up the Stable Cream Cheese Icing Base
- Beat the softened butter until it's super pale and fluffy give it a full two minutes. Add the slightly chilled cream cheese and mix until completely smooth. Stop and scrape the bowl often!
- Gradually add the sifted powdered sugar. Start slow, or you’ll dust your entire kitchen in sugar snow. Once incorporated, beat on medium high until the frosting is voluminous and light. If it feels too soft, pop it in the fridge for 10 minutes.
Stage 3: The Art of the White Chocolate Bandage Drizzle
- Melt the white chocolate wafers gently. I use the microwave in 30 second bursts, stirring vigorously between each burst until it's completely smooth and drippy.
- Transfer the melted chocolate into a small piping bag or a Ziploc bag with a very tiny corner snipped off. We want thin lines, not thick rivers of chocolate.
Stage 4: Placing the Edible Eyes and Bringing Your Mummy to Life
- Spread a layer of cream cheese frosting on the cooled cupcakes, creating a slight dome shape. This is the mummy’s canvas.
- Place two edible candy eyes near the top centre of the cupcake. They should be just far enough apart to give your mummy a slightly cross eyed, spooky expression.
- Starting above the eyes, use your piping bag to drizzle thin, overlapping strips of white chocolate down the cupcake. Work quickly and unevenly, crossing over the strips to simulate tattered cloth. Do not cover the eyes!
Chef's Note: If you pause for too long while piping the chocolate, the heat from your hand will melt it, making it too runny. If this happens, stick the bag in the freezer for 60 seconds to firm it back up.
Tomb Raiders’ Secrets: Chef's Tips and Avoiding Common Baking Catastrophes
Nobody wants a baking failure on party day. We’ve all been there, staring sadly at a sunken cake.
The Ideal Baking Temperature and Testing for Doneness
Always trust your oven thermometer, not the dial on the front of the oven mine is often off by 25 degrees! The ideal temperature of 350°F (175°C) ensures the outside sets while the middle stays tender.
If you overbake, even this moist batter will dry out, so pull them out the second the skewer test passes.
Stopping the Cream Cheese Icing from Running or Splitting
If your frosting is too soft, it’s almost always a temperature issue (butter or cream cheese too warm) or a lack of sugar. If it splits (looks oily and grainy), you can sometimes rescue it by adding 1 tablespoon of ice-cold milk and beating the whole thing rapidly for 30 seconds.
The Mummy Face Off: Troubleshooting Uneven White Chocolate Bandages
If your chocolate bands look like thick blobs instead of delicate strips, your piping tip (or the cut corner of your bag) is too large. When I first tried this, I used a thick tip and the mummies looked like they were wearing ski goggles terrible! Go smaller than you think you need.
Preserving Your Pharaoh’s Feast: Storage, Shelf Life, and Freezing
Because these treats use cream cheese frosting, storage is slightly different than regular buttercream cupcakes.
Best Practices for Refrigerating Frosted Chocolate Mummy Cupcakes
Due to the dairy content in the cream cheese, the frosted mummy cupcakes must be kept airtight and refrigerated. They will keep beautifully in the fridge for 3 to 4 days. Always let them warm up slightly ( 20 minutes) before serving ; the chocolate base is best enjoyed at room temperature.
Freezing the Unfrosted Chocolate Base for Later Use
If you want to get ahead, you can bake and cool the chocolate cupcakes completely, then wrap them tightly in plastic wrap and foil. They freeze well for up to 3 months. This is a brilliant way to save time before a big event.
Revival Strategies: How to Thaw and Serve for Optimal Texture
Thaw the frozen cupcakes overnight in the refrigerator, still wrapped, to prevent condensation from making them soggy. Once thawed, unwrap them and let them come to room temperature on the counter before frosting. Frosting them cold will help keep the base intact.
Complete the Halloween Spread: Pairing and Presentation Ideas
These spooky treats are the perfect finale to a fun Halloween meal.
For dinner, I always recommend something easy that keeps the theme going, like my speedy French Bread Mummy Pizzas Quick Easy Halloween Dinner Idea . Afterwards, you can round out the dessert platter with some less messy options, perhaps the fun Frozen Halloween Banana Popsicles Easy Mummy Treats which are super easy for kids.
If you’re hosting a more adult gathering, serving these alongside a rich, slightly bitter dark coffee or maybe even a minty palate cleanser (like a small portion of a Keto Smoothies Mint Chocolate Dynamo Best Smoothie For Fat Loss ) creates a fantastic contrast. These Chocolate Mummy Cupcakes are designed to be decadent, so don’t forget to enjoy every gooey, fudgy bite!

Recipe FAQs
Why are my chocolate cupcakes dry or dense, and how can I ensure they are moist?
Dryness is usually caused by overmixing the batter or overbaking the sponges. Ensure you stop mixing immediately once the dry ingredients are just incorporated, and use a timer to avoid baking past the minimum time required.
For maximum moisture, slightly under baking (when the toothpick test shows a few moist crumbs) is better than over baking.
My cream cheese frosting turned out too runny. How can I fix the consistency?
Runny frosting typically occurs if the butter and cream cheese were too warm before mixing. To rectify this, gradually whip in an additional 1 to 2 tablespoons of sifted powdered sugar until the desired stiffness is achieved.
Alternatively, chill the bowl in the refrigerator for 20 minutes before whipping it briefly again.
Can I make the chocolate cupcake base gluten-free or dairy-free?
Yes, you can substitute the all-purpose flour with a high-quality 1:1 gluten-free baking blend that contains xanthan gum. For dairy-free cupcakes, replace the butter with a vegan butter stick and use unsweetened oat or almond milk instead of traditional dairy milk.
Remember that cream cheese frosting requires alternative ingredients like vegan cream cheese blocks.
What is the best technique for creating neat, realistic 'mummy bandages' with white chocolate?
Use high-quality white chocolate (or candy melts) and let it cool slightly after melting so it thickens enough to hold its structure. Transfer the melted chocolate to a piping bag fitted with a very small round tip or a small, snipped corner.
Pipe thin, tight, overlapping zig-zag lines across the cupcake, leaving a small gap for the edible eyes.
How far in advance can I bake and store these cupcakes?
Since these utilize cream cheese frosting, they must be stored in an airtight container in the refrigerator to maintain food safety. They will remain fresh for 3 to 4 days refrigerated; however, ensure you let them sit at room temperature for about 30 minutes before serving to achieve the optimal soft texture.
Can I use milk chocolate instead of dark chocolate for the cupcake base?
While possible, substituting milk chocolate will result in a much sweeter and less intense flavor profile, which may conflict with the rich cream cheese frosting. If you use milk chocolate, consider reducing the amount of granulated sugar by 1/4 cup to balance the overall sweetness of the final product.
Always use high-quality cocoa powder for the best depth of flavor.
Can I freeze the baked cupcakes if I want to prepare them significantly ahead of time?
Absolutely, freezing the unfrosted cupcake base is an excellent way to prep. Once fully cooled, wrap each cupcake tightly in plastic wrap, then place them in a large freezer bag for storage up to 3 months. Thaw them overnight at room temperature before applying the frosting and the white chocolate bandages.
Ultimate Chocolate Mummy Cupcakes Recipe
Ingredients:
Instructions:
Nutrition Facts:
| Calories | 180 kcal |
|---|---|
| Protein | 1.0 g |
| Fat | 8.0 g |
| Carbs | 28.0 g |
