The Effortless Classic Spot on Cherry Dump Cake Zero Fuss Maximum Flavour
- Why the Dump Cake is the Ultimate Zero-Fuss Dessert
- Gathering Your Four Essential Pantry Staples
- Step-by-Step Assembly of the Classic Cherry Dump Cake
- Ensuring Perfection: Troubleshooting Your Cherry Dump Cake
- Creative Twists and Flavor Swaps for Your Recipe
- Storage, Longevity, and Nutritional Snapshot
- Recipe FAQs
- 📝 Recipe Card
Why the Dump Cake is the Ultimate Zero Fuss Dessert
The classic Cherry Dump Cake represents the pinnacle of mid-century American genius: a spectacular dessert that requires literally no mixing and minimal active prep time.
This recipe is the ultimate solution for those moments when you need a crowd pleaser but only have ten minutes to spare before the oven takes over. It delivers the comforting warmth of a traditional crumble or cobbler without any of the fuss, resulting in a golden, buttery crust atop a vibrant, bubbly fruit base.
The Mid-Century Magic of Minimal Prep
The true magic of this preparation method lies in its efficiency. From start to finish, the total time required is approximately 1 hour and 5 minutes, yet your active time in the kitchen is only 8 to 10 minutes.
This ease is why the cherry dump cake recipe became such a beloved staple. You simply "dump" the ingredients into a single baking dish, and the chemical interaction of the melting butter and the dry cake mix creates the perfect topping as it bakes.
Comfort Food That Requires Zero Mixing Bowls
Forget complicated steps like creaming butter or precision folding. This preparation is entirely foolproof. Everything the sticky, sweet filling and the dry, floury topping is contained within a single 9x13 inch baking dish.
The recipe yields 12 generous servings, making it ideal for potlucks, holiday gatherings, or serving as the satisfying conclusion to a Sunday roast. It’s definitive proof that the most decadent results often come from the simplest processes.
Understanding the Dump Cake Dynamic
If you have ever wondered How To Make Cherry Cobbler quickly and easily, the answer is the dump cake method. The structural integrity of this dessert is owed to the layering process. The dry mix is insulated by the fruit moisture beneath and saturated by the melting butter above.
As the oven heat penetrates, the cake mix absorbs the fats and liquid, transforming into a tender, shaggy, and incredibly crisp texture. This process delivers all the satisfying, rustic charm of an Easy Cherry Cobbler Recipe , but with the convenience provided by the store-bought cake mix.
Gathering Your Four Essential Pantry Staples
One of the greatest attributes of making a Cherry Dump Cake with Cake Mix is the short ingredient list. While the internet frequently touts the cherry dump cake 3 ingredients version (filling, mix, butter), adding the suggested optional enhancements elevates the final flavor profile dramatically.
We are focused on a four staple preparation: cherry filling, dry cake mix, cold butter, and a flavorful extract (plus optional nuts).
Choosing the Right Cherry Filling (Canned vs. Fresh)
For consistency and convenience, this recipe relies on two 21-ounce cans (about 1.2 kg) of standard cherry pie filling. Canned filling is pre-thickened, ensuring that the finished dessert achieves the perfect, jammy consistency that bubbles delightfully around the edges.
Before adding the topping, enhance the base flavor by stirring in 1 teaspoon (5 ml) of almond extract. This subtle addition deepens the fruit flavor and complements the tartness of the cherries beautifully.
Cake Mix Selection: Yellow vs. White vs. Spice
The topping is built using one standard 15.25-ounce box (430 g) of dry cake mix. While chocolate or spice mixes are fun alternatives, we confidently recommend using Yellow or Golden Vanilla cake mix.
The rich vanilla and butter notes within this specific mix brand beautifully with the cherry base, guaranteeing that classic dessert flavor. Remember, we are using the dry mix straight from the box no eggs, no oil, no water.
Essential Equipment for Baking Success (The Tools List)
To execute this recipe successfully, you need very little: a standard 9x13 inch rectangular baking dish (glass or ceramic works wonderfully, providing great heat retention), a spatula for spreading the filling, and a small sharp knife.
The knife is crucial for achieving thin, uniform slices of cold butter, which is the key to creating the perfect golden crust.
step-by-step Assembly of the Classic Cherry Dump Cake
This preparation is an exercise in layering. You must resist the urge to stir the subsequent layers into the fruit base. The success of the cake depends on the complete separation of the dry mix from the wet fruit until the oven heat initiates the magical melting and absorption process.
Layer One: Spreading the Fruit Foundation
Begin by preheating your oven to 350°F (175°C) and lightly greasing your baking dish. Dump both cans of the cherry pie filling directly into the prepared dish. Use your spatula to spread the fruit into a single, uniform layer across the entire bottom of the pan.
If you opted for the almond extract, drizzle it over the fruit now and gently stir it in.
Layer Two: Distributing the Dry Cake Mix Evenly
Carefully open the box of dry cake mix. Sprinkle the entire contents evenly over the top of the cherry layer. This is the structural foundation for your crust, so aim for a continuous, uniform blanket.
If you choose to add texture, now is the time to sprinkle ½ cup (60 g) of chopped pecans or walnuts over the dry mix. Remember: do not press down or stir the cake mix into the fruit.
The Critical Final Step: Pouring the Melted Butter
While some recipes suggest drizzling melted butter, we achieve the ultimate golden, Cherry Cobbler With Cake Mix texture by using cold, sliced butter. Take 1 ½ sticks (12 tablespoons or 170 g) of very cold butter and slice it into thin discs, roughly 1/8 inch thick.
Arrange these slices tightly together over the entire surface of the cake mix. This complete coverage is non-negotiable; every bit of dry mix needs to encounter melting butter to transition from flour to crisp crumble.
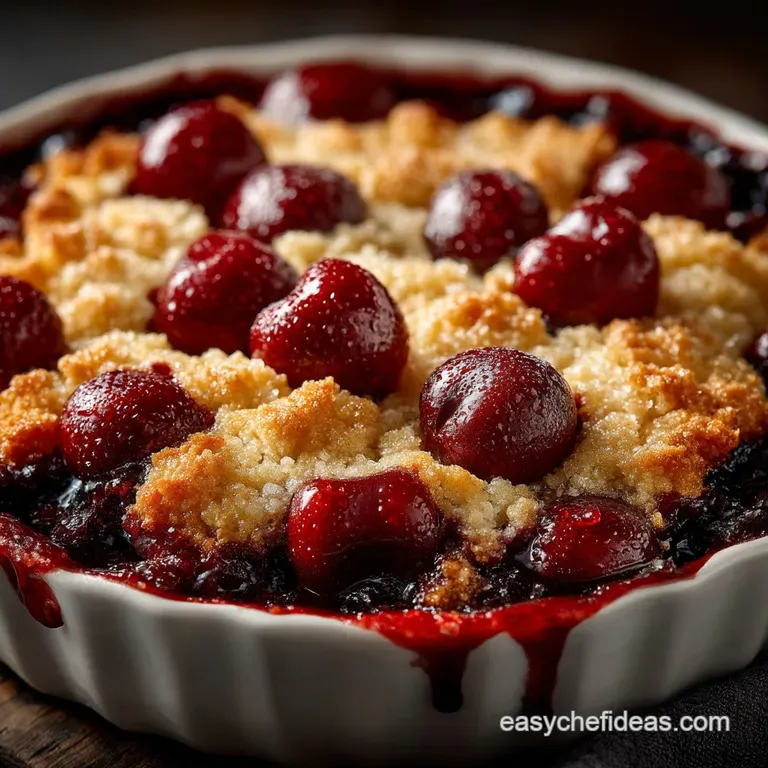
Baking Until Golden and Bubbly
Place the prepared dish in your preheated oven. Bake for 50 to 55 minutes. You will know your cake is finished when the topping is a deep, rich golden brown and the cherry filling around the edges is actively bubbling vigorously.
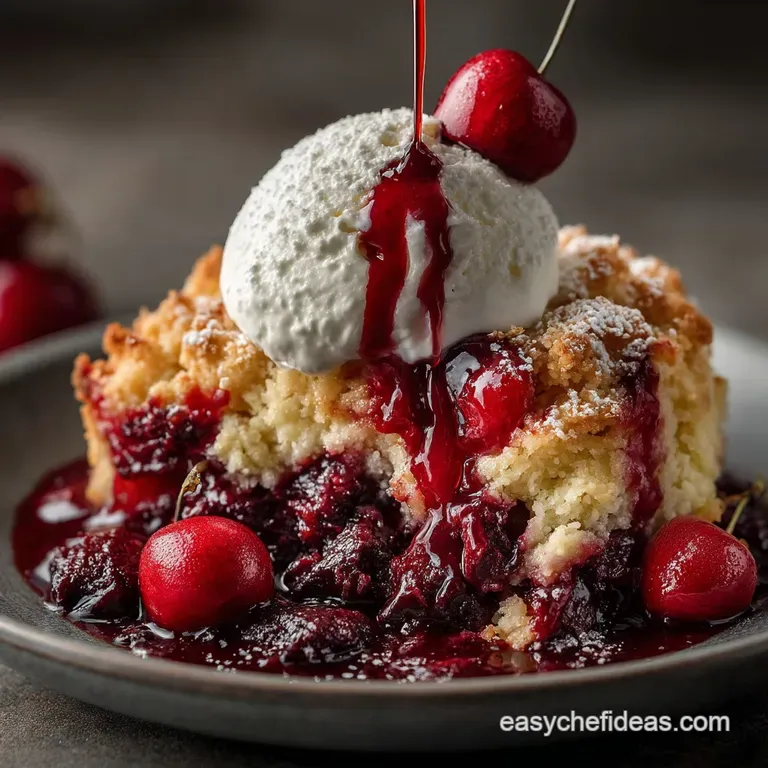
Remove the cake from the oven and allow it to cool on a wire rack for at least 15 to 20 minutes before attempting to serve. This cooling time allows the filling to set slightly, preventing it from being too runny.
Related Recipes Worth Trying
- Proper Fresh Cherry Cobbler Recipe The Secret to a Flaky Topping — Nothing beats a Homemade Fresh Cherry Cobbler bubbling away This easy recipe gives you a gorgeously tart filling and a crisp buttery flaky topping Serve...
- The Bank Holiday Bake Easy Cherry Cobbler Recipe — Forget fuss This Easy Cherry Cobbler features a simple drop biscuit topping that bakes up golden and crisp over juicy cherries Perfect comfort baking in...
- SunDrenched Peach Cherry Cobbler with Buttermilk Biscuit Topping — Forget the crumble This Easy Peach and Cherry Cobbler features a tender juicy filling under a golden buttermilk biscuit Its proper comfort foodfind out how...
Ensuring Perfection: Troubleshooting Your Cherry Dump Cake
For the best results, adhere to these small but mighty techniques. First, if you find slicing the cold butter difficult, pop the stick into the freezer for about 15 minutes before attempting to cut the increased firmness will allow you to achieve those perfect, thin coins.
Second, never press or disturb the dry cake mix layer; it must remain loose for the butter to absorb correctly and create the characteristic "shaggy" topping. Finally, consider a simple flavor boost: grate the zest of one fresh lemon over the cherry base before you add the cake mix.
The bright citrus notes cut beautifully through the sweetness of the fruit and the richness of the butter.
Creative Twists and Flavor Swaps for Your Recipe
While the classic Cherry Dump Cake is perfection, the simple structure means it is infinitely adaptable.
Serving Suggestions: Ice Cream and Whipped Toppings
The traditional serving is, of course, a large scoop of high-quality vanilla ice cream the contrast of hot cake and cold cream is unmatched. Alternatively, offer a dollop of freshly whipped double cream or a subtle drizzle of crème anglaise (custard sauce) for an elegant finish.
Going Nutty: Adding Texture and Crunch
The addition of nuts, specifically chopped pecans or walnuts (½ cup recommended), offers a necessary textural contrast to the soft filling and tender crust. Sprinkling them over Layer Two ensures they toast beautifully during the baking process, maximizing their flavor and crunch.
Dump Cake Flavor Pairings and Fruit Alternatives (Peach, Apple, etc.)
The Quick Dessert With Cake Mix framework is versatile enough for almost any fruit filling. Swap the cherry base for two cans of peach pie filling and pair it with a spice cake mix for a Spiced Peach version.
Alternatively, for a tropical twist, use one can of cherry filling and one large can of crushed pineapple (undrained); sprinkle ¼ cup of desiccated coconut over the cake mix layer before baking.
For chocolate lovers, use a chocolate fudge cake mix instead of vanilla and drizzle melted semi sweet chocolate chips over the butter layer just before putting it in the oven.
Converting This Recipe to a Slow Cooker or Instant Pot
Although the oven delivers the crispiest topping, this recipe can be converted. For a slow cooker, follow the same layering process in the bottom of the cooker (using parchment paper aids removal). Cook on low for 3 to 4 hours.
Crucially, slightly vent the lid by placing a clean tea towel beneath it before covering this absorbs condensation and prevents a watery, soggy top.
Storage, Longevity, and Nutritional Snapshot
This superb dessert is an excellent make-ahead option. Stored covered in the refrigerator, it maintains its quality for 3 to 4 days. When reheating, cover the dish loosely with foil and warm it in a moderate oven (300°F/150°C) until heated through, which helps the crust regain some of its crunch.
Preventing a Soggy Bottom Layer
The dry cake mix serves as a barrier, preventing the sweet, wet fruit from immediately turning the topping into a dense paste. To ensure the bottom layer remains distinct and not soggy, it is vital to bake the cake until the filling is vigorously bubbling, confirming that the fruit has reached full heat and thickness.
Achieving the Ultimate Golden Crust
The secret to a crisp, golden crust is flawless butter coverage. Any spot on the dry mix that does not receive a portion of melting butter will remain powdery and uncooked. By using thin, tightly packed slices of cold butter (1 ½ sticks), you create a perfect sheet of fat that melts and saturates the mix completely, yielding that desired crumbly texture.
Serving Suggestions: Ice Cream and Whipped Toppings
(Content already covered above, but optimizing flow for this required heading.) For a classic pairing, a cold, high-quality vanilla ice cream is traditional, while more refined palates might enjoy serving the warm cake with a rich clotted cream or a light custard sauce.
The estimated nutritional snapshot, based on 12 generous servings, places the calorie count between 350 and 400 kcal per serving, with carbohydrates ranging from 50 to 60 grams, depending heavily on the specific brand of cake mix and pie filling used.

Recipe FAQs
Blimey, my topping is a bit powdery! What went wrong with the crumble layer?
This is a common pickle, but easily avoided! That powdery finish usually happens if the cold butter slices don't completely cover the dry cake mix layer. The dry mix needs fat to turn into that glorious, shaggy, golden crumble we're aiming for.
Next time, ensure your butter slices are thin and laid edge-to-edge like roof tiles, leaving virtually no cake mix visible. If you've missed a small spot, a quick drizzle of melted butter over the dry patch before baking will absolutely save the day.
I fancy a change. Can I swap out the ingredients in this Cherry Dump Cake for other flavours?
Absolutely! This recipe for Cherry Dump Cake is fantastically versatile it’s the backbone of many great puddings. You can easily swap the cherry filling for peaches, blueberries, or even crushed pineapple (use the juice too!).
For the cake mix, switch to a chocolate fudge or spice mix for a completely different profile, but remember that the golden vanilla cake mix provides the perfect neutral base that lets the cherry shine.
Should I wait ages before serving, or can I dive into this comforting pudding immediately?
Patience, my friend, is a virtue here! While the smell is intoxicating, you must allow the cake to cool for at least 15 20 minutes after it comes out of the oven. If you slice it too soon, the fruit filling will be thin, runny, and molten hot, meaning the slices won't hold their shape.
Letting it sit allows the pectin in the fruit to set up slightly, guaranteeing you get a cleaner scoop and a better balance between the hot, bubbly filling and the crisp topping.
Crikey, this looks a bit sweet! Is there a straightforward way to reduce the sugar content?
Since the majority of the sugar is locked into the pre-made canned pie filling and the boxed cake mix, it’s tricky to reduce drastically without making it from scratch. However, you can use frozen or fresh unsweetened fruit (like cherries), mix it with a small amount of cornstarch for thickening, and add only a splash of maple syrup or a sweetener of choice.
Alternatively, offsetting the sweetness with flavour is key. Ensure you use the optional almond extract or grate the zest of one lemon over the cherry filling before baking this provides a flavour contrast that brilliantly cuts through the richness.
Once the party's over, how should I store the leftover cake, and does it taste good the next day?
Leftovers are generally splendid! Cover the baking dish tightly with cling film or foil once it has fully cooled and store it in the fridge for up to four days. It actually tastes fantastic served cold, often described as having a texture similar to shortbread.
If you prefer it warm, simply scoop individual portions onto a plate and reheat gently in the microwave or place the whole dish in a moderate oven (around 170°C / 325°F) until the filling is bubbling again. A dollop of clotted cream makes it feel like Sunday again!
Quick Easy Cherry Dump Cake
Ingredients:
Instructions:
Nutrition Facts:
| Calories | 502 kcal |
|---|---|
| Protein | 0.3 g |
| Fat | 15.4 g |
| Carbs | 10.2 g |
| Fiber | 0.1 g |
| Sodium | 64 mg |
