The Perfect Posh Corn Pudding Creamy Golden Utterly Divine
- Why This Elevated Corn Pudding Recipe Transcends the Standard Side Dish
- A Culinary Deep Dive: Understanding the Heritage and History of Corn Pudding
- Gathering Your Golden Components: Essential Ingredients List
- Tools and Gear: Prepping Your Kitchen for Posh Corn Pudding
- The Process: Achieving Perfect Creaminess in Your Corn Pudding Batter
- Baking to Perfection: Heat Control and Monitoring Doneness
- Mastering Your Bake: Troubleshooting and Expert Tips
- Planning Ahead: Storage, Freezing, and Reheating This Savory Side
- Serving Suggestions: Perfect Pairings for Creamy Corn Pudding
- Recipe FAQs
- 📝 Recipe Card
Why This Elevated Corn Pudding Recipe Transcends the Standard Side Dish
While many people associate Corn Pudding with holiday buffets or simple church potlucks, this particular formulation takes the classic American side dish and elevates it to a truly luxurious culinary experience.
We are moving far beyond a standard, often dry, cornbread like bake and embracing the rich, custardy potential inherent in the ingredients. The secret lies in a careful balance of textures and flavors namely, incorporating heavy cream for unparalleled richness and using brown butter to infuse a deep, nutty complexity that instantly sets this apart.
It’s an Easy Corn Pudding Dish to assemble, requiring only about 15 minutes of active preparation, yet the resulting texture is smooth, silky, and utterly divine, perfect for impressing guests or elevating a weeknight dinner.
This is the ultimate Recipe For Corn Pudding designed for those who appreciate finesse in comfort food.
A Culinary Deep Dive: Understanding the Heritage and History of Corn Pudding
The origins of Corn Pudding trace back deeply into traditional American cooking, particularly throughout the Mid-Atlantic and Southern regions, where corn was (and still is) a dietary staple.
Historically, it served as a hearty and humble way to utilize fresh corn, often enriched with basic dairy and eggs. Our modern take respects this foundation, echoing the comforting nature of Grandma's Corn Pudding recipes, but updates the technique to achieve a much smoother, almost soufflé like interior rather than the denser consistency of a typical Sweet Corn Casserole .
This evolution means we maintain the nostalgic sweetness of the corn while incorporating precise culinary methods for a sophisticated result.
The Magic Ratio: Balancing Sweetness and Savory Notes
Achieving the perfect flavor profile requires hitting the "sweet spot" between savory side dish and decadent dessert. This recipe utilizes just 1/4 cup of granulated sugar, ensuring the natural sweetness of the corn itself shines through, creating a delightful Sweet Corn Pudding .
We counter this sweetness with essential savory depth: 1 teaspoon of Kosher salt and 1/2 teaspoon of freshly ground black pepper. This balanced seasoning is key; it ensures the dish remains versatile enough to pair with robust main courses like barbecue or roast poultry, rather than tasting like dessert masquerading as a side.
What Makes Our Texture Uniquely Silky (Hint: Brown Butter)
The hallmark of this recipe is its incredibly silky texture, which is achieved through two major factors. First, the use of a combination of whole milk and heavy cream provides a high fat, rich liquid base that prevents the final product from becoming dry or spongy.
Second, and most critically, the inclusion of brown butter. Browning the initial 4 tablespoons of butter adds a deep, toasted, nutty dimension (beurre noisette) that permeates the custard, while its warmth helps emulsify the fat and dairy when mixing, contributing significantly to that smooth, melt-in-your mouth quality.
Southern Comfort Meets French Sophistication in a Single Dish
While firmly rooted in Southern comfort food tradition, the technique we employ creating a batter based on dairy, eggs, and a small amount of binder leans structurally closer to a French clafoutis or custard.
This approach ensures that the corn kernels are suspended in a tender, set custard rather than a heavy breading. This blend of comforting American flavors with the precise cooking method of European custards creates a dish that feels simultaneously familiar and refined.
Gathering Your Golden Components: Essential Ingredients List
To successfully execute this elegant Corn Pudding From Scratch , it is paramount to use high-quality ingredients, paying attention to temperature and measurement.
For the base, you will need 3 large eggs, 1 cup of heavy cream, and 1/2 cup of whole milk; ensuring these are all at room temperature will aid in emulsification. The dry components require just 3 tablespoons of all-purpose flour, acting as a gentle binder, alongside the necessary salt, pepper, and 1 teaspoon of baking powder for a subtle lift.
The star, of course, is the corn: a full 16 ounces of whole kernel corn (thawed if frozen) must be combined with one 14.75-ounce can of cream style corn, which is essential for achieving the required ultra creamy consistency.
This focused approach ensures we create a delicious Corn Pudding Recipe Without Jiffy Mix , relying entirely on fresh, measurable components.
Tools and Gear: Prepping Your Kitchen for Posh Corn Pudding
Efficiency in preparation starts with gathering the right equipment. You will need a medium saucepan for browning the butter, a large mixing bowl for combining the batter, and a reliable whisk and rubber spatula.
Fresh vs. Frozen: Choosing the Best Kernel for Flavor
While making Corn Pudding with Fresh Corn cut straight from the cob during peak season offers the most vibrant flavor, high-quality frozen whole kernel corn is a perfectly acceptable and convenient alternative, especially outside of summer.
The key rule, however, is moisture management: if using frozen corn, it must be completely thawed and thoroughly drained before mixing into the batter. Excess water will dilute the rich custard base, resulting in a thin and disappointing final product.
Dairy Decisions: Selecting the Right Cream and Milk Fat
For the richest, smoothest result, whole milk and heavy cream are strongly recommended. The high fat content contributes directly to the silky mouthfeel and prevents the proteins from tightening up during baking.
On top of that,, the imperative is that all cold dairy and eggs must be brought to room temperature (about 30 minutes on the counter) before mixing. Cold ingredients shock the melted butter and can lead to a lumpy, poorly emulsified batter.
The Secret Ingredient: How Brown Butter Adds Depth
The 4 tablespoons of unsalted butter are deliberately browned before being introduced to the recipe. This process involves heating the butter just beyond the melting point until the milk solids separate and turn a rich, nutty brown, imparting a toasted depth that cannot be achieved with standard melted butter.
This subtle nuance is what separates a decent corn side dish from an extraordinary one.
Must Have Bakeware for an Even Golden Crust
A 9x9 inch square baking dish or a 2-quart casserole dish is the ideal vessel for this recipe. Using a dish of this size ensures the pudding bakes evenly within the prescribed 45 to 50 minutes.
If the dish is too shallow, the pudding will dry out; if it is too deep, the center will take significantly longer to set, risking a burned crust. Remember to lightly grease the dish before pouring in the batter.
Related Recipes Worth Trying
- Nantucket Corn Pudding Recipe The Creamy Corn Milk Classic — This Easy Nantucket Corn Pudding is an absolute cracker We use fresh corn and rich corn milk for a creamy sweet corn pudding texture that beats anything...
- The Ultimate Silky Sweet Corn Pudding Recipe with Fresh Corn — Achieve truly creamy authentic Sweet Corn Pudding by using fresh corn and the corn milk scraping technique A timeless fresh sweet corn side dish perfect for...
- Creamy Corn Pudding Recipe from Scratch Without Jiffy Mix — The ultimate comfort food This creamy corn pudding recipe uses fresh corn and our puree secret to achieve a meltinyourmouth texture Forget dry Jiffy mix...
The Process: Achieving Perfect Creaminess in Your Corn Pudding Batter

The foundation of a perfect Corn Pudding lies in meticulous mixing. The preparation begins by preheating the oven to 350°F (180°C). While the oven heats, melt the 4 tablespoons of unsalted butter in a saucepan, continuing to cook it until it achieves that beautiful, aromatic brown butter stage.
Once slightly cooled, whisk the butter, heavy cream, and whole milk together with the room temperature eggs and sugar. In a separate, larger bowl, ensure your dry components flour, salt, baking powder, and pepper are thoroughly whisked together to eliminate any lumps.
The critical next step is combining the two: pour the liquid mixture into the dry ingredients and whisk only until just combined. A few small lumps of flour are actually preferable to an overmixed, tough batter.
Finally, gently fold in both the whole kernel and the cream style corn until evenly distributed before transferring to the prepared baking dish.
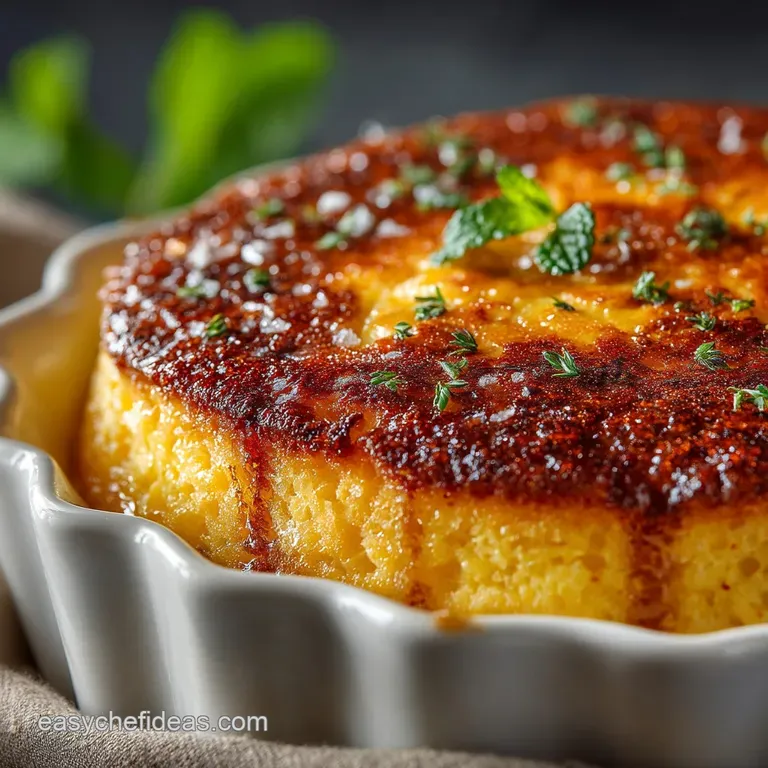
Baking to Perfection: Heat Control and Monitoring Doneness
Baking is where the structure sets, transforming the liquid batter into a smooth, sliceable custard. The casserole should bake at 350°F (180°C) for approximately 45 to 50 minutes. Monitoring the setting process is crucial to avoid a runny center or a tough exterior.
Step One: Tempering Your Eggs for a Smooth Foundation
While this recipe doesn't involve traditional high heat tempering, the use of room temperature eggs is essentially a soft temper. When combined with the slightly warm, brown butter and dairy mixture, the eggs integrate smoothly without curdling or seizing, creating a homogenous base for the custard structure.
Combining Wet and Dry: Preventing Overmixing for Tender Results
As mentioned earlier, flour, once hydrated, develops gluten strands when agitated. For a tender, custardy result, it is essential to mix the wet ingredients into the dry ingredients as gently and quickly as possible. The moment you see the dry streaks of flour disappear, stop mixing immediately.
This ensures a light, airy texture rather than a heavy, dense loaf.
The Critical Resting Time Before Baking
While not mandatory, allowing the finished batter to rest for 5– 10 minutes before placing it in the oven allows the flour to fully hydrate and the corn kernels to settle slightly. This aids in achieving a more consistent texture during the bake.
How to Test the Center: The Jiggle Test and Internal Temperature
After about 45 minutes, perform the 'jiggle test': gently shake the baking dish. The edges should be beautifully golden and set, while the center should still exhibit a slight, uniform wobble, indicating it’s still moist but not liquid.
For absolute certainty, insert a knife or thin skewer near the center. It should emerge mostly clean, though some moist, creamy residue is acceptable. The ideal internal temperature for the perfectly set custard is 175°F (80°C).
Once removed from the oven, it must rest for a minimum of 10 minutes to allow the residual heat to finalize the setting process, guaranteeing a clean slice.
Mastering Your Bake: Troubleshooting and Expert Tips
The single best tip for ensuring success is strictly adhering to the gentle mixing rule; overmixing is the most common pitfall that leads to a tough texture. Next,, always verify that your frozen corn is fully thawed and drained. Excess moisture is the enemy of a smooth custard.
If you notice your edges browning too quickly before the center is set, loosely tent the dish with aluminum foil for the remainder of the baking time. Finally, trust the cooling process the dish finishes setting its internal structure during the post bake rest.
Planning Ahead: Storage, Freezing, and Reheating This Savory Side
This Corn Pudding is best enjoyed warm, shortly after its required resting period, but it is excellent for make-ahead convenience.
Optimal Freshness: Refrigerating Leftover Portions
Leftover portions should be stored in an airtight container in the refrigerator and will keep well for up to 3 to 4 days. When storing, ensure the pudding has cooled completely to room temperature before covering it, preventing condensation from making the top layer soggy.
Can You Prepare the Batter the Night Before?
Yes, the batter can be prepared up to 12 hours in advance. If prepping ahead, complete all steps through folding in the corn (Stage 2, Step 7). Cover the bowl tightly and refrigerate. Crucially, do not add the baking powder until just before baking.
When you are ready to bake, whisk in the baking powder, pour the batter into the prepared dish, and add about 5– 10 minutes to the total baking time to account for the chill factor.
Serving Suggestions: Perfect Pairings for Creamy Corn Pudding
Warm, creamy Corn Pudding makes a spectacular pairing for almost any hearty meal. It is an essential component of a successful barbecue spread, standing up beautifully against smoky pulled pork or beef brisket.
It also complements traditional holiday mains like roasted turkey or ham, serving as a comforting yet elegant alternative to mashed potatoes. For an indulgent touch, a small dollop of crème fraîche and a garnish of fresh chives brings out the savory notes.
Customization Corner: Exciting Flavor Variations (Spicy, Cheesy, Herbaceous)
To customize this dish, the possibilities are vast. For a spicy kick, fold in one finely diced and seeded jalapeño along with 1/2 cup of grated Pepper Jack or aged cheddar cheese.
Alternatively, for a sophisticated, herbaceous profile, gently incorporate 2 tablespoons of finely chopped fresh chives and 1 tablespoon of fresh thyme leaves right before baking. If you desire a slightly more granular, textured bite, substitute 1 tablespoon of the all-purpose flour with finely ground yellow cornmeal (polenta).
Solving the Soggy Center Problem
A soggy, unset center is almost always the result of one of two issues: either the batter had too much liquid (often from undrained frozen corn) or it was removed from the oven too early. If you encounter this, return the dish to the oven immediately and lower the temperature slightly (to 325°F or 160°C).
Continue baking until the center is firm to the touch, and make sure to heed the mandatory 10-minute rest time post bake, which allows the custard to finish its setting process.

Recipe FAQs
Why did my Corn Pudding turn out watery or rubbery? It wasn't as creamy as I hoped!
Achieving that perfect, silky texture is key, and it often comes down to two culprits: overmixing and temperature. If you overmix the batter, the gluten develops, making the pudding tough and rubbery remember, mix gently until just combined.
If it’s watery, the custard likely didn't set properly, possibly due to a fluctuating oven temperature or too much moisture from the corn. Always ensure your corn is thoroughly drained!
Can I bake this Corn Pudding ahead of time, say for a big family dinner or Sunday lunch?
Absolutely! This is a fantastic dish for batch cooking. Bake it fully, let it cool completely, cover it tightly, and store it in the fridge for up to 3 days. To reheat, cover the dish loosely with foil and warm it through in a 325°F (160°C) oven for about 15-20 minutes until piping hot.
While the very best texture is achieved fresh, it reheats like a dream.
Is browning the butter really worth the faff, or can I just melt it quickly?
Honestly, don't skip the brown butter it’s the secret sauce that elevates this from a simple side to a posh plate! It adds a deep, nutty complexity (think toasted hazelnuts) that ordinary melted butter just can’t replicate.
Just watch it like a hawk while it's cooking, because going from nutty brown to burnt black happens in a flash, and you'll have to start over.
Is this dish intended to be sweet like dessert, or is it a savoury side?
This recipe sits gloriously in the middle! It has enough natural sweetness from the corn and sugar to pair nicely with rich main dishes like barbecue or roast meat, balancing the flavour profile.
If you want to push it fully into the savoury camp, reduce the sugar to just 1-2 tablespoons and fold in some grated cheese or fresh chives, as noted in the variations.
I need to make this gluten-free or dairy-free. Are there easy substitutions that still work well?
Yes, easy peasy! For gluten-free, substitute the all-purpose flour with a 1:1 gluten-free baking blend that contains xanthan gum for structure. For dairy-free, use a good quality plant based butter substitute and swap the heavy cream for full fat coconut milk (for richness) and the milk for unsweetened oat milk.
Posh Brown Butter Corn Pudding Recipe

Ingredients:
Instructions:
Nutrition Facts:
| Calories | 846 kcal |
|---|---|
| Protein | 7.6 g |
| Fat | 17.4 g |
| Carbs | 40.5 g |
| Fiber | 4.2 g |
| Sodium | 268 mg |
