Fudgy 2-Minute Brownie Mug Cake
- Time: Active 2 minutes, Passive 1 minute, Total 3 minutes
- Flavor/Texture Hook: Molten chocolate with a fudgy, dense crumb
- Perfect for: Solo late night cravings or quick entertaining
- Create a Velvety Brownie Mug Cake in Minutes
- Why This Works
- Selecting Your Elements for the Perfect Crumb
- The Building Blocks
- Essential Tools for Microwave Baking Success
- Step by Step Assembly and Cooking Method
- Solving Common Microwave Baking Hurdles Fast
- Scaling the Indulgence for More People
- Artisanal Variations and Flavorful Ingredient Swaps
- Troubleshooting Common Issues
- Kitchen Myths and Microwave Realities
- Keeping Your Dessert Fresh and Reviving Leftovers
- Visual Styling and Plating for Occasions
- Recipe FAQs
- 📝 Recipe Card
Create a Velvety Brownie Mug Cake in Minutes
The scent of warm, blooming chocolate hitting the microwave vents is a modern kitchen ritual that I absolutely adore. This Brownie Mug Cake is more than just a quick fix, it is a descendant of a long tradition of "emergency desserts" that dates back to the early days of home microwave adoption in the late 1970s.
While our grandmothers might have baked elaborate sponges for hours, the 21st-century kitchen has embraced the beauty of the single serving masterpiece. It represents a cultural shift toward mindful indulgence having exactly one perfect serving without the temptation of an entire leftover tray sitting on the counter.
I remember my first attempt at a microwave dessert years ago. I used too much leavening, and it ended up looking like a dry, porous sponge rather than a rich brownie. It was a disheartening moment, but it taught me that microwave baking is about moisture management, not just heat.
This specific version, which we have refined through many late night kitchen sessions, relies on the heavy lifting of coconut sugar and high fat cocoa to create a mouthfeel that is truly luxurious.
It is the kind of treat you make when the house is quiet and you want something that feels special, yet takes less time than making a cup of tea.
The beauty of this dish lies in its accessibility. You don't need a stand mixer or a preheated oven. You just need a favorite mug and a fork. We are using Dutch process cocoa here because it offers a darker, smoother flavor profile that reminds me of those expensive artisanal chocolate bars.
It is a humble recipe that yields sophisticated results, proving that you don't need a professional pastry kitchen to create something that makes your heart skip a beat. Whether you are a student in a dorm or a busy parent looking for a five minute escape, this mug cake is your new best friend.
Why This Works
Understanding the "why" behind this quick bake is what separates a rubbery cake from a fudgy one.
- Low Gluten Development: Since we stir the batter gently and only for a few seconds, the gluten in the all purpose flour remains relaxed, ensuring a tender bite.
- Humectant Properties: Coconut sugar acts as a humectant, meaning it holds onto water molecules tightly, which prevents the microwave from drying out the cake.
- Fat Saturation: Using melted coconut oil provides a rich mouthfeel that stays liquid like even as the cake cools slightly, mimicking the texture of a traditional fudgy brownie.
- Cocoa Bloom: The rapid heat of the microwave "blooms" the cocoa powder in the almond milk, releasing deep aromatic oils that wouldn't be as intense in a slow oven bake.
| Method | Total Time | Texture | Best For |
|---|---|---|---|
| Microwave | 3 minutes | Molten, fudgy center | Immediate cravings |
| Conventional Oven | 20 minutes | Crispy edges, cakey | Batch cooking |
| Air Fryer | 12 minutes | Crusty top, soft middle | Small batches (2-3) |
Microwave radiation works by vibrating water molecules, which generates heat. This is why the center often stays moist while the edges set first. In this recipe, we stop the cooking while the center is still a bit shiny because the residual heat will finish the job without turning the cake into a brick.
Selecting Your Elements for the Perfect Crumb
Choosing the right components is the difference between a mediocre snack and a gourmet experience.
| Ingredient | Science Role | Pro Secret |
|---|---|---|
| Dutch process Cocoa | Low acidity/High fat | Sift it with a fork to prevent bitter clumps. |
| Coconut Sugar | Moisture retention | Provides a subtle caramel note that mimics brown butter. |
| Sea Salt | Flavor contrast | Enhances the perception of sweetness and cuts through fat. |
| Coconut Oil | Moisture/Tenderness | Ensure it is fully melted to emulsify with the almond milk. |
Selecting a high-quality cocoa powder is vital. Dutch process cocoa has been treated with an alkalizing agent to neutralize its natural acidity. This results in a darker color and a much smoother, less astringent chocolate flavor.
If you used natural cocoa powder here, the cake might taste slightly sharp or metallic because we aren't using baking soda to neutralize it.
The Building Blocks
The ingredients in this recipe are chosen for their ability to react quickly under high intensity heat.
- 30g All purpose flour (1/4 cup) - Why this? Provides the essential structure without being too heavy or dense.
- 50g Coconut sugar (1/4 cup) - Why this? Its lower melting point creates a fudgy, almost syrupy interior.
- 15g Unsweetened Dutch process cocoa powder (2 tbsp) - Why this? Delivers deep chocolate intensity without the bitterness of natural cocoa.
- 1/8 tsp Sea salt - Why this? Acts as a flavor bridge between the sugar and the cocoa.
- 27g Melted coconut oil (2 tbsp) - Why this? High fat content ensures the brownie remains moist after cooling.
- 30ml Unsweetened almond milk (2 tbsp) - Why this? Provides the necessary hydration for the starch to gelatinize.
- 1/4 tsp Pure vanilla extract - Why this? Rounds out the chocolate notes with a warm, floral aroma.
- 15g Dark chocolate chips (1 tbsp) - Why this? Creates pockets of molten chocolate that enhance the sensory experience.
| Original Ingredient | Substitute | Why It Works |
|---|---|---|
| Coconut Sugar (50g) | Light Brown Sugar (50g) | Similar moisture level, adds a stronger molasses flavor. |
| Coconut Oil (27g) | Unsalted Butter (27g) | Adds a dairy richness but may feel slightly more "cakey." |
| Almond Milk (30ml) | Oat Milk (30ml) | Creamier consistency and a slight toasted grain sweetness. |
For those looking for a different texture, you might consider checking out my Fudgy brownie cookies which use a similar ratio of fats to sugars but are optimized for the oven's dry heat.
Essential Tools for Microwave Baking Success
You don't need a full patisserie setup, but the size of your mug is non negotiable for success.
Choosing the Right Vessel
A 300ml to 350ml (10 to 12 ounce) ceramic mug is the sweet spot. If the mug is too small, the batter will climb the walls and overflow, leaving a sticky mess on your microwave glass. If it's too wide, the brownie will be thin and prone to drying out.
Ceramic is the preferred material because it holds heat evenly and doesn't get as scorching hot as some glass options might.
The Mixing Implement
I always recommend a small whisk or a sturdy fork. A spoon tends to trap pockets of dry flour in the "shoulders" or bottom corners of the mug. A fork allows you to "whisk" the dry ingredients together, effectively sifting them without needing extra equipment.
This ensures that every bite is consistent and free of chalky surprises.
The Power Settings
Microwaves vary wildly in power. Most standard models run at 1000 to 1100 watts. If you have a very powerful microwave, you might need to drop the power to 80 percent to ensure the cake doesn't toughen up. We are aiming for a gentle, fast steam bake, not a high pressure blast.
Knowing your microwave's "hot spots" can also help placing the mug slightly off center often results in more even cooking.
step-by-step Assembly and Cooking Method
- Whisk the 30g all purpose flour, 50g coconut sugar, 15g Dutch process cocoa powder, and 1/8 tsp sea salt in a 300ml ceramic mug. Note: Breaking up cocoa clumps now prevents bitter pockets later.
- Pour in the 27g melted coconut oil, 30ml almond milk, and 1/4 tsp vanilla extract.
- Stir the mixture gently with a fork until the batter becomes glossy and dark.
- Fold in the 15g dark chocolate chips until they are evenly distributed.
- Place the mug in the center of the microwave on a small paper towel to catch any stray drips.
- Cook on high for 50 to 60 seconds until the edges are set and matte.
- Observe the center; it should still look slightly shiny and moist.
- Remove the mug carefully it will be hot and place it on a heat proof surface.
- Let the brownie rest for 60 seconds until the starches set into a fudgy crumb.
- Serve immediately while the chocolate chips are still in their molten state.
Chef's Tip: To get a truly decadent finish, add a tiny splash (about 1/2 teaspoon) of almond milk over the top of the batter right before microwaving. This creates a "steam cap" that keeps the top surface incredibly soft and velvety.
Solving Common Microwave Baking Hurdles Fast

Microwave baking can be finicky because of how fast everything happens. If your first attempt isn't what you expected, it's usually a minor tweak away from being perfect.
Why Your Brownie Turned Out Rubbery
The most common culprit for a rubbery texture is overcooking. In a microwave, ten seconds is the difference between "molten" and "pencil eraser." Another cause is over mixing the batter. Once you add the liquid, stir only until the flour disappears.
If you beat it like a traditional cake batter, you'll develop too much gluten, which toughens up instantly under microwave radiation.
Why the Bottom is Still Floury
This happens because mugs often have a curved bottom where a fork or spoon can't quite reach. When you are mixing the dry ingredients, make sure you really scrape the bottom edges. When you add the wet ingredients, do a "sweep and fold" motion to ensure the liquid reaches the very base of the mug.
| Problem | Root Cause | Solution |
|---|---|---|
| Tough or dry crumb | Overcooking or high wattage | Reduce time by 10 seconds or use 80% power. |
| Overflowing batter | Mug too small or too much air | Use a 300ml+ mug and stir gently, don't whisk air in. |
| Grainy texture | Sugar didn't dissolve | Ensure coconut oil is warm when adding to help melt sugar. |
Common Mistakes Checklist
- ✓ Forgot to melt the coconut oil (results in greasy clumps)
- ✓ Used a cold mug (increases cooking time unevenly)
- ✓ Skipped the rest period (essential for the fudgy set)
- ✓ Used natural cocoa instead of Dutch process (tastes acidic)
- ✓ Overcrowded the microwave with other items (divides the energy)
Scaling the Indulgence for More People
If you are making this for a partner or a small group, scaling requires a few tactical changes.
Making Two Mugs
While you might be tempted to just double everything and put both mugs in at once, I highly recommend cooking them one at a time. Microwaves work by distributing waves; two mugs will absorb those waves differently, often leading to one being raw while the other is overdone.
If you must do two, increase the time by about 50 percent and swap their positions halfway through.
Adjusting the Ratios
When scaling up for a small "party" of four mugs, I suggest mixing the dry ingredients in a large bowl first. This ensures perfect distribution of the sugar and cocoa. Then, spoon the dry mix into individual mugs and add the wet ingredients separately to each. For a more traditional experience with multiple people, you might prefer my Double chocolate brownies which are designed for a standard baking pan and offer a more consistent result for a crowd.
| Servings | Ingredient Adjustments | Mug Size | Total Cook Time |
|---|---|---|---|
| 1 Person | Standard recipe | 300ml | 50-60 seconds |
| 2 People | 2x ingredients, separate mugs | 300ml each | 100 seconds (total) |
| 4 People | 4x dry mix, mix wet per mug | 300ml each | 3-4 minutes (total) |
Artisanal Variations and Flavorful Ingredient Swaps
One of the best parts about this recipe is how easily it adapts to your pantry.
Troubleshooting Common Issues
| Issue | Solution |
|---|---|
| Why does skipping the egg create a better texture | In a traditional oven, eggs provide lift and structure. In a microwave, eggs often cook faster than the rest of the batter, leading to a "rubbery" or "spongy" texture. By omitting the egg, we rely on |
| How can I make this a "Healthier Version" | You can swap the all purpose flour for oat flour at a 1:1 ratio by weight (30g). Oat flour adds a lovely nuttiness and extra fiber. However, keep in mind that oat flour absorbs more liquid, so you may |
| Make this gluten-free | Yes, a high-quality gluten-free 1:1 baking flour (the kind with xanthan gum) works beautifully here. Because this isn't a high rising cake, the lack of gluten doesn't hurt the structure significantly. |
Kitchen Myths and Microwave Realities
There are many misconceptions about microwave baking that prevent people from trying it.
"Microwave cakes are always dry." This is a myth born from overcooking. Most people wait until the cake looks "done" on top, but by that point, the interior is already overextended. The cake continues to cook for about 60 seconds after the microwave stops.
If you pull it out while it still looks slightly underdone, you'll have a perfect, moist brownie every time.
"You can't get a crust in a microwave." While you won't get the "shatter thin" paper crust of an oven brownie, you can create a localized "sugar crust" by sprinkling a teaspoon of coconut sugar and a tiny pinch of salt on top before cooking.
The sugar melts and recrystallizes slightly as it cools, giving you a hint of that desired texture.
"Metal is the only thing that reflects microwave energy." Actually, thick ceramic or certain types of glass can also absorb or reflect energy, which is why your mug choice matters. A very thick walled mug will act as a heat sink, pulling energy away from the batter and extending the cook time.
A standard weight ceramic mug is the intended vessel for this specific timing.
Keeping Your Dessert Fresh and Reviving Leftovers
This recipe is designed for immediate gratification, but life happens.
Storage Guidelines
If you can't finish your brownie, cover the mug with plastic wrap or a lid once it has cooled to room temperature. It will stay soft on the counter for about 12 hours. In the fridge, it will last up to 2 days, but it will become very firm as the coconut oil solidifies.
Reheating and Zero Waste
To revive a cold mug cake, add a teaspoon of water or almond milk to the top and microwave on 50% power for 15-20 seconds. This creates a small amount of steam that softens the starches again. If you have leftovers that are truly past their prime, crumble them over a bowl of vanilla bean ice cream.
The "stale" brownie chunks act like a rich, chocolatey topping that softens beautifully as the ice cream melts.
Freezing Options
You can actually freeze the dry mix! I like to prep 5 or 6 small jars with the flour, sugar, and cocoa. When the craving hits, just pour a jar into a mug, add your oil and milk, and you are 60 seconds away from bliss. It's a great way to use up those last few tablespoons of cocoa powder or coconut sugar in the bag.
Visual Styling and Plating for Occasions
Even a mug cake can look like a five star dessert with a little bit of photography minded styling.
The contrast between the dark, matte brownie and a bright topping is key. A dollop of coconut whipped cream or a scoop of tart raspberry sorbet creates a beautiful visual tension. For a "seasonal" touch, I love adding a single sprig of mint or a few pomegranate arils during the winter months.
The deep red against the chocolate is stunning.
If you are serving this for a casual dinner party, don't just leave it in the mug. You can run a knife around the edge and "depan" it onto a small artisanal saucer. Drizzle with a little bit of extra melted dark chocolate and a dusting of cocoa powder.
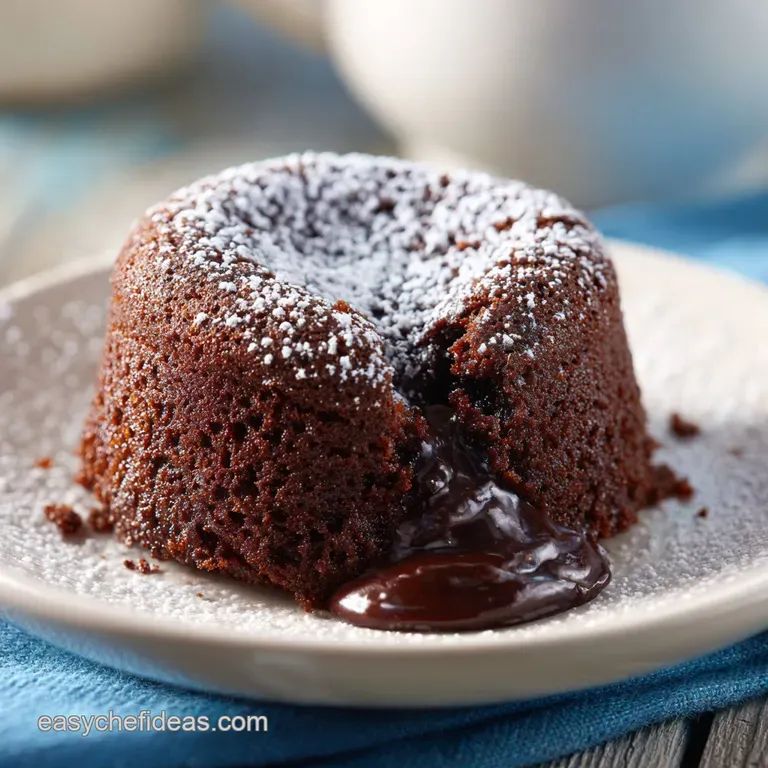
This elevates the dish from a "midnight snack" to a "thoughtful dessert." The molten center will spill out slightly, creating an appetizing "lava" effect that looks incredible in photos.
Always remember to wipe any stray drips off the rim of the mug or plate before serving to keep the presentation clean and focused on the rich, velvety texture of the brownie itself.

Recipe FAQs
Can you make brownies in a mug with brownie mix?
No, stick to the scratch recipe provided. Boxed mixes are balanced for large oven baked batches and often contain chemical leaveners that cause mug cakes to overflow or develop a rubbery, sponge like texture.
How to make chocolate mug brownies?
Whisk the dry ingredients in a 10-ounce to 12-ounce ceramic mug first. Once the flour, sugar, cocoa, and salt are combined, stir in the oil, milk, and vanilla, then fold in the chocolate chips and microwave on high for 50 to 60 seconds.
What is the best mug size for brownies?
Use a 10-ounce to 12-ounce ceramic mug. This size provides enough room for the batter to rise without spilling over while ensuring the microwave heat distributes evenly for a consistent cook.
What makes a mug brownie different?
It relies on rapid microwave steam rather than dry oven heat. Because the cooking happens in just 60 seconds, allowing the cake to rest for a full minute afterward is non-negotiable for achieving that signature chewy, fudgy texture. If you enjoyed mastering this quick set structure, you can see how heat intensity affects molten centers in our Chocolate Lava Cake recipe.
Why is my brownie dry and crumbly?
You likely overcooked it or used the wrong cocoa. Ensure you are using Dutch process cocoa powder, as natural cocoa is too acidic and creates a dry, lighter crumb, and always pull the mug out while the center still looks slightly shiny.
Can I store the brownie for later?
Yes, cover it with plastic wrap once it reaches room temperature. It will stay soft on the counter for 12 hours, though keeping it in the fridge for up to two days will make the coconut oil solidify and the texture significantly firmer.
How to fix a greasy brownie?
Whisk the melted coconut oil thoroughly into the milk before adding it to the dry ingredients. If the oil is added directly onto the flour or sugar, it tends to pool and create greasy patches rather than emulsifying into a smooth, glossy batter.
Fudgy Brownie Mug Cake

Ingredients:
Instructions:
Nutrition Facts:
| Calories | 642 kcal |
|---|---|
| Protein | 6.8 g |
| Fat | 36.2 g |
| Carbs | 84.5 g |
| Fiber | 7.2 g |
| Sugar | 56.4 g |
| Sodium | 315 mg |
