The Ultimate Cloud Loaf Simple Delistyle White Bread from Scratch
- Why This Homemade White Bread Recipe Tops the Store-Bought Standard
- Unlocking the Secret to the Perfect Fluffy Crumb
- Assembling the Foundation: Essential Components for Superior White Bread
- Crucial Equipment Checklist Before You Begin Mixing
- The Step-by-Step Journey from Pouch to Perfect Loaf
- Proofing Protocols: Mastering the Art of the Double Rise
- Troubleshooting Common Pitfalls in Your Baking Endeavor
- Variations and Enhancements for Your Next Batch
- Recipe FAQs
- 📝 Recipe Card
Why This Homemade White Bread Recipe Tops the store-bought Standard
There is a distinct, almost primal satisfaction that comes from pulling a truly magnificent loaf of White Bread from your own oven. Forget the flimsy, airy slices wrapped in plastic that seem to dissolve upon contact; we are talking about bread with substance, spring, and a subtle sweetness that only comes from using the right ingredients and a little dedicated time.
This homemade white bread recipe transforms simple flour, water, yeast, and fat into something extraordinary. It’s the foundation of comfort food, the sturdy base for the best grilled cheese, and the aromatic centerpiece of any weekend brunch.
We aim for a texture that is simultaneously light enough to feel cloud like, yet structurally sound enough to support your most generous toppings.
Unlocking the Secret to the Perfect Fluffy Crumb
Achieving that desirable "fluffy" quality hinges not just on measurements, but on technique specifically, how you handle the gluten development and how patiently you allow the fermentation process to occur.
This recipe is engineered to be an easy white bread recipe for beginners, but its results rival seasoned bakers. The goal is an open, yet uniform crumb structure that remains soft for days.
Ditching the Doughy Disappointments: Our Flavor Promise
The disappointment often stems from under proofing or using low-protein flour. To combat doughy disappointments, we rely on a generous amount of good quality White Bread with Bread Flour —this higher protein content provides the necessary scaffolding for the gases produced by the yeast to inflate properly, creating those beautiful, airy pockets.
The small addition of sugar isn't just for taste; it provides the necessary fuel for the yeast to produce abundant carbon dioxide quickly, ensuring a robust rise before it even hits the oven.
The Irresistible Aroma of Baking Real Bread at Home
Long before you slice into the finished product, the aroma signals success. The smell of make fresh bread wafting through your home is unmatched. This is primarily due to the Maillard reaction occurring on the crust during baking. As the surface browns, complex flavour compounds are released.
This recipe focuses on achieving a deeply golden, but not overly thick, crust that locks in moisture and provides that perfect audible crackle when squeezed gently post cooling.
Defining Our Approach to Classic Deli Style Texture
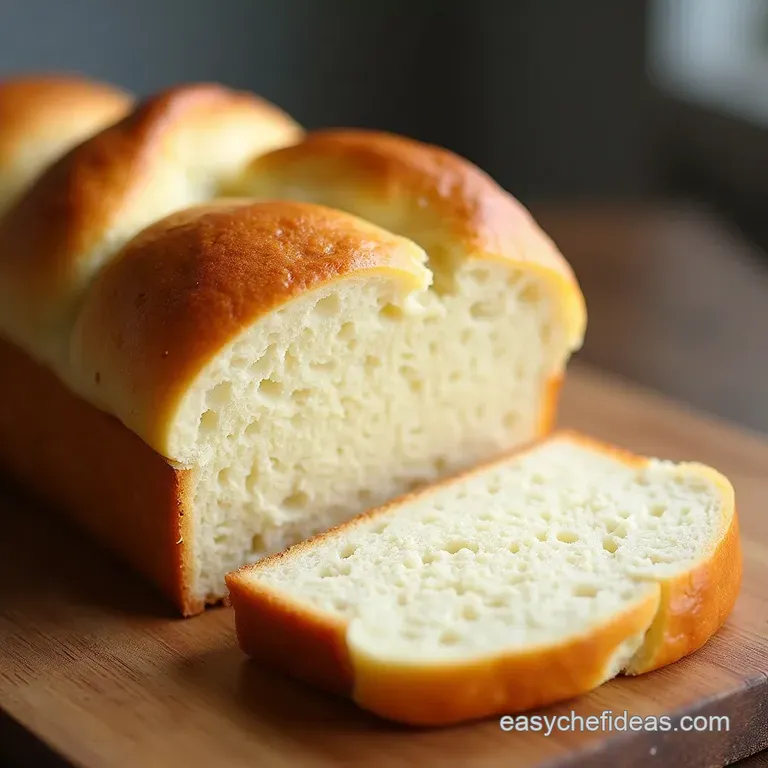
What defines deli style bread is its slightly rectangular shape and its very fine, velvety crumb perfect for stacking high with fillings. To achieve this, the shaping process is critical.
We move away from rustic, free form loaves and focus on tightly rolling the White bread dough recipe into a cylinder that fits snugly into a standard loaf pan. This confinement forces the final rise upward rather than outward, resulting in that classic, high crowned profile.
Assembling the Foundation: Essential Components for Superior White Bread
Before we start mixing, understanding what we are mixing is half the battle. This isn't just a bag of ingredients; it’s a chemical reaction waiting to happen. For this loaf, we are keeping things simple but high impact.
We begin with warm water (approximately 1 ¼ cups) which must hover between 105° F and 115° F, paired with 2 ¼ teaspoons of active dry yeast and 2 tablespoons of granulated sugar to wake up that yeast.
This activation step is non-negotiable for beginners learning how to bake a loaf of bread .
The bulk of our structure comes from 4 cups of bread flour, complemented by 1 ½ teaspoons of fine sea salt for flavour regulation. Finally, 3 tablespoons of softened unsalted butter, cut into small cubes, adds richness, tenderizes the crumb slightly, and significantly improves the final texture, moving us firmly into best white bread recipe territory.
Crucial Equipment Checklist Before You Begin Mixing

While you can certainly mix this by hand, having the right tools makes the journey to baking a loaf of bread far more enjoyable. Ensure your workspace is ready before you activate your yeast.
Selecting Flour Power: All-Purpose vs. Bread Flour Nuances
While you can use all-purpose flour, for the definitive, sturdy, yet soft fluffy white bread recipe , bread flour is the champion. Bread flour typically boasts a protein content of 12-14%.
This higher protein level translates directly into more gluten potential when mixed with water and agitated during kneading. More gluten means better elasticity and better structure to hold those lovely gas bubbles, preventing collapse.
The Role of Yeast: Activating Your Rise for Maximum Volume
The 2 ¼ teaspoons of active dry yeast must be verified as active. The initial bloom in the sugary water proves viability. If you see foam after about 10 minutes, you are good to go.
If nothing happens, your water was too hot or the yeast is old, and you must start this step over to ensure a successful rise.
Measuring Mastery: Precision Tips for Wet and Dry Elements
Precision matters immensely in baking, especially concerning dry goods. For the flour, never scoop directly from the bag with your measuring cup; this compacts it, adding too much weight. Instead, spoon the flour lightly into the cup and level it off with a straight edge.
For liquids, measuring cups with clear spouts allow you to check the level at eye height for accuracy.
Tooling Up: Pans, Mixers, and Thermometers You'll Need
A standard 9x5-inch loaf pan, lightly greased, is essential for achieving the correct final shape. If you have a stand mixer, the dough hook attachment is a massive time saver for the kneading stage.
A crucial, yet often overlooked, item is an instant read thermometer, which ensures your water is warm enough to activate the yeast without shocking it, and later verifies the internal temperature of the finished loaf ( 200° F– 210° F).
Related Recipes Worth Trying
- Best Unleavened Bread Recipe Crisp Flatbread in 20 Mins — Learn how to make unleavened bread thats perfectly crisp and chewy using only flour and boiling water A truly simple recipe perfect for Passover or scooping...
- The Best NoKnead Bread Recipe Rustic Hearth Loaf — Meet your new favourite easy bread recipe This rustic loaf uses a slowrise method for incredible flavour and a perfect crust Foolproof baking awaits
- Authentic Crisp Homemade Matzah Recipe Unleavened Bread — Finally master homemade Matzah This easy unleavened bread recipe uses 4 simple ingredients to achieve that perfect brittle crunch for your Seder meal Get baking
The step-by-step Journey from Pouch to Perfect Loaf
This is where the magic begins. Once the yeast is foamy, combine it with the 4 cups of flour and 1 ½ teaspoons of salt in your mixing bowl. Mix until just combined it will look shaggy then add your cubed, softened butter. This stage creates a relatively stiff, but yielding, mass ready for work.
Mixing Magic: Creating a Shaggy, Hydrated Dough Mass
In the initial mixing phase, we are simply hydrating the flour. Do not worry about smoothness yet; we want a shaggy mass that pulls away from the sides of the bowl. This ensures all the flour particles have access to the liquid before we begin the intensive gluten development process.
Kneading Kinetics: Developing Gluten Structure Effortlessly
Whether using a machine or your hands, kneading for 8 to 10 minutes is vital. Kneading aligns the gluten proteins, creating the elastic network necessary to trap the carbon dioxide the yeast is producing. The dough should transform from rough and sticky to smooth, supple, and resilient.
A well kneaded dough is the bedrock of any excellent first time bread recipe .
Shaping the Streamline: Forming Your Dough for the Pan
After the first long rise (bulk fermentation), gently deflate the air. This is not violent punching; it’s a gentle press. On a very lightly floured surface, flatten the dough into a rectangle slightly shorter than the length of your loaf pan.
Starting from one long edge, roll the dough up tightly, like rolling a yoga mat, ensuring there are no trapped air pockets inside. Pinch the final seam firmly closed and tuck the ends slightly before placing it seam side down into the prepared pan.
Oven Temperature Secrets for a Golden Brown Exterior
Preheat your oven to 375° F ( 190° C). This temperature is hot enough to provide significant "oven spring" (the final burst of rising upon entering the oven) but moderate enough to allow the interior to cook through before the exterior burns.
Brushing the top with a simple milk or egg wash 15 minutes before baking promotes that sought after deep, even golden hue.
Proofing Protocols: Mastering the Art of the Double Rise
Patience is the silent ingredient in superb baking. The first rise, or bulk fermentation, takes 1 to 1. 5 hours and allows the flavour to develop. The second rise, or final proofing inside the pan, dictates the final volume.
During this second rise, watch the dough, not the clock. It should nearly double again and crest about an inch above the pan's rim. If you gently poke the side, the indentation should spring back slowly, leaving a slight memory mark. This indicates perfect readiness to bake a loaf of bread .
Troubleshooting Common Pitfalls in Your Baking Endeavor
Even with the best recipe, sometimes things go awry. Don't despair; every baker has faced a collapsed loaf or a dense crumb.
Diagnosing Density: Why Your Bread Fell Flat
The primary culprit for density is either under proofing (the yeast didn't have time to create enough gas for the oven spring) or over kneading (which can sometimes tear the delicate gluten structure, though this is rarer with this method).
If the dough was perfectly risen but sank in the oven, the structure was likely too weak to support the expansion, often pointing back to insufficient kneading development.
Optimal Storage Solutions to Maintain Freshness Longer
To keep your White Bread soft, store it at room temperature in a paper bag for maximum freshness retention for the first day or two. Avoid airtight plastic bags immediately, as they trap moisture, which can make the crust soft and encourage mold growth sooner.
Once sliced, storing it cut-side down on a cutting board helps preserve the crumb.
Variations and Enhancements for Your Next Batch
Once you master the plain white loaf, feel free to experiment. This base recipe is incredibly versatile.
Sweetening the Deal: Incorporating Honey or Milk Substitutions
To boost flavour and tenderness, you can swap the 2 tablespoons of sugar for 3 tablespoons of honey. If you prefer a richer loaf that resembles classic Pullman bread, substitute the 1 ¼ cups of warm water with an equal volume of whole milk. This substitution makes the crumb softer and adds a faint yellow tint.
From Sandwich Slices to Toast: Utilizing Your Finished White Bread
Your finished loaf is perfect for the quintessential comfort food: toast. The medium density holds up beautifully under butter and jam. On top of that,, this bread makes truly superior French Toast or bread pudding, as its structure prevents it from disintegrating when soaked in custard.
The slightly sweet flavour profile complements both sweet and savoury applications equally well.

Recipe FAQs
Why didn't my White Bread rise properly, even though my yeast was foamy?
The most common culprit besides dead yeast is temperature during the proving stages. If your kitchen is too chilly, the yeast goes dormant; try placing the dough in a slightly warm spot, like inside a turned off oven with the light on.
Also, make sure you didn't add too much salt directly onto the yeast at the start, as salt can inhibit its activity.
Can I use All-Purpose (AP) flour instead of bread flour for this recipe?
You absolutely can, though the result won't be quite the same as the deli style loaf described. Bread flour has a higher protein content, which develops stronger gluten networks, yielding that desirable springy, slightly chewy texture.
AP flour will work, but your final loaf might be a bit softer and slightly less structured fine for toast, mind you!
How should I store homemade White Bread to keep it fresh? Is refrigeration a must?
Never put homemade bread in the fridge; it dries it out faster than you can say "bap!" Store the completely cooled loaf wrapped tightly in a clean tea towel or in a paper bag at room temperature for 2 3 days.
For longer storage, slice it first and freeze the slices; they toast beautifully straight from the freezer.
My crust is hard as a rock! How do I get that soft, perfect crust mentioned in the recipe?
A rock hard crust usually means either too little steam during baking or overbaking. Try placing a shallow pan of hot water on the bottom rack of your oven while preheating to generate steam, which keeps the crust soft initially.
The egg/milk wash also helps achieve that golden softness, but avoid baking past 210°F internal temperature.
This recipe seems a bit long. Can I speed up the proving/rising time?
While patience is a virtue when dealing with yeast, you can definitely speed things up safely. Ensure your proving area is consistently warm (around 75°F 80°F). Avoid the temptation to crank up the oven temperature, though, as too much heat kills the yeast, leaving you with a dense brick instead of a fluffy cloud loaf.
Fluffy Homemade White Bread

Ingredients:
Instructions:
Nutrition Facts:
| Calories | 2314 kcal |
|---|---|
| Protein | 52.4 g |
| Fat | 91.1 g |
| Carbs | 255.0 g |
| Fiber | 29.3 g |
| Sodium | 40272 mg |
