Oven Steak: the Effortless Reverse Sear Method
- Achieving Pub-Quality Steak at Home: The Reverse-Sear Revolution
- Choosing Your Cut and Essential Seasonings
- The Science of Perfection: Why the Oven Reverse-Sear Wins
- Step-by-Step: Mastering the Reverse-Sear Oven Method
- Troubleshooting and Professional Chef's Secrets
- Handling Leftovers: Storage and Reheating Safely
- Elevating Your Meal: Recommended Pairings for Oven Steak
- Recipe FAQs
- 📝 Recipe Card
Achieving Pub-Quality Steak at Home: The Reverse Sear Revolution
Stop panicking about tough, gray steaks. Seriously, stop it right now. The moment that perfectly seasoned slab hits the searing hot pan, the aroma fills the kitchen, promising that smoky, savory crust we all dream about. We aren't aiming for guesswork here; we are aiming for foolproof consistency.
This method guarantees a flawless, edge-to-edge pink interior every single time, making this the only Oven Steak recipe you will ever need.
This reverse sear technique is the ultimate lifesaver for busy weeknights or when you are trying to impress guests without stressing out. It takes almost all the pressure out of the final sear because 90% of the cooking happens gently in the oven.
It's affordable because you aren't risking an expensive piece of meat, and it’s ridiculously easy to clean up compared to splattering oil everywhere for 15 minutes.
Ready to ditch the traditional, stressful pan-fry method and master the secret professional chefs use? We are going to dive deep into exactly how to cook the most tender, consistently perfect Oven Steak you have ever encountered. Let’s crack on.
What is Reverse Searing and Why Use the Oven?
The reverse sear technique flips the traditional cooking method on its head. Instead of searing first and finishing low, we start low and slow in the oven and finish with a lightning fast sear. Why?
Because gentle, low heat allows the steak to cook perfectly evenly across its entire thickness, pushing the internal juices toward the center slowly. The moment you pull the steak out of the oven, its internal temperature is almost exactly where you want it to be.
Using the oven for this initial phase of cooking your Oven Steak means consistency is guaranteed. The gentle heat environment, usually 250°F (120°C), eliminates the dreaded gray band that forms when a cold steak hits high heat instantly.
That gray band is where the meat gets tough and dry; we want to avoid that entirely. The final over high heat sear then only needs about 90 seconds per side just to develop a ridiculously crunchy, flavor packed crust.
Required Equipment for Flawless Steak Results
Look, I’m usually the first person to tell you to use whatever you have in your cupboard. But for genuinely perfect Oven Steak , a couple of pieces of specialized gear are non-negotiable. If you don't have them, you are guessing, and guessing means risking a $20 steak.
The Essentials:
- Digital Thermometer: This is the most crucial piece of equipment. You need an instant read thermometer, ideally a probe style that can stay in the steak while it's in the oven. If the meat stalls at a lower temperature, you need to know exactly why, and only a reliable thermometer tells the tale.
- Wire Rack and Baking Sheet: Resting the steaks on a wire rack inside the oven allows the heat to circulate completely around the meat, ensuring even cooking on the bottom, too. It also helps with the air-drying stage.
- Cast Iron Skillet: For the final sear, cast iron holds heat like nothing else, giving you maximum crust development in minimum time. It’s what delivers that beautiful, dark brown finish to your Oven Steak .
Prepping the Steak for Optimal Cook Consistency
Prepping is 80% of the game when it comes to amazing results. When I was first learning this method, I skipped the drying step because I was impatient, and guess what? My "seared" crust was just sad and soggy. Learn from my mistake, friend.
The Crucial Step of Drying
As soon as you bring your steak home, remove it from the plastic, pat it aggressively dry with paper towels, and season it aggressively with flaky salt. Then, place it on that wire rack (over a baking sheet) and stash it in the fridge for at least 40 minutes, uncovered.
This evaporative process pulls moisture from the surface, creating the ideal dry canvas for an incredible over high heat sear.
Starting Cold vs. Room Temp Debate
For years, people swore you needed to let the steak come to room temperature. This is actually counterproductive for the reverse sear. We want the inside to be cold, so we can control the rate at which the heat penetrates.
Since we are cooking this Oven Steak slowly, keeping it cold initially gives you maximum control over that internal temperature gradient.
Choosing Your Cut and Essential Seasonings
This Oven Steak method works best when you give it something substantial to work with. If you try this with a thin cut, the over low heat oven stage might overcook the edges before the center even warms up. We want big, hearty steaks here!
Recommended Thick Cuts for Reverse Searing Success
We need thickness, ideally 1.25 inches (3.2 cm) or more. My favorites for a reliable and tender Oven Steak are:
- Ribeye: High marbling means phenomenal flavor and a tender bite. The fat cap melts beautifully during the slow cook.
- New York Strip (Sirloin): A good balance of marbling and firm texture, providing great beef flavor.
- Porterhouse or T-Bone: If you are cooking for two and want to tackle a real showstopper, these massive cuts offer great bone-in flavor.
Chef’s Note: Avoid flank or skirt steak for this specific reverse sear method, as their thin structure means they cook too quickly in the oven and lack the height needed for edge-to-edge consistency.
The Importance of Fat (Oils and Finishing Butter)
The oil is for the sear; the butter is for the flavor and the basting. You must use a high smoke point oil like grapeseed or avocado oil for the initial high heat blast, or your kitchen will be engulfed in acrid smoke immediately.
Once the beautiful crust has formed, then we introduce the butter, herbs, and smashed garlic cloves. Basting with that foaming, nutty brown butter is what truly makes this Oven Steak taste like it came from a five star kitchen.
Salt, Pepper, and Herb Substitutions for Flavor
Simplicity is key, but variety is the spice of life! You absolutely need quality salt (flaky sea salt is best) and freshly cracked black pepper. Don't use pre-ground pepper; it tastes like dust.
| Ingredient | Role | Viable Substitute/Variation |
|---|---|---|
| Flaky Sea Salt | Crust creation, seasoning | Fine kosher salt (use 3/4 the amount) |
| Fresh Black Pepper | Essential aromatic spice | White pepper (more subtle) or dried chili flake mix |
| High Smoke Point Oil | Searing base | Refined coconut oil or vegetable oil |
| Unsalted Butter | Finishing/Basting | high-quality ghee (if dairy intolerant) |
| Thyme/Rosemary | Aroma infusion | Sage sprigs or 1/2 tsp dried oregano (less potent) |
| Garlic Cloves | Flavor during basting | 1/2 tsp garlic powder mixed into the butter (less ideal, but works) |
The Science of Perfection: Why the Oven Reverse Sear Wins
Why does the reverse sear consistently outperform the traditional pan-sear? It’s all about physics and thermal mass. When you cook a cold steak quickly in a hot pan, the outer layers heat up immediately, contracting and squeezing moisture out, which creates the gray ring.
By putting the steak into a very low oven, we give the entire muscle time to relax and absorb the heat gently and evenly. This process is so steady that the difference between the temperature at the center and the temperature at the edge is minimal.
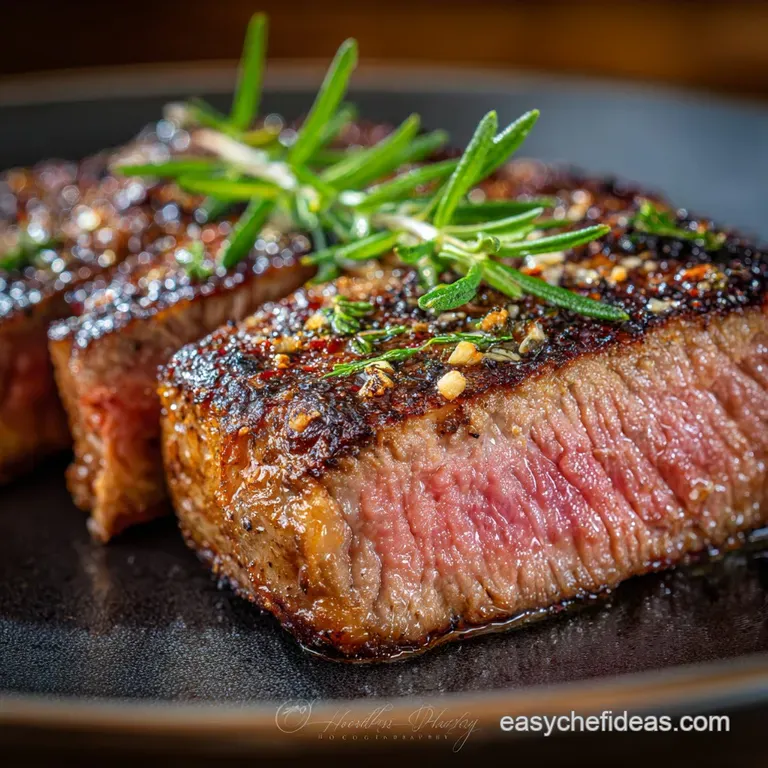
That’s how we achieve that perfect pink band across the whole piece of Oven Steak .
This slow cook also slightly dries out the surface of the steak just before the sear, even further than the fridge drying. This guarantees that when you hit the blazing hot pan, all the energy goes directly into the Maillard reaction (browning), not into evaporating leftover surface moisture.
If you want consistently tender results, mastering the perfect Oven Steak in this manner is non-negotiable.
step-by-step: Mastering the Reverse Sear Oven Method

Understanding Internal Temperature Zones (Doneness Guide)
You must know your target temperature before you start. Remember, the steak will rise 5 8 degrees F (2 4 degrees C) while resting, so pull it out of the oven slightly early!
| Desired Doneness | Oven Pull Temp (Pre-Sear) | Final Internal Temp (After Rest) |
|---|---|---|
| Rare | 115°F (46°C) | 125°F (52°C) |
| Medium Rare | 125°F (52° C) | 135°F (57° C) |
| Medium | 130°F (54°C) | 140°F (60°C) |
Achieving Edge-to-Edge Medium Rare Consistency
Our goal is 125°F (52°C) internal temperature when the steak leaves the oven. This is the key to perfect Oven Steak. Set your oven to 250°F (120°C). It’s low, it’s slow, and it’s controlled.
The total time for this phase will depend entirely on the thickness of your cut, usually 20 to 30 minutes for a 1.5 inch steak. Trust your thermometer, not the clock.
Phase 1: Low and Slow in the Oven (The Initial Cook)
- Get Ready: Preheat the oven to 250°F (120°C). Place the seasoned and dried steaks (on the wire rack) into the center of the oven.
- Insert Probe: If using a probe thermometer, insert it now into the center of the thickest part.
- Cook: Let the steaks cook undisturbed until they hit the pre-sear temperature target (125°F / 52°C for medium rare).
Phase 2: over High heat Sear and Basting
- Rest & Preheat: As soon as the steaks hit 125°F, pull them out immediately and transfer them to a plate. They will rest here for about 5 minutes while you turn your skillet heat to High. You want the skillet screaming hot, smoking slightly, before the Oven Steak goes in.
- Oil: Add the high smoke point oil. It should immediately shimmer.
- Sear: Place the steaks in the pan and press them down slightly with your tongs to ensure maximum contact. Sear undisturbed for exactly 90 seconds.
- Flip and Butter: Flip the steaks. Reduce the heat slightly to medium high and immediately add the butter, smashed garlic, and herb sprigs. The butter should foam rapidly.
- Baste: Tilt the pan and use a large spoon to scoop up the foaming brown butter and continuously pour it over the top of the steaks for another 60 90 seconds. This step is flavor magic!
Phase 3: The Mandatory Rest Period
Remove the finished Oven Steak from the skillet and place it on a clean cutting board. Tent it loosely with foil. Do not wrap it tightly, or it will continue to cook and steam the crust you just worked so hard for. You must rest the steak for 10 full minutes.
I know it’s torture, but this rest allows the contracted muscle fibers to relax, sucking the internal juices back in. Cutting early means those precious juices flood the board, leaving your steak dry. Resist the urge!
Troubleshooting and Professional Chef's Secrets
Even when cooking an Oven Steak , things can go wrong. Here are the common pitfalls and how to navigate them.
The Crucial Mistake of Searing a Cold Steak
If you skip the prep steps and try to reverse sear a steak straight out of the fridge, you might run into trouble during the oven phase. The surface might dry out too much before the center warms, and worst of all, any remaining surface moisture will cause sputtering and steaming during the sear.
Always chill and dry the steak uncovered first. It’s the difference between a crispy crust and a wet sizzle.
Calibrating Your Oven for Temperature Accuracy
Oven temperatures lie, frequently. If you followed the recipe exactly but your Oven Steak is taking twice as long as expected, your oven thermometer is likely inaccurate.
I once wasted half an hour on a fancy Oven Steak dinner only to discover my oven was running 50 degrees too cold. Buy a separate, cheap oven thermometer and verify the temperature before starting Phase 1.
Customizing Cooking Times for Thinner Cuts
What if you only have a 1 inch thick cut? You can still reverse sear, but you must be lightning fast. Check the internal temperature after just 12 minutes in the oven. For thin cuts, your window of perfection is tiny.
If the steak hits 120°F (49°C) early, pull it, rest it, and execute a quick 60 second sear instead of 90.
Handling Leftovers: Storage and Reheating Safely
Leftovers? What are those? If, by some miracle, you have extra of this perfect Oven Steak , don't ruin it by nuking it in the microwave.
Optimal Short Term Refrigeration
Allow the steak to cool completely before covering and refrigerating. Wrap tightly in foil or place in an airtight container. It will keep safely for 3 to 4 days. If you plan on using the leftovers for something else, like a fantastic Steak and Cheese Sandwiches: Elevated Ribeye Provolone Recipe , pre-slicing it makes it easy for fast assembly the next day.
Restoring Texture: The Best Way to Reheat
Never reheat this beautiful Oven Steak in a skillet or microwave. The only way to restore it without turning it tough is to use the oven again. Slice the steak thinly against the grain. Place the slices on a foil lined baking sheet. Preheat the oven to a very low 300°F (150°C).
Slide the slices in for just 3– 5 minutes, until they are warmed through but haven't started cooking further. This keeps the interior tender and juicy.
For longer term storage, the reverse sear Oven Steak freezes surprisingly well, tightly wrapped, for up to 3 months.
Elevating Your Meal: Recommended Pairings for Oven Steak
Serving the perfect Oven Steak requires minimal fuss, but a great side takes it from dinner to an experience. I highly recommend pairing the richness of the seared steak with something slightly acidic or sweet.
Simple Sauce Recommendations (Pan Drippings Base)
The pan drippings left in your cast iron skillet after searing are liquid gold. Don't waste them!
- Classic Red Wine Reduction: After removing the steak, pour off any excess oil, leaving the flavorful residue. Deglaze the pan with 1/2 cup of dry red wine, scraping up the browned bits. Reduce slightly, then whisk in 1/4 cup of good beef stock and a tablespoon of butter. Done.
- Blue Cheese Crumble: Skip the complicated sauce and simply sprinkle a good quality blue cheese (like Gorgonzola or Roquefort) over the hot Oven Steak during the rest period. The residual heat will melt it perfectly.
If you are aiming for a showstopping side dish, consider making some rich, flavorful oven-roasted Tomatoes: Liquid Sunshine Slow Roast Recipe while your steak is in Phase 1. The contrasting flavors are divine. And if you are cooking for a crowd and want more hearty options, you can run a batch of my famous OvenBaked Ribs: Low and Slow Recipe for Tender BBQ alongside the steaks, using a different rack. This perfect Oven Steak is a foundational recipe, the best friend of any hearty dinner plan. Enjoy!

Recipe FAQs
Why is a meat thermometer essential for the reverse sear method?
Using a meat thermometer is critical because the reverse sear relies on precision internal temperature (e.g., 125 130°F for medium rare) before searing begins. The oven cooks the steak so gently that visual cues or the 'touch test' are unreliable and too slow to indicate doneness accurately.
My final sear didn't produce a good, dark crust. What went wrong?
A poor crust is usually caused by excessive moisture remaining on the surface of the steak or a pan that wasn't hot enough. Ensure you pat the steak completely dry with paper towels immediately before searing, and let your cast iron pan heat for at least three minutes on high heat before adding oil and the steak.
Can I use thinner cuts like flank or skirt steak for reverse searing?
The reverse sear method works best for thick cuts ideally 1.5 inches or thicker like Ribeye, Porterhouse, or New York Strip. Thinner steaks will come up to temperature too quickly in the oven, which risks overcooking the interior and prevents the surface from drying out sufficiently for a successful sear.
Should I rest the steak between the oven phase and the searing phase?
No, resting is counterproductive between the two phases; you want the steak as hot and dry as possible for the sear. The crucial resting time (5 10 minutes) must occur immediately after the high heat searing process to allow the internal juices to redistribute properly.
My kitchen fills with smoke during the final high heat sear. How can I fix this?
Excessive smoke often indicates that you are using an oil with a low smoke point, such as standard olive oil. Switch to a high smoke point oil like grapeseed, avocado, or refined canola oil, and ensure your range hood is running at full capacity during the searing stage.
How should I store leftover oven steak, and how long will it keep?
Allow the leftover steak to cool fully, then store it in an airtight container in the refrigerator for safe consumption. Cooked steak should be eaten within 3 to 4 days, or it can be tightly wrapped and frozen for up to three months.
Can I use butter instead of oil for searing the steak?
Butter burns very easily at the high temperatures required for searing, so you should use a high smoke point oil for the initial crisping. If you want the rich butter flavor, add a knob of butter to the pan only during the final 60 seconds of searing and use it for basting.
Easy Oven Steak Reverse Sear

Ingredients:
Instructions:
Nutrition Facts:
| Calories | 700 calories |
|---|---|
| Fat | 50 g |
| Fiber | 0 g |
