The Proper British Bake Rich Creamy New York Style Baked Cheesecake
- The Quest for the Flawless Baked Cheesecake
- Why This Classic Recipe Outshines the Rest
- The Essential Components for Decadent Layers
- The Detailed Construction of Your Baked Cheesecake
- Troubleshooting Common Cheesecake Setbacks
- Elevating Your Final Product with Garnishes
- Frequently Asked Questions
- 📝 Recipe Card
The Quest for the Flawless Baked Cheesecake
There are certain desserts that carry an air of expectation; they are the grand statements of the baking world. A truly exceptional baked cheesecake sits firmly at the top of that list.
It’s more than just a dessert; it’s a commitment to texture a quest for that elusive balance between a sturdy, buttery base and a filling that melts away on the tongue like silk.
Many home bakers shy away from this classic, fearing the dreaded crack across the surface, but I assure you, achieving that dense, velvety result, reminiscent of the famed New York style, is entirely within your grasp.
This comprehensive guide walks you through every crucial stage, turning apprehension into absolute confidence as we construct what I call The Proper British Bake: Rich & Creamy New York Style Baked Cheesecake.
Why This Classic Recipe Outshines the Rest
This particular iteration moves beyond quick fixes. We are deliberately aiming for the dense, rich architecture characteristic of the best cheesecakes, utilizing digestive biscuits for a traditional, satisfyingly crunchy foundation, perfectly complementing the tangy, luscious filling.
The difficulty level here is rated as Medium, not because the ingredient ratios are complex, but because success hinges on mastering temperature control and technique specifically the incorporation of air and the use of a bain marie .
This isn't a ten-minute assembly job; with about 35 minutes of active prep and several hours dedicated to gentle cooling and chilling, the resultant flavor and texture payoff is exponential. We are aiming for a bake that serves 10 to 12 generous wedges, a true centerpiece for any gathering.
Setting the Stage: Achieving True Creaminess
The journey to a velvety baked cheesecake begins long before the oven is switched on. The single most critical factor for a smooth, lump free texture is the temperature of your primary ingredients.
We require 900g of full fat cream cheese, 3 large eggs, and 120ml of full fat sour cream all must be brought fully to room temperature. Cold cream cheese will fight you at every turn, resulting in small, unpleasantly gritty pockets in your otherwise perfect baked cheesecake filling recipe .
Once softened, you'll find the ingredients combine effortlessly, creating a homogenous base ready to accept flavor without resistance.
Demystifying the Water Bath Technique
The water bath, or bain marie , is non-negotiable for a perfect classic baked cheesecake . Its purpose is twofold: it introduces moisture into the baking environment, preventing the surface from drying out too rapidly, and it acts as a temperature buffer.
Instead of the harsh, direct heat of the oven element baking the sides too quickly, the water bath ensures gentle, even heat distribution across the entire circumference of the cake. This is vital for achieving that uniform set we crave.
A Chef’s Promise of No Cracks
Cracking occurs almost exclusively due to rapid temperature changes. My promise to prevent this involves three key safeguards: minimal mixing once eggs are added, gradual cooling within the switched off oven, and the diligent wrapping of the pan.
To combat the seepage that can ruin the base, the 9 inch springform pan must be encased in at least two layers of heavy duty aluminum foil before it ever meets the water bath. This meticulous waterproofing is the first line of defense against a soggy bottom.
The Essential Components for Decadent Layers
Every layer of this baked cheesecake with graham cracker crust (though we'll use digestive biscuits for a British twist, the principle is the same) serves a structural or flavor enhancing role.
The base provides necessary crunch and stability, while the filling relies on a specific blend of dairy, acid, and stabilizer to reach that ideal density.
Securing the Base: Graham Cracker Crust Components
For the base, we start with 225g of digestive biscuits (or graham crackers), blitzed into fine crumbs. These are bound together with 115g of melted, unsalted butter and 30g of granulated sugar. This mixture is pressed firmly into the base of the prepared pan.
A well compacted base is essential for later handling and contributes significantly to the overall structural integrity of the final product, whether you serve it as a full cake or later transform leftovers into baked cheesecake bars .
The Rich Core: Cream Cheese Temperament Guide
The foundation of the baked cheesecake filling recipe is the cream cheese. Ensure you use a full fat product low-fat varieties contain more water, which invariably leads to weepiness and a less satisfying texture. We use 900g of this superb ingredient.
Its primary role is density, but it needs to be perfectly soft to accept the sugar and flour without becoming overworked during mixing.
Flavor Architects: Vanilla, Lemon Zest, and Spice Ratios
While the cream cheese provides the canvas, the accents define the character. We are enhancing the richness with 1 teaspoon of high-quality vanilla extract and the zest of one large lemon.
The lemon zest is crucial; its essential oils cut through the richness of the dairy, providing a bright lift that stops the dessert from feeling heavy. A light dusting of 30g of all-purpose flour is introduced early on; this acts as a minor stabilizer, helping bind the structure just enough to prevent excessive spreading during the bake.
Equipment Check: Pans, Springforms, and Parchment Paper
Beyond the standard mixing bowls and electric mixer, precise equipment is necessary. You must use a 9 inch springform pan, as its removable side is the only practical way to release a delicate, fully set baked cheesecake .
The second essential piece is a large, deep roasting pan this vessel will hold the boiling water for the bain marie and must be large enough to comfortably accommodate your springform pan on the center rack.
Related Recipes Worth Trying
- The Best CrackFree New York Cheesecake Recipe — Stop chasing that perfect New York Cheesecake This detailed recipe delivers a dense creamy and flawless baked cheesecake top every time Get the secrets
- The Ultimate New York Cheesecake Recipe Rich Creamy — Stop hunting This is the perfect cheesecake recipedense gloriously creamy and wonderfully tangy with a crumbly base Master the water bath technique today
- Easy Mediterranean Baked Fish with Tomatoes and Olives — This easy Mediterranean baked fish recipe uses one sheet pan for minimal washing up Expect moist flaky fish swimming in bright tomatoes and capers Perfect...
The Detailed Construction of Your Baked Cheesecake
The construction phase marries the base and the filling, preparing them for their slow transformation in the oven. After preparing and baking the base for 10 minutes at 350° F ( 175° C) to set it, the oven is immediately reduced to 325° F ( 160° C) for the main bake.
This initial blast sets the crust; the lower temperature maintains the integrity of the filling.
Prepping the Pan and Forging the Crumb Foundation
As the base cools, wrap the foil meticulously around the outside of the springform pan, ensuring the foil extends high up the sides to prevent any accidental contact with water. Once the filling is ready, it is poured gently over the cooled crust.
A gentle tap on the counter surface at this stage is recommended it encourages any trapped air bubbles, which are the primary culprits behind surface blemishes, to rise and burst before they hit the oven.
Gently Incorporating Ingredients: Avoiding Over Mixing
When combining the wet ingredients, the process must be deliberate and slow. After the cream cheese, sugar, flour, vanilla, and sour cream are incorporated, you introduce the three room temperature eggs one at a time. After each egg addition, mix only until the yolk has just disappeared into the batter.
If you continue to beat the mixture once the eggs are present, you are whipping air into the batter. This trapped air expands during baking, then contracts sharply upon cooling, leading to sinking and cracking.
The Crucial Transition: Entering the Water Bath
With the filling poised, carefully place the foil wrapped pan inside the waiting roasting pan. Now, boil your water. Once boiling, place the roasting pan onto the middle oven rack, and then carefully pour the boiling water into the roasting pan until it reaches halfway up the side of the springform.
This step needs to be done inside the oven to prevent spills.
The Slow Cool Down: Preventing Sudden Temperature Shock
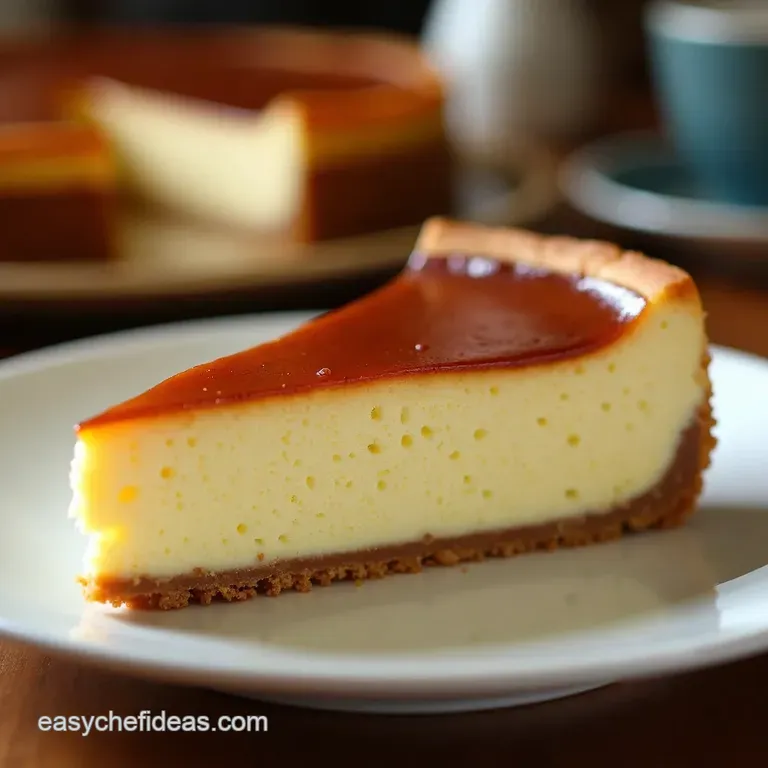
The baking process itself takes approximately 75 to 90 minutes. You know the baked cheesecake is done when the edges are firm and slightly puffed, but the center two inches still exhibit a distinct, gentle wobble, like firm jelly. This slight under baking is intentional.
The next hour is the most important: turn the oven off completely, prop the door open slightly using a wooden spoon handle, and allow the cake to reside in the residual warmth. This extended, gradual cooling period is the final defence against structural collapse, ensuring a perfect texture, whether you plan to slice it traditionally or cut it later into baked cheesecake bites .
Troubleshooting Common Cheesecake Setbacks
Even with the best preparation, issues can arise. If you find your cheesecake has developed cracks despite your best efforts, don't despair; the interior texture is usually unaffected. A simple cover of fruit compote or a dusting of powdered sugar can camouflage any minor surface imperfections.
If the base is soggy, it indicates a failure in the foil wrapping; next time, use a double layer of the thickest foil available.
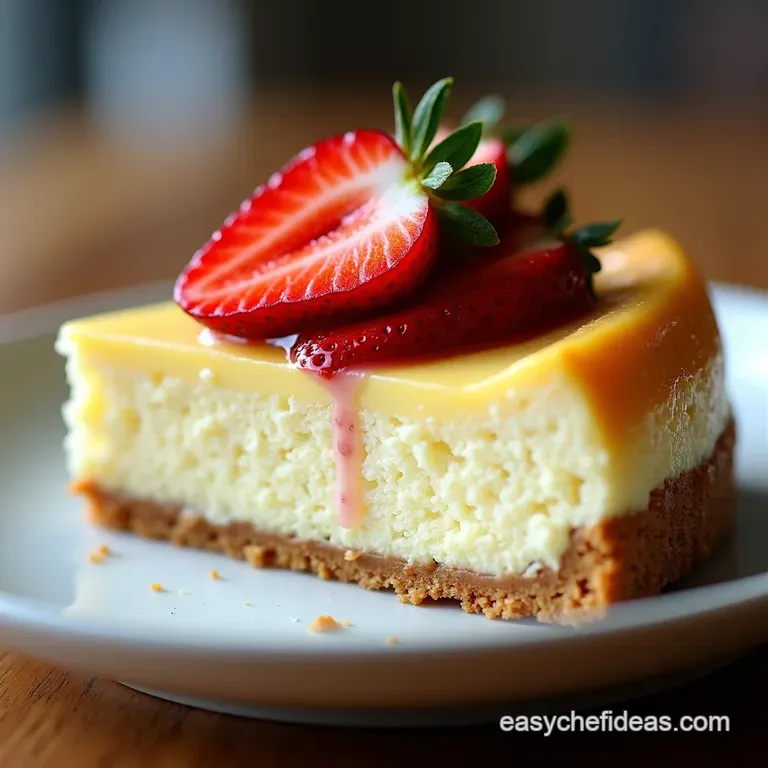
Elevating Your Final Product with Garnishes
A true New York style bake is often enjoyed simply, allowing the density and tang of the cheese to shine. However, presentation is key when serving this decadent creation.
Post Bake Care: Proper Chilling Duration for Firmness
Once the cheesecake has completed its slow descent out of the oven and cooled on a wire rack to room temperature, it must be chilled. Refrigeration firms the structure considerably.
For optimum slicing and that perfect mouthfeel, aim for a minimum of 6 hours, though overnight chilling is highly recommended.
Creative Variations: From Chocolate Swirl to Fruit Toppings
While our base recipe is classic, feel free to innovate. A stunning variation involves swirling in melted dark chocolate during the final mix, transforming it into a marbled delight. For a fresher approach, a sharp topping of lightly sweetened raspberries provides a beautiful color contrast to the ivory center.
Storing Leftover Perfection: Shelf Life Insights
This baked cheesecake recipe stores exceptionally well due to its high fat, low-moisture content (relative to sponge cakes). Keep leftovers tightly covered in the refrigerator for up to five days.
If you find yourself with slices left over, they also freeze beautifully; wrap individual portions tightly in plastic wrap and foil and freeze for up to two months, thawing slowly in the refrigerator before serving.

Frequently Asked Questions
Why does my Baked Cheesecake always crack on top? I follow the recipe religiously!
Ah, the dreaded crack! That's usually down to two main culprits: over mixing the batter, which introduces too much air, or a drastic temperature change during cooling. Make sure you only mix the eggs until just combined and, crucially, let the cheesecake cool down gradually inside the switched off oven with the door propped open for an hour.
It’s the cooling process that earns you that perfect, unblemished surface.
Can I skip the water bath (bain marie) when making this rich Baked Cheesecake?
While you technically could skip it, I wouldn't advise it if you want that signature silky texture. The water bath creates a moist, gentle heat environment, which cooks the edges slowly while protecting the centre from scorching.
Without it, you risk a dry, grainy texture or, worse, significant cracking, making it look a bit rougher than intended.
What's the trick to ensuring my cream cheese filling is perfectly smooth with no lumps?
The absolute golden rule here is room temperature ingredients and I mean room temperature! If your cream cheese, eggs, and sour cream are cold, they will never fully incorporate smoothly. Let everything sit out for at least an hour before starting.
Beat the cream cheese on its own first until it’s light and fluffy before gradually adding the other ingredients.
How long does a homemade Baked Cheesecake last in the fridge, and can I freeze leftovers?
Once fully chilled, this cheesecake is splendid for about 5 to 7 days when stored airtight in the refrigerator it often tastes even better on day two! Yes, you can freeze it; just make sure it's completely cooled, wrapped tightly in plastic wrap and then foil.
Thaw it slowly overnight in the fridge for the best results, though the texture might become marginally softer.
My oven temperature is unreliable; can I use a lower temperature for longer to cook the cheesecake?
A slightly lower temperature for a longer bake can absolutely work, especially if your oven runs hot, but you must respect the total cooking time. If you drop the temperature significantly (say, below 300°F/150°C), the centre might not set properly, leaving it too gooey.
Stick to the recipe's structure, focusing on the "slight wobble" centre, rather than aiming for a specific number of minutes.
Creamy Baked Cheesecake Recipe

Ingredients:
Instructions:
Nutrition Facts:
| Calories | 172 kcal |
|---|---|
| Protein | 2.5 g |
| Fat | 9.7 g |
| Carbs | 29.7 g |
| Fiber | 0.6 g |
| Sodium | 69 mg |
