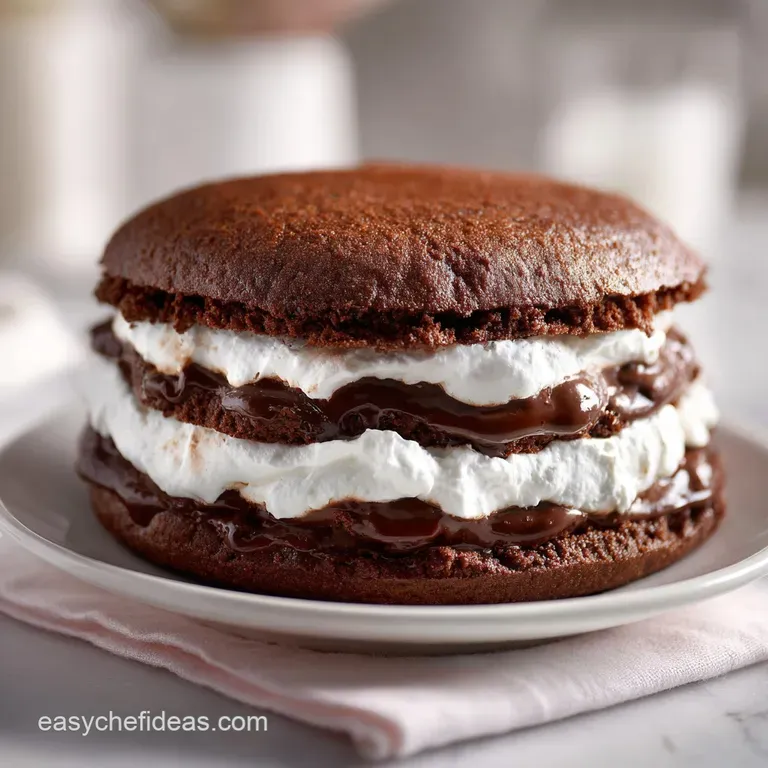
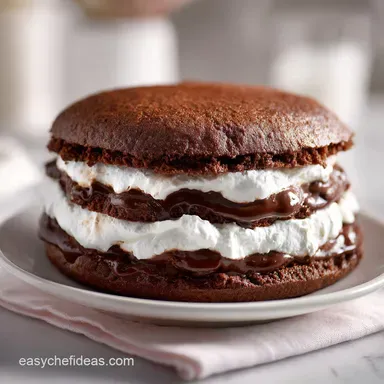
Chocolate Whoopie Pie Cake: Moist Layers

- Time: Active 20 minutes, Passive 25 minutes, Total 45 minutes
- Flavor/Texture Hook: Deep cocoa fudginess paired with airy, shatter proof marshmallow cream
- Perfect for: Birthday celebrations, potlucks, or when you need a nostalgic crowd pleaser
- Master the Chocolate Whoopie Pie Cake
- Why This Recipe Actually Works
- Component Analysis for Success
- The Selection of Essential Elements
- Tools for Perfect Cake Layers
- Step-by-Step Cake Assembly Guide
- Avoiding Common Baking Failures
- Scaling the Recipe for Any Crowd
- The Truth About Baking Myths
- Proper Cake Storage Guidelines
- Elegant Ways to Serve
- Recipe FAQs
- 📝 Recipe Card
Master the Chocolate Whoopie Pie Cake
The first time I pulled a giant whoopie pie cake out of the oven, the aroma of blooming cocoa was so thick you could practically taste it. I remember the kitchen was a bit of a disaster, flour dusting the counters like a light snowfall, but the sight of those two perfect, domed chocolate rounds made it all worth it.
My friends still talk about that specific party because the cake didn't just look impressive; it had that classic, slightly tacky to the touch top that every good whoopie pie should have.
Honestly, I used to struggle with getting the filling right. It was either too sweet or it would just squish out the sides the moment someone took a fork to it. Through a lot of trial and error (and many "ugly" cakes eaten in secret), I discovered that the secret isn't just more sugar.
It's about the structural integrity of the marshmallow fluff mixed with the right ratio of fats. This recipe is the result of those messy experiments, and it’s now my go to whenever I want to see people’s eyes light up.
We are going for that specific, old-fashioned Pennsylvania Dutch vibe but in a format that serves a whole table. You’re going to love how the slightly tangy buttermilk interacts with the hot coffee to create a crumb that is remarkably dark and rich.
It’s not just another chocolate cake; it’s a childhood memory reimagined as a sophisticated dessert. Trust me on this, once you try this version, the little plastic wrapped store cakes will never satisfy you again.
Why This Recipe Actually Works
- The Bloom Effect: Mixing cocoa with hot coffee dissolves lumps and releases the volatile flavor compounds for a more intense chocolate hit.
- Acidity Balance: Using buttermilk provides the necessary acid to react with the baking soda, creating a vigorous rise and a tender, velvety crumb.
- Fat Hybridization: Combining butter and shortening in the filling ensures a buttery flavor while maintaining a stable, airy texture that won't melt.
- Humectant Properties: The brown sugar helps retain moisture in the cake layers, preventing them from drying out even after 48 hours.
| Prep Method | Total Time | Texture | Best For |
|---|---|---|---|
| Hand Whisked | 55 mins | Denser, fudgy crumb | Quick family dessert |
| Stand Mixer | 45 mins | Airy, cake like dome | Parties and celebrations |
| Hand Mixer | 50 mins | Traditional soft texture | Casual weekend baking |
When you are planning your bake, keep in mind that the stand mixer is really the MVP here for getting that marshmallow filling to a cloud like consistency. If you're looking for other ways to use your mixer, you might find my Classic Homemade German recipe helpful for practicing your layer cake assembly. Using the right method ensures that your Chocolate Whoopie Pie Cake doesn't end up as a flat pancake.
Component Analysis for Success
| Ingredient | Science Role | Pro Secret |
|---|---|---|
| Buttermilk | Tenderizer | Sub with milk plus lemon juice if needed |
| Marshmallow Fluff | Emulsifier | Keeps the filling stable and prevents weeping |
| Cocoa Powder | Flavor Base | Sift twice to ensure zero lumps in the batter |
| Hot Coffee | Solvent | Use decaf if sensitive; it just boosts the cocoa |
The Selection of Essential Elements
To get the best results for this Chocolate Whoopie Pie Cake, you really want to pay attention to the temperature of your ingredients. Having your egg and buttermilk at room temperature prevents the batter from breaking when you mix the fats and liquids.
- 2 cups all purpose flour Why this? Provides the structural backbone without making the cake tough.
- ¾ cup unsweetened cocoa powder Why this? Use Dutch processed for a darker color and smoother taste.
- 1 ½ tsp baking soda Why this? Essential for that characteristic whoopie pie puff.
- ½ tsp salt
- ½ cup unsalted butter, softened
- 1 cup granulated sugar
- ½ cup brown sugar, packed Why this? Adds moisture and a hint of molasses depth.
- 1 large egg, room temperature
- 1 tbsp vanilla extract
- 1 cup buttermilk, room temperature
- ½ cup hot water or hot coffee Why this? Blooms the cocoa and hydrates the flour quickly.
- ½ cup unsalted butter, softened (filling)
- ½ cup vegetable shortening Why this? Provides the "stiffness" required for the center layer.
- 7 oz marshmallow fluff/creme
- 1 ½ cups powdered sugar
- 1 tsp vanilla extract (filling)
Tools for Perfect Cake Layers
You don't need a professional bakery to pull this off, but two 9 inch round cake pans are your best friends here. I highly recommend using parchment paper rounds at the bottom of the pans because this cake is quite tender and likes to cling to the edges.
A sturdy stand mixer or a powerful hand mixer is pretty much non negotiable for the filling; whipping that marshmallow fluff into submission takes some serious torque.
An offset spatula is another little tool that makes a huge difference. It allows you to spread the marshmallow cream right to the edges without dragging the cake crumbs along with it. If you’re used to making smaller treats, like my Irresistible Classic Chocolate recipe, you'll find that the batter consistency here is quite similar, just scaled up for a grander presentation.
step-by-step Cake Assembly Guide
Prepping the Chocolate Base
Preheat your oven to 350°F (180°C) and grease your cake pans thoroughly. Line the bottoms with parchment paper to ensure a clean release later.
The Creaming Process Explained
Cream the ½ cup softened butter with both granulated and brown sugars until the mixture is light and fluffy. This usually takes about 3 minutes on medium high speed.
Incorporating Liquid Gold
Add the egg and vanilla extract to the butter mixture. Beat well until completely combined and pale in color.
Sifting the Dry Components
Whisk the flour, cocoa powder, baking soda, and salt together in a separate bowl. This ensures the leavening agent is evenly distributed so you don't get large air pockets.
Alternate the Additions
Add the dry ingredients to the butter mixture in three parts, alternating with the buttermilk. Start and end with the flour until the batter is smooth and thick.
Blooming Your Cocoa Powder
Slowly pour in the hot coffee or water. Whisk by hand until the batter is thin but cohesive. Note: The heat helps the cocoa flavor "pop" and ensures a silky texture.
Baking Until Perfectly Set
Divide the batter equally between the two pans. Bake for 25 minutes until a toothpick comes out clean with a few moist crumbs.
Whipping the Cloud Filling
While the cakes cool, beat the remaining butter and shortening until perfectly smooth and white. Fold in the marshmallow fluff, then slowly add the powdered sugar and vanilla.
Final Layer Assembly
Once the cakes are cold, spread the filling over the flat side of one cake. Top with the second cake, flat side down, until the filling slightly bulges at the edges.
Avoiding Common Baking Failures
One of the biggest heartbreaks is when the cake layers sink in the middle. Usually, this happens if you open the oven door too early to check on them, causing a sudden temperature drop before the structure has set.
Another culprit is expired baking soda; if that powder has been in your pantry for over six months, do yourself a favor and buy a fresh box.
Fixing Sinking Cake Centers
If your cake does sink, don't panic. You can actually fill that center divot with extra marshmallow filling. No one will ever know once the top layer is on, and it actually makes for a delightful surprise in the middle of the slice.
| Problem | Root Cause | Solution |
|---|---|---|
| Filling is runny | Butter was too warm | Chill the filling for 20 mins before spreading |
| Cake is dry | Overbaked | Brush the layers with a little simple syrup |
| Top layer slides | Cake was still warm | Ensure cake is stone cold before assembly |
A common mistake I see is people trying to use only butter for the filling. While I love butter, a 100% butter filling will simply melt at room temperature once the marshmallow fluff is added.
Shortening isn't the "enemy" here; it's the structural engineer that keeps your cake looking like a masterpiece on the dessert table.
✓ Always sift your cocoa powder to prevent bitter "flavor bombs" in the cake. ✓ Measure your flour using the spoon and level method to avoid a dry, heavy crumb. ✓ Ensure the hot coffee isn't boiling; it should be hot to the touch but not steaming.
✓ Let the cake layers cool in the pan for 10 minutes before flipping them onto a rack. ✓ Beat the filling for at least 5 minutes to achieve the maximum possible volume.
Scaling the Recipe for Any Crowd
If you need to feed a smaller group, you can easily cut this recipe in half. Use a single 8 inch or 9 inch pan and reduce the bake time by about 5 minutes. You'll end up with a single layer cake that you can top with the marshmallow cream like a thick frosting.
It's less dramatic but just as tasty for a casual Tuesday night.
When you want to go big for a wedding or a massive reunion, doubling the recipe works well, but I suggest baking in batches. Overcrowding the oven can lead to uneven heat distribution, which might leave one cake underbaked while the other is perfect.
Keep your spices and salt at 1.5x the original amount when doubling to prevent the flavors from becoming overwhelming.
The Truth About Baking Myths
"Hot coffee will cook the eggs in the batter." This is a classic worry, but it’s actually false. By the time you add the coffee, it's being mixed into a large volume of flour and buttermilk, which quickly brings the temperature down. The coffee serves to hydrate the cocoa, not scramble your eggs.
"Shortening makes the filling taste oily." Not if you whip it correctly! When properly aerated with butter and powdered sugar, shortening provides a clean, neutral base that lets the marshmallow and vanilla shine. It’s all about the air you incorporate during the whipping process.
Proper Cake Storage Guidelines
You can keep this Chocolate Whoopie Pie Cake at room temperature in an airtight container for up to 2 days. Because of the marshmallow filling, it actually stays quite moist on its own.
If you need to keep it longer, the fridge is fine for up to 5 days, but just be sure to let it sit out for 30 minutes before serving so the butter in the cake softens up.
For zero waste, if you have leftover cake scraps from leveling the layers, don't toss them! Crumble them up and mix them into vanilla ice cream, or layer them with any leftover marshmallow filling in small jars for "whoopie pie trifles." You can even freeze individual slices wrapped tightly in plastic wrap for up to 3 months for those late night chocolate emergencies.
Elegant Ways to Serve
When it comes to serving, this cake doesn't need much. A simple dusting of powdered sugar on the top layer is traditional and looks beautiful. If you're feeling fancy, a drizzle of dark chocolate ganache over the top can make it feel more like a gourmet bakery item.
I personally love serving it with a side of fresh raspberries; the tartness of the fruit cuts through the rich sweetness of the marshmallow filling perfectly.
Always use a sharp, serrated knife to cut the cake. Use a gentle sawing motion rather than pressing straight down, which helps prevent the filling from being squeezed out the sides. If you want those clean, professional looking slices, wipe the knife with a warm, damp cloth between every single cut.
It's a bit of extra work, but the photos will look incredible!

Recipe FAQs
Can I substitute buttermilk with regular milk in the cake batter?
No, you should not substitute 1:1. Buttermilk’s acidity is necessary to react with the baking soda for the proper rise and tender crumb structure.
How to ensure the marshmallow filling stays stable and doesn't ooze out?
Beat the fats until completely white and airy before adding the fluff. The stability relies on incorporating maximum air into the fat/shortening base first; if you enjoyed mastering that aeration technique here, see how the same principle works in our How to Bake recipe for perfect volume.
Is it true that using hot liquid in the batter ruins the chocolate flavor?
False. Using hot coffee or water is essential for "blooming" the cocoa powder, which dissolves lumps and intensifies the final deep chocolate taste.
How to achieve a perfectly dark, fudgy cake layer?
Use Dutch process cocoa powder and add hot liquid. Dutch process cocoa yields a smoother, darker color than natural cocoa, and the heat ensures the powder fully incorporates without leaving dry pockets.
Why is my cake layer sticking to the pan despite greasing it well?
You likely skipped using parchment paper rounds. This cake is very moist; always use parchment cut to fit the bottom of the pan to guarantee a clean release after cooling.
Can I make the cake layers ahead of time for a party?
Yes, up to 24 hours ahead is ideal. Bake them, let them cool completely, and wrap each layer tightly in plastic wrap at room temperature before assembling the next day.
What is the best way to serve leftover cake to maintain moisture?
Store airtight at room temperature for up to two days. If storing longer, refrigerate it, but always let it sit out for 30 minutes before serving so the cake softens; it pairs beautifully with a quick topping like The Homemade Chocolate recipe.
Chocolate Whoopie Pie Cake
Ingredients:
Instructions:
Nutrition Facts:
| Calories | 525 calories |
|---|---|
| Protein | 4.6g |
| Fat | 23.5g |
| Carbs | 73.6g |
| Fiber | 1.8g |
| Sugar | 54.2g |
| Sodium | 275mg |
