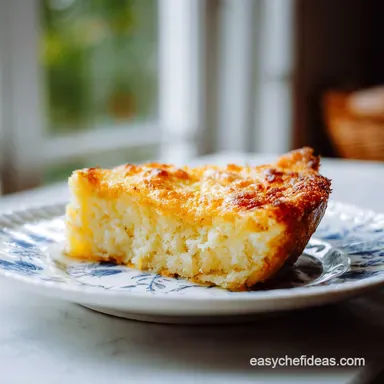
Bisquick Impossible Pie: Savory Beef and Cheese
- Time: Active 15 minutes, Passive 30 minutes, Total 45 minutes
- Flavor/Texture Hook: Savory beef base with a golden, puffed biscuit top
- Perfect for: Busy weeknights or a nostalgic family brunch
A Self Forming Golden Crust
What makes this dish so iconic is the way the textures interact. You get the "shatter" of the very top layer of the crust, followed by a soft, pillowy crumb, and then the hearty, seasoned beef.
Unlike a traditional pot pie where the crust can sometimes steam and get doughy underneath, this version integrates the cheese into the transition layer. It creates a bridge between the protein and the starch that is remarkably satisfying.
The visual appeal is all about the contrast. You have the deep, caramelized browns of the beef peeking through the edges, the vibrant yellow of the cheddar, and that characteristic matte gold finish on the crust. It doesn't look like a "quick" meal; it looks like something you spent hours assembling.
By using a glass pie plate, you can actually see the layers formed through the side, which adds a lovely rustic charm to the presentation.
Why This Works
The "magic" here isn't actually magic; it's a beautiful bit of kitchen physics involving density and suspension. We are basically creating a savory custard that uses starch to provide structure.
- Starch Migration: As the cold batter hits the hot meat and enters the 400°F (200°C) oven, the leavening agents in the Bisquick (baking soda and acidic salts) activate. Because the starch particles are lighter than the meat and fat, they naturally buoy toward the surface.
- Protein Coagulation: The eggs in the mixture act as the "glue." As they heat up, they form a matrix that traps the milk and starch. This is why whisking for exactly 60 seconds is vital it develops just enough gluten to hold the structure without making it tough.
- Fat Integration: The cheddar cheese acts as a barrier. It melts relatively early, creating a semi permeable layer that prevents the liquid batter from soaking too deeply into the meat, which helps prevent that dreaded "mushy" interface.
- Thermal Momentum: Starting with hot, browned beef means the bottom of the pie begins cooking immediately, while the top relies on the oven's ambient heat to brown. This dual direction cooking ensures the center sets before the top burns.
| Servings | Ground Beef | Bisquick Mix | Pie Plate Size | Bake Time |
|---|---|---|---|---|
| 3 people | 0.5 lb | 1/4 cup | 6 inch small | 20 minutes |
| 6 people | 1 lb | 1/2 cup | 9 inch standard | 30 minutes |
| 12 people | 2 lbs | 1 cup | Two 9 inch plates | 30 minutes |
When preparing this for a larger crowd, I always suggest using two separate 9 inch glass plates rather than one giant casserole dish. The physics of the "impossible" layer work best when the batter isn't too deep. If the layer is too thick, the middle stays jiggly while the edges get dry.
Component Deep Dive
Understanding your ingredients is the difference between a "fine" dinner and one people ask for every week. We aren't just tossing things in a pan; we are building layers of flavor.
| Ingredient | Science Role | Pro Secret |
|---|---|---|
| 1/2 cup Bisquick | Structural Base | Sift it first to avoid lumps in your "magic" slurry. |
| 2 Large Eggs | Emulsifier/Binder | Use room temperature eggs for a more even, airy rise. |
| 1 cup Whole Milk | Hydration | Don't use skim; the fat in whole milk creates a velvety crumb. |
| 1 lb Ground Beef | Protein Foundation | Pat it dry with towels after draining to stop grease pools. |
Chef's Tip: If you want to take the flavor to another level, add a tiny pinch of freshly grated nutmeg to the milk and egg mixture. It doesn't make it taste like dessert; it just highlights the savory notes of the cheese and beef.
Essential Ingredients and Staples
To get the best results, stick to the higher fat versions of these ingredients. Fat carries flavor, and in a crustless pie, you need that richness to carry the day.
- 1 lb lean ground beef (90/10): Why this? Higher fat beef makes the pie too greasy; 90/10 is the perfect balance.
- 1 cup yellow onion, finely diced: Why this? They provide a sweetness that cuts through the heavy meat and cheese.
- 1 tsp salt: Essential for bringing out the beef’s natural depth.
- 1/2 tsp coarse black pepper: Provides a subtle heat that lingers on the tongue.
- 1 cup sharp cheddar cheese, shredded: Why this? Sharp cheddar has a lower moisture content than mild, preventing a watery pie.
- 1/2 cup Original Bisquick mix: The engine that drives the self crusting magic.
- 1 cup whole milk: Necessary for a rich, tender "impossible" layer.
- 2 large eggs: The structural support system for the entire dish.
For a fun twist on these flavors, you might recognize the savory salty profile from my sausage balls, which use a similar starch to protein ratio for that classic comfort food texture.
| Original Ingredient | Substitute | Why It Works |
|---|---|---|
| Ground Beef (1 lb) | Ground Turkey (1 lb) | Similar texture. Note: Add 1 tbsp oil as turkey is leaner. |
| Whole Milk (1 cup) | Heavy Cream + Water | 1/2 cup each. Creates an even richer, silkier custard. |
| Sharp Cheddar | Smoked Gouda | Adds a woody, sophisticated flavor profile to the base. |
| Yellow Onion | Leeks (white parts) | Provides a milder, more "spring like" onion flavor. |
Using ground turkey is a great way to lighten things up, but remember that turkey lacks the iron rich "beefy" punch, so you might want to add a dash of Worcestershire sauce to the skillet during the browning phase.
Simple Tools for Baking
You don't need a high tech kitchen for this. In fact, simpler is better.
- 9 inch Glass Pie Plate: Glass is non negotiable for me. It conducts heat more evenly than metal and allows you to check the browning on the bottom and sides.
- Large Skillet: Use a heavy bottomed skillet (like a Lodge cast iron or a thick stainless steel pan) to get a good sear on the beef.
- Whisk: A balloon whisk is better than a fork for getting those 60 seconds of aeration into the batter.
- Paper Towels: This is actually a "tool" here. You must pat the cooked beef dry. Any residual surface fat will prevent the batter from clinging to the meat.
Steps to Pie Perfection

This process moves quickly once you start, so have all your ingredients measured and ready to go. This is what we call "mise en place," and it prevents you from scrambling while the beef is overcooking in the pan.
- Heat the environment. Preheat your oven to 400°F (200°C). Grease your 9 inch glass pie plate thoroughly with butter or non stick spray. Note: A well greased plate ensures the "crust" releases cleanly.
- Sizzle the beef. In your large skillet over medium high heat, cook the 1 lb ground beef and 1 cup diced onions. Cook until the meat is deeply browned and onions are translucent.
- Eliminate the moisture. Drain the fat from the skillet. Use paper towels to pat the beef mixture dry. Note: This is the most important step to prevent a soggy, oily pie.
- Layer the base. Spread the seasoned beef and onion mixture evenly across the bottom of the prepared pie plate.
- Add the melt. Sprinkle the 1 cup of shredded sharp cheddar cheese evenly over the warm meat. The heat from the beef will start to soften the cheese immediately.
- Create the slurry. In a medium bowl, combine the 1/2 cup Bisquick, 1 cup milk, and 2 eggs.
- Whisk with precision. Whisk the mixture for exactly 60 seconds. You want it relatively smooth, though a few tiny lumps are okay.
- The big pour. Pour the batter slowly over the meat and cheese. Use a spoon to ensure it reaches the edges of the pie plate.
- Bake to set. Place in the center of the oven. Bake for 25 to 30 minutes until the center is firm to the touch and the top is a deep golden brown.
- The crucial rest. Let the pie sit for 5 minutes before slicing. This allows the internal steam to settle and the layers to fully "lock" together.
| Method | Time | Texture | Best For |
|---|---|---|---|
| Oven (Standard) | 30 minutes | Crisp top, fluffy middle | The classic, intended result. |
| Stovetop (Skillet) | 20 minutes | Dense, more like a frittata | Quick lunch (lacks the browned top). |
| Air Fryer | 18 minutes | Extra crunchy edges | Small batches/halved recipes. |
While the air fryer is trendy, I find the oven method is the only way to get that specific "pie" structure. The air fryer tends to cook the top too fast, leaving the very center of the meat layer slightly too damp. If you're looking for that specific crispy on-the outside texture, the oven is your best friend. For another crispy favorite that uses a similar over high heat logic, check out my animal style fries for a weekend treat.
Pro Tips for Results
Even with a simple recipe, things can go sideways. The "impossible" part of the pie refers to the magic layering, but it can feel "impossible" to fix if you don't watch out for these common pitfalls.
Solving the "Jiggly" Center
If you pull the pie out and the center wobbles like Jello, it's not done. This usually happens if your milk was straight from the fridge and your beef had cooled down too much before you added the batter. The internal temperature needs to reach a point where the egg proteins can solidify.
If the top is getting too brown but the middle is still loose, tent a piece of foil over the top and give it another 5 minutes.
Preventing the "Soggy Bottom"
A soggy bottom is almost always caused by one of two things: undrained grease or watery onions. Onions release a lot of liquid as they cook. Make sure you sauté them until that liquid has evaporated and they are starting to turn golden.
If you see a pool of liquid in your skillet, don't pour it into the pie plate!
| Problem | Root Cause | Solution |
|---|---|---|
| Pie is oily | Beef wasn't drained/patted dry | Use paper towels to soak up every drop of fat after browning. |
| Crust didn't form | Batter wasn't whisked enough | Ensure a full 60 seconds of whisking to activate the leavening. |
| Top is burnt/Middle raw | Oven rack is too high | Bake on the center rack and check at 25 minutes. |
Common Mistakes Checklist:
- ✓ Always preheat your oven for at least 15 minutes before the pie goes in.
- ✓ Don't use "low-fat" or "fat free" milk; the structure will collapse.
- ✓ Shred your own cheese from a block if possible; pre shredded cheese is coated in potato starch which can thicken the batter incorrectly.
- ✓ Use a glass dish so you can visually confirm the bottom is browned.
- ✓ Let the meat rest after browning for 2 minutes before adding the cheese.
Creative Recipe Variations
Once you've mastered the basic cheeseburger version, the world of "impossible" pies opens up. This ratio of 1/2 cup Bisquick to 1 cup milk and 2 eggs is a universal template.
The Bisquick Impossible Chicken Twist
Swap the ground beef for shredded rotisserie chicken. Add a half cup of frozen peas and carrots to the meat layer and replace the sharp cheddar with Swiss or Gruyère. It tastes remarkably like a high end chicken pot pie but with a fraction of the labor.
I like to add a teaspoon of dried thyme to the batter for that classic poultry seasoning aroma.
The Original Bisquick Impossible Coconut Pie Recipe
This is the dessert version that started the whole craze in the 70s. You ditch the beef, onions, and cheese. Instead, you mix the batter with 1 cup of shredded coconut, 3/4 cup sugar, and 4 tablespoons of melted butter.
As it bakes, the coconut sinks to form a "crust," the middle becomes a custard, and the top gets toasted. It's a completely different experience using the exact same magic physics.
Vegetarian Mediterranean Swap
For a meatless version, sauté spinach, sun dried tomatoes, and Kalamata olives. Use Feta cheese instead of cheddar. The salty pop of the olives against the creamy batter is incredible. Just make sure to squeeze the cooked spinach very dry, or the excess water will ruin the emulsion.
Storing Your Leftover Pie
This dish actually holds up surprisingly well, making it a great option for meal prep.
- Fridge: Store in an airtight container for up to 4 days. I actually think the flavors meld and improve after 24 hours. The crust will soften slightly, but the savory beef layer becomes more cohesive.
- Freezer: You can freeze slices of this pie for up to 2 months. Wrap them tightly in plastic wrap and then foil. To reheat, don't use the microwave if you can avoid it it makes the crust rubbery.
- Reheating: The best way to revive the "shatter" of the crust is the toaster oven or a standard oven at 350°F (180°C) for about 10 minutes.
- Zero Waste Tip: If you have leftover diced onions that didn't make it into the pan, don't toss them! Sauté them with a little sugar and balsamic vinegar to make an onion jam. It’s a spectacular topping for the pie the next day. Also, any leftover Bisquick can be used to make a quick batch of biscuits or to thicken a gravy if you decide to serve the pie with a side of brown sauce.
Plating and Garnish Ideas
Because this dish is quite "brown and beige," the key to a beautiful presentation is color balance. We want to add fresh, vibrant elements to the plate to wake up the visual senses.
- 1. Vibrant Green
- Finely chopped Italian flat leaf parsley. Sprinkle this over the pie the second it comes out of the oven. The residual heat releases the parsley's oils, making it smell incredibly fresh.
- 2. Smokey Red
- A light dusting of smoked paprika. This adds a beautiful orange red hue to the golden crust and hints at a deeper, wood fired flavor.
- 3. Bright Pink
- Pickled red onions. Serve a small pile of these on the side. The acidity cuts through the richness of the beef and cheese, and the bright pink color makes the whole plate pop.
When serving, use a sharp serrated knife to cut the first slice. The first slice is always the hardest to get out cleanly (we call it the "cook's tax"), but once that's out, the rest will lift away from the glass plate perfectly.
Serve it alongside a crisp green salad with a sharp lemon vinaigrette to balance out the comfort food weight of the pie.
Kitchen Myths Debunked
There are a few old wives' tales about this recipe that we need to clear up so you can bake with confidence.
Myth 1: You must use "Original" Bisquick or it won't work. Truth: While the "Original" is the gold standard, the "Heart Smart" version works nearly as well, though the crust will be slightly less tender.
However, gluten-free baking mixes often require more liquid, so don't swap those 1:1 without adjusting.
Myth 2: Searing the meat "seals in" the juices. Truth: Searing is about the Maillard reaction creating those deep, complex flavor compounds on the surface of the beef.
It doesn't seal anything, but it does provide the savory backbone that makes the pie taste like a real meal rather than a bland casserole.
Myth 3: You can't over whisk the batter. Truth: You absolutely can. If you whisk for 5 minutes instead of 60 seconds, you'll develop too much gluten. Instead of a light, biscuit like top, you'll end up with a tough, leathery cap that’s hard to cut through.
Stick to the 60 second rule!
By following these steps and respecting the simple science behind the layers, you’ll turn a humble box of baking mix into a dinner that feels like a genuine achievement. It’s reliable, it’s comforting, and once you see that crust form for the first time, you’ll be a believer in the "impossible" too.
Let's get that oven preheating your future self will thank you when dinner is on the table in under an hour.

Recipe FAQs
What kind of filling is used in Impossible Pie?
This recipe uses a savory base of ground beef, onions, and sharp cheddar cheese. The Bisquick, milk, and eggs form a custard like batter that settles into a crust as it bakes.
Can Impossible Pie be made without coconut?
Yes, this specific version does not contain coconut. It is a savory main dish, unlike the classic dessert versions that rely on shredded coconut for texture.
Why is it called Impossible Pie?
It is named for the "impossible" way the ingredients separate during baking. You pour a single liquid batter over the meat and cheese, yet it magically forms its own crust on the bottom and sides while you bake at 400°F.
Can you freeze bisquick Impossible Pie?
Yes, you can freeze individual slices for up to two months. Wrap them tightly in plastic wrap followed by a layer of foil to prevent freezer burn.
How to ensure the crust does not stick to the pie plate?
Grease the 9 inch glass pie plate thoroughly using butter or non-stick cooking spray before adding any ingredients. If you enjoyed mastering the velvety sauce texture here, applying consistent surface coverage is the key to a clean release.
Is it true I should microwave the pie to reheat it?
No, this is a common misconception. Microwaving tends to make the crust rubbery; it is much better to reheat slices in the oven to revive the original texture.
How to get the best consistency for the batter?
Whisk the Bisquick, milk, and eggs for exactly 60 seconds. This timing ensures the mixture reaches a smooth consistency necessary for the ingredients to separate properly in the oven.
Bisquick Impossible Beef Pie
Ingredients:
Instructions:
Nutrition Facts:
| Calories | 308 kcal |
|---|---|
| Protein | 25.5 g |
| Fat | 15.8 g |
| Carbs | 10.8 g |
| Fiber | 0.5 g |
| Sugar | 2.4 g |
| Sodium | 617 mg |
