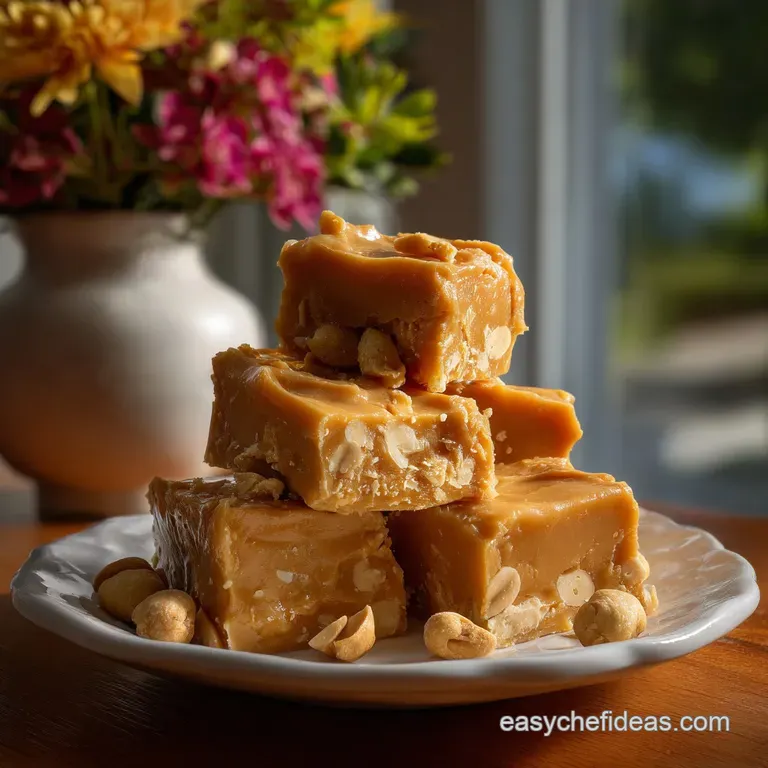
Creamy Peanut Butter Fudge | Simplest No-Fail Recipe
- Effort/Time: 15 minutes total, low-intensity assembly.
- Flavor Hook: Deeply roasted nuttiness balanced by a saline finish.
- Perfect for: Last-minute gifting, make-ahead holiday platters, and high-protein snack cravings.
- The Culinary Physics of Emulsion and Sugar Saturation
- The Alchemy of Elements: Selecting Your Fudge Components
- Yields and Timing for the Perfect Batch
- The Alchemy of Elements: Selecting Your Elements
- Precision Tools for Superior Texture Control
- The Thermal Assembly Protocol: Step-by-Step Construction
- Analyzing Structural Failures and Texture Imbalances
- ⚗️ The Scaling Lab: The Physics of Quantity
- Common Myths in the Fudge World
- Preservation Physics and Quality Maintenance
- Flavor Architecture and Ingredient Adaptations
- Visual Presentation and Curated Pairing Strategies
- Recipe FAQs
- 📝 Recipe Card
Mastering the Ultimate Creamy Peanut Butter Fudge at Home
There is nothing more demoralizing than investing in high-quality ingredients only to end up with a grainy, oil-slicked slab of cement. I’ve seen countless home cooks and even some pros watch in horror as their fudge breaks into a crumbly, sandy mess that eventually ends up in the trash bin.
The financial cost of wasted nut butter and dairy is one thing, but the emotional drain of a failed centerpiece is what really stings.
I’ll be the first to admit that I once tried to rush the cooling process by tossing a hot batch directly into the freezer. I ended up with a rock hard perimeter and a soup like center that never fully set, proving that physics doesn't care about your schedule.
I’ve spent years refining this specific peanut butter fudge to ensure the ratio of fats to sugars stays perfectly balanced, preventing that dreaded separation.
The secret to this "Masterclass" version isn't just about mixing; it’s about the science of emulsification and sugar saturation. By using sweetened condensed milk as our base, we leverage pre-dissolved sugar crystals and milk solids to create a stable matrix.
This prevents the "seizing" that happens with traditional recipes, resulting in a peanut butter fudge that is velvety, dense, and structurally sound enough to hold its shape at room temperature.
The Culinary Physics of Emulsion and Sugar Saturation
- Lecithin Stabilization: Peanut butter naturally contains lecithin, which acts as an emulsifier to bind the fat from the butter and the water based milk.
- Controlled Recrystallization: The high concentration of sugar in the condensed milk prevents large crystals from forming, ensuring a smooth mouthfeel.
- Lipid Integration: Adding cubed butter at a specific temperature allows the fats to interlock with the nut oils rather than floating on top.
- Hygroscopic Balancing: The salt and sugar work together to manage moisture, preventing the fudge from sweating or becoming tacky in humid environments.
The Alchemy of Elements: Selecting Your Fudge Components
| Ingredient | Chemical/Physical Role (Science) | The Pro Secret (Why This Matters) |
|---|---|---|
| Creamy Peanut Butter | Provides the protein structure and primary lipid base | Use a stabilized brand (like Jif) to prevent oil separation during heating. |
| Sweetened Condensed Milk | Acts as a pre-saturated sugar solution and thickener | The reduced water content ensures the fudge sets firmly without boiling to "soft ball" stage. |
| Unsalted Butter | Lowers the melting point and adds a creamy, fat-rich finish | Cubing it cold ensures it melts slowly into the emulsion rather than breaking it. |
| Fine Sea Salt | Modulates osmotic pressure and sharpens flavor perception | Finer grains dissolve instantly into the fats, preventing a "crunchy" salty surprise. |
Yields and Timing for the Perfect Batch
- Prep Time: 10 minutes
- Cook Time: 5 minutes
- Total Time: 15 minutes
- Yield: 36 servings
This peanut butter fudge recipe is designed for maximum efficiency. While the assembly is fast, the setting time is non-negotiable for the internal crystal structure to stabilize. Think of this as a marathon, not a sprint even though the "running" part only takes a few minutes.
The Alchemy of Elements: Selecting Your Elements
Selecting the right components is the difference between a mediocre snack and a professional grade peanut butter fudge.
- 2 cups (512g) Jif Creamy Peanut ButterWhy this? Stabilized oils prevent the fudge from becoming "greasy" at room temperature.
- Substitute: Almond butter (smooth). Note: Result will be significantly softer and less structurally stable.
- 1 can (14 oz / 397g) Eagle Brand Sweetened Condensed MilkWhy this? Provides the precise sugar-to-protein ratio required for a no-fail set.
- Substitute: Evaporated milk + 1.25 cups sugar. Note: Requires boiling to 235°F, which changes the recipe complexity.
- 1/4 cup (57g) Kerrygold Unsalted Butter, cubedWhy this? Higher fat content than standard butter creates a silkier finish.
- Substitute: Coconut oil (solid). Note: Adds a distinct tropical flavor and lower melting point.
- 1 tsp (5ml) Nielsen Massey Vanilla Extract
- Substitute: Maple syrup. Note: Adds a woody sweetness but slightly increases moisture.
- 1/4 tsp (1.5g) Diamond Crystal Fine Sea Salt
- Substitute: Kosher salt. Note: Use double the volume (1/2 tsp) because of larger crystal size.
Precision Tools for Superior Texture Control
For the best results, skip the thin aluminum pans. I highly recommend using a Lodge Enameled Cast Iron Dutch Oven or a heavy bottomed All-Clad Saucepan. The thermal mass of these tools prevents "hot spots" that can scorch the milk solids.
You’ll also need an 8x8-inch Pyrex Baking Dish and a over high heat silicone spatula to ensure you can scrape every bit of the mixture from the sides, preventing wasted product and uneven cooling.
The Thermal Assembly Protocol: step-by-step Construction

- Line an 8x8-inch pan with parchment paper, leaving an overhang on two sides. Note: This allows for a "clean lift" once set, preventing the fudge from shattering during removal.
- Combine the 14 oz of sweetened condensed milk and 1/4 cup of cubed butter in a heavy saucepan over medium low heat.
- Stir constantly for 3 minutes until the butter is fully melted and the mixture looks like glossy liquid gold.
- Add 2 cups of creamy peanut butter to the warm milk mixture.
- Fold the mixture gently with a spatula until the nut butter is fully incorporated and the texture is uniform and matte.
- Remove the pan from the heat immediately until the bubbling subsides and the nutty aroma intensifies.
- Whisk in 1 tsp of vanilla extract and 1/4 tsp of sea salt.
- Pour the mixture into the prepared pan, smoothing the top with an offset spatula until the surface is level and reflects a soft sheen.
- Tap the pan firmly on the counter three times until trapped air bubbles rise to the surface and pop.
- Chill in the refrigerator for at least 4 hours until the center feels firm to the touch and the edges pull away slightly from the paper.
Chef's Note: If you want to experiment with other textures, this technique is very similar to the one I use in my low-fat Rice recipe, where temperature control is key to keeping the marshmallow (or in this case, the milk) from becoming too tough.
Analyzing Structural Failures and Texture Imbalances
Why Your Fudge Is Too Soft
This usually occurs when the emulsion hasn't been heated enough to drive off excess moisture, or if a "natural" peanut butter with high oil content was used. Without the stabilizers found in commercial brands, the lipids remain fluid at room temperature.
| Problem | Root Cause | The Fix | Pro Protocol |
|---|---|---|---|
| Soft/Gooey | High moisture or natural oil | Return to heat briefly | Add 2 tbsp of powdered sugar to bind the excess oil. |
| Oily Surface | Emulsion break (overheating) | Vigorous whisking | Add 1 tsp of warm milk and whisk off-heat to re-emulsify. |
| Grainy | Sugar recrystallization | Heat milk/butter first | Never add the peanut butter until the milk/butter are a cohesive liquid. |
Oily Surface Separation
If you see a pool of oil on top of your peanut butter fudge, you likely applied too much heat too quickly. This causes the fats to separate from the protein solids. To fix this, you must lower the temperature and use mechanical force (whisking) to pull the emulsion back together. It’s a delicate balance, much like the one found in a Pumpkin Butter Velvety recipe, where fats and sugars must be slowly integrated to maintain a spreadable consistency.
⚗️ The Scaling Lab: The Physics of Quantity
Scaling a peanut butter fudge recipe isn't as simple as doubling the numbers. When you increase the volume, the thermodynamics of the pan change drastically.
- The Evaporation Paradox: If you double this recipe in the same saucepan, the surface area doesn't increase, but the volume does. This means moisture escapes slower. You may need to cook the milk/butter mixture for an extra 2 minutes to achieve the same thickness.
- Pan Crowding (Thermal Mass): Using a pan that is too small for a double batch will result in the center remaining liquid while the edges overcook. Always use two 8x8 pans rather than one deep pan.
- Flavor Saturation: Scale the salt to 1.5x only. Salt's impact on the palate increases exponentially in dense fats like peanut butter.
- Carry Over Heat: A double batch holds more internal energy. Pull it from the heat slightly earlier than a single batch, as the residual heat will continue to "cook" the mixture for several minutes.
Common Myths in the Fudge World
- Myth: You must use a candy thermometer to make fudge.
- Truth: Not with the condensed milk method. The sugar is already dissolved and the milk solids provide the structure, making "soft ball" stage testing unnecessary.
- Myth: Natural, stir style peanut butter is better for fudge.
- Truth: Natural oils are too unstable. For the signature "snapping" texture of professional peanut butter fudge, stabilized brands provide a much more consistent result.
- Myth: You can't over stir fudge.
- Truth: Over stirring as it cools can actually introduce air and encourage premature crystallization, leading to a dull, dry finish.
Preservation Physics and Quality Maintenance
Storage: Store your peanut butter fudge in an airtight container at room temperature for up to 1 week, or in the refrigerator for up to 3 weeks. The high sugar and fat content act as natural preservatives, but exposure to air will cause the edges to become dry and crumbly.
Freezing: This recipe freezes beautifully. Wrap individual squares in plastic wrap, then place them in a heavy duty freezer bag. They will maintain their texture for up to 3 months. To serve, thaw in the fridge overnight to prevent "sweating" caused by rapid temperature changes.
Zero Waste Tip: Don't throw away the "scraps" or crumbs from cutting the squares. Transform: Melt them down and use them as a decadent ripple inside homemade vanilla ice cream or as a filling for stuffed cupcakes.
Science: Since the fudge is already an emulsion, it melts smoothly into other fats without becoming gritty.
Flavor Architecture and Ingredient Adaptations
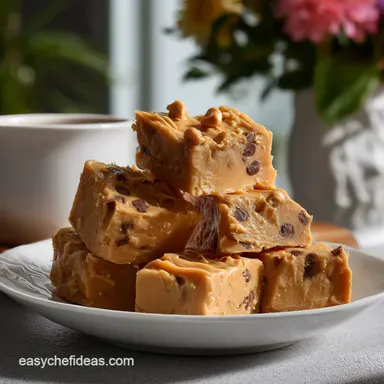
Chocolate Marble Twist
Melt 1/2 cup of semi sweet chocolate chips and drop dollops onto the warm fudge before it sets. Use a knife to swirl the chocolate into the peanut butter fudge base. The contrasting melting points of the chocolate and the nut butter create a complex mouthfeel.
Crunchy Texture Swap
While the recipe calls for creamy, you can substitute 1 cup of the creamy for crunchy peanut butter. This introduces roasted nut fragments that provide a "structural break" to the otherwise uniform fudge.
Salted Caramel Variation
Drizzle a thick caramel sauce over the top of the set fudge and sprinkle with Maldon flaky salt. The large salt flakes provide a different "saline hit" than the fine sea salt integrated into the base, which changes how your taste buds perceive the sugar.
Visual Presentation and Curated Pairing Strategies
When serving this peanut butter fudge, presentation is everything. Use a hot knife (dipped in boiling water and wiped dry) to get those perfectly sharp, clean edges.
The Coffee Pairing: This fudge is exceptionally dense, meaning it pairs perfectly with a high acid beverage. A light roast Ethiopian coffee or a bitter Espresso will cut through the fat of the peanut butter, cleansing the palate between bites.
Dessert Board Feature: Arrange the fudge alongside tart green apples, dark chocolate shards, and salty pretzels. The acidity of the apples and the crunch of the pretzels provide the necessary contrast to the rich, velvety texture of the peanut butter fudge.
Trust me, your guests will appreciate the variety of textures more than a single note dessert.
This recipe is a testament to the fact that you don't need a degree in chemistry to make "Masterclass" treats you just need to understand how your ingredients interact. Let's crack on and get a batch in the fridge!

Recipe FAQs
How to make peanut butter fudge?
Melt condensed milk and butter, then fold in peanut butter. This simplified emulsion relies on the stabilized fats in the peanut butter to create structure without needing a candy thermometer. Ensure you use a heavy bottomed pan to prevent scorching the milk solids.
How to make peanut butter fudge with condensed milk?
Use one 14oz can per two cups of peanut butter. The high sugar content in condensed milk preemptively dissolves the sugar crystals, guaranteeing a smooth texture. If you mastered controlling cookie spread here, see how the same fat-to-sugar ratio logic applies to our Foolproof Flaky Pie Dough Recipe Butter Pastry From Scratch.
How to make peanut butter fudge with icing?
Myth: Using pre-made icing results in better fudge. Reality: Icing contains too much powdered sugar and corn syrup, leading to a brittle, overly sweet final product that crumbles.
How to make peanut butter fudge in the microwave?
Only melt the butter and milk; do not cook the mixture. Microwaving milk solids causes rapid, uneven overheating and guarantees a seized, grainy texture. Use the microwave only to bring the base ingredients to a warm, meltable state before folding in the peanut butter.
How to make peanut butter fudge with marshmallow fluff?
Marshmallow fluff substitutes some sugar and moisture content. Fluff provides significant aeration, resulting in a lighter, slightly cakier texture compared to dense, traditional fudge. This method is quicker but lacks the deep, glossy set of the condensed milk version.
Does peanut butter fudge need to be refrigerated?
No, room temperature storage is fine for one week. The high fat and sugar concentration acts as a preservative, preventing microbial growth. Storing it in the fridge too long can slightly dull the creamy mouthfeel upon serving.
Salted vs. Unsalted Butter for Fudge?
Unsalted butter for precision control. Salted brands vary widely in sodium content, making standardization difficult. Unsalted lets you adjust seasoning based on the salt already present in the peanut butter.
Best Peanut Butter Fudge Recipe
Ingredients:
Instructions:
Nutrition Facts:
| Calories | 130 kcal |
|---|---|
| Protein | 4 g |
| Fat | 9 g |
| Carbs | 9 g |
| Fiber | 1 g |
| Sugar | 7 g |
| Sodium | 90 mg |
