Grill Smoky Nachos: the Ultimate Camping Snack
- Essential Ingredients Guide for Flavorful Camping Fun
- Mastering Professional Cooking for Grill Smoky Nachos
- Pro Tips & Secrets for Grill Smoky Nachos
- Perfect Presentation of Your Nachos
- Storage & Make-Ahead Tips
- Creative Variations
- Complete Nutrition Guide
- Wrapping It Up: Your Camping Culinary Adventure Awaits!
- Frequently Asked Questions
- 📝 Recipe Card
Ever found yourself around a crackling campfire, the sun setting just right, and a starry sky creeping in? it’s one of those magical nights, and suddenly it hits you you need snacks! what’s better than a plate of grill smoky nachos for delicious camping fun?
seriously, every crispy, cheesy bite takes me back to my childhood camping trips where the outdoors was home and the smores were just the beginning.
Recipe Overview
So, let’s talk nachos! the concept of nachos has roots deep in mexican cuisine, dating back to the 1940s. but it exploded onto the american scene as the ultimate game day snack and party favorite.
Fast forward to today, and you've got nachos making grand appearances on camping trips, tailgates, and backyard barbecues. they're super easy to whip up and only require about 35- 40 minutes from start to finish, making them perfect for those who don’t want to miss a second of fun.
Now, before i scare you off, let me get this straight: this recipe is easy peasy ! anyone can do it.
Plus, you’ll probably spend less than $15 on all the ingredients. yep, it’s the kind of wholesome camping food that won’t break the bank.
And it makes enough to serve 4-6 hungry campers .
Key Benefits
Let’s dive into why these nachos need to be on your camping menu! first and foremost, they’re packed with health benefits .
You’ve got fiber from the beans, healthy fats from the avocado, and lots of cheesy goodness. not to mention, they can easily adapt to any dietary preference think plant based nachos if you want to switch it up!
These nachos are a crowd pleaser and work great for quick camping recipes or even as a party appetizer idea during gatherings.
Trust me, when your friends dig into these layers of cheesy goodness, they won’t stop raving about the smoky flavor and fresh toppings.
Whether it's a birthday bash, fourth of july, or simply a saturday night hangout, this is one recipe that's sure to shine.
Toss in some zesty salsa or experiment with nacho toppings like jalapeños, fresh corn, or even a sprinkle of smoked paprika you can truly customize these grill delights!
and if you want to impress with some serious grilling finesse, try layering with different cheeses for those ooey gooey cheese melting tips that everyone loves to talk about.
Ready to fire up the grill and enjoy some tasty camping treats? First, let’s check what you’ll need to bring these Grill Smoky Nachos to life.
Grab a list and get ready; these nachos are about to become your new favorite camping snack!
Essential Ingredients Guide for Flavorful Camping Fun
When it comes to whipping up delicious camping meals, having the right ingredients can make all the difference. think about it: you're out in nature, the sun's setting, and that perfect chill is in the air.
Let's get into the premium core components that every outdoor cooking ensoiast should keep stocked for those tasty grill smoky nachos for delicious camping fun!
Premium Core Components
First things first measurements matter! for our nachos, here’s what you need: 1 bag (13 oz/370 g) tortilla chips , 2 cups (8 oz/225 g) shredded cheddar cheese , and 1 cup (240 ml) canned black beans .
It’s also handy to keep things in metric. for instance, if you’re measuring out cheese, that’ll help you if you’re weighing it: 225 grams gets you right on point!
Now, let’s talk about quality . look for tortilla chips that are nice and sturdy. nobody wants a soggy chip. and cheese? aim for freshly shredded.
It melts better and tastes so much yummier than that bagged pre-shredded stuff. remember to check for any funky smells or discolorations freshness is key.
Storage can be tricky while camping. keep dry goods like chips in a sealed container or bag to avoid any critters making a midnight snack.
Sour cream or yogurt? those need to stay chilled. if you're out camping, just throw that cooler in with ice packs!
Signature Seasoning Blend
Now let's jazz things up with a signature seasoning blend . for smoky flavors that truly hit the spot, whisk together 1 tsp smoked paprika , 1 tsp chili powder , ½ tsp garlic powder , and ½ tsp cumin .
This mix works magic on your nachos. pair it with fresh herbs! think cilantro or scallions these guys add freshness and brightness.
Taste buds dancing? you might also experiment with different regional variations . use jalapeños if you like it spicy or load up on those tex-mex flavors with some taco seasoning; it’ll change the game.
Smart Substitutions
Sometimes you gotta roll with the punches this is camping, after all! if you can’t find tortilla chips, try using pita chips or even sliced veggies like bell peppers for a low-carb alternative.
Feeling lazy? canned beans are fantastic. if black beans aren’t your jam, go for kidney beans. just rinse these bad boys, and you’re good to go!
Dietary options? no problem. if you’ve got plant based eaters in the mix, you can always swap out cheese for a creamy avocado mash or use nut-based cheese .
It’s all about making something that everyone can enjoy while you’re gathering ‘round that campfire.
Kitchen Equipment Essentials
Don’t sweat it if you think you need a whole bunch of fancy gadgets. for campfire cooking , your grill is your best friend, with a large grilling pan or aluminum foil easy peasy.
No fancy equipment necessary. just throw those nachos straight on there and cover ‘em up!
Don’t forget a spatula or tongs; you don’t want to get in there with your fingers yikes! and if you’re lucky enough to have a fire pit , you’ll want to make sure it’s at a safe cooking temp.
Worried about storage solutions? Keep everything organized! Use clear, sealed containers to separate ingredients and prevent any “surprise” additions, like ants!
With these essentials covered, you’re almost ready to craft those grill smoky nachos . trust me, gathering around the campfire with those cheesy, smoky nachos will be a camping activity you won’t soon forget.
Alright, let’s move on to the fun part the instructions! you're just a few steps away from enjoying the ultimate satisfying snacks that are great for gatherings, easy camping meals, or just a good ol’ outdoor get-together.
Stay tuned!
Mastering Professional Cooking for Grill Smoky Nachos
So you’re ready for delicious camping fun with some grilled nachos, huh? that’s awesome! but let’s make sure you nail it, just like the pros do.
Whether you're cooking over a campfire, or firing it up in the backyard, there's some must know stuff before you dive into proper nacho heaven.
Essential Preparation Steps
First things first, we gotta talk about mise en place . this fancy term just means getting everything ready before you start cooking.
Grab your tortilla chips , cheese, and all those tantalizing toppings. you don’t want to be scrambling around while things are grilling away.
Have a bowl for salsa, avocado prepped, and a spoon for sour cream that kind of thing!
Next up, let’s tackle time management . prep your ingredients like a champ. spend about 15 minutes piling them up and 10 minutes making those drool worthy toppings.
You start the grill while the toppings are in their bowls. multitasking is key!
Now, let’s get organized. keep your grill tools like tongs and spatula handy. you don’t wanna be rummaging through a messy picnic basket mid-cook.
And don’t forget safety! make sure your grill is on level ground and not near flammable stuff. scorched nachos are great, but a fire is not!
step-by-step Process
Alright, let’s dive into the nitty gritty! Here’s how you whip up those Grill Smoky Nachos without losing your mind:
- Preheat the grill to medium heat (around 350° F ).
- Prepare the base : Spread your tortilla chips across a large grilling pan. Trust me, this is your nacho kingdom!
- Add the layers : Sprinkle those cheesy dreams like cheddar and queso fresco. Layer with black beans, corn, and if you dare, sliced jalapeños.
- Season it up (optional): Mix together smoked paprika and chili powder and give your nachos a flavorful sprinkle.
- Grill it : Place your pan on the grill and cover it. Let it cook for 10- 15 minutes . Check often you want that cheese bubbled up and gooey, but not burnt!
- Toppings time : While that’s grilling away, chop an avocado, and keep that fresh salsa ready. Pro tip avoid a wild avocado slice disaster by using a knife that actually cuts.
- Serve : Take that pan off the grill, adding your toppings and garnishing with cilantro. Don't skip the lime wedges they’re mandatory!
Expert Techniques
Now that you've got the basics, let’s sprinkle in some expert techniques . one critical step is to monitor temperature control .
Cheese generally melts around 160° f , and you do not want it to hit that boiling point. pay attention let that cheese just get gooey and avoid dry clumps.
Another cool trick: if things start looking a bit dry, give them a good spray of cooking oil or even a splash of salsa! Your nachos will thank you later, trust me.
And, oh, the toppings! Don’t be shy. Toss on those flavorful toppings like avocado and more cheese. Adding fresh greens or even a scoop of bean dip will elevate your grilling game makes for some yummy campfire recipes !
Success Strategies
Let’s talk about the things that could go sideways. A common mistake is overloading those chips. Too much on top and they go soggy, which is so not what we want.
For quality assurance, turn those nachos regularly while grilling. Keep checking for golden edges. Just think of them like a sunbather a little flip keeps things from getting too burnt!
And if you’ve got extra nachos? No biggie! These bad boys can be made ahead. Just pre-grill and warm them back up when you’re ready.
By now, you’ve made it through the nitty gritty of nacho preparation. Everything from camping snacks to grilling recipes , you've got the knowledge to wow your friends around the campfire.
So gear up for you next outing, and let’s tackle that camping trip with some epic grill smoky nachos for delicious camping fun ! you might even turn a few heads while you're at it.
Next stop, easy camping meals to impress! you’re gonna slay it!
Pro Tips & Secrets for Grill Smoky Nachos
Alright, folks, let’s chat about how to take your grill smoky nachos to the next level. first up, i’ve got some gems from my own camping trips.
These are the little secrets that make all the difference.
Prep like a pro: before you even light that grill, have everything ready to go. i’m talking about all your nacho toppings and smoky seasonings prepped ahead of time.
It’s way less stressful when you can just grab and sprinkle. trust me, nobody wants to forget the jalapeños while everyone's hungry!
Layer it right: when building those nachos, remember to layer. start with chips, then cheese, and keep adding till you feel the nacho gods approve.
A sprinkle of smoked paprika and chili powder really amps up those smoky flavors.
Keep an eye on things: nachos can go from melty goodness to burnt bits faster than you can say, "where's the dip?" stay close to that grill.
Flip things around if needed, and don't be surprised if the cheese starts bubbling in just about 10 minutes!
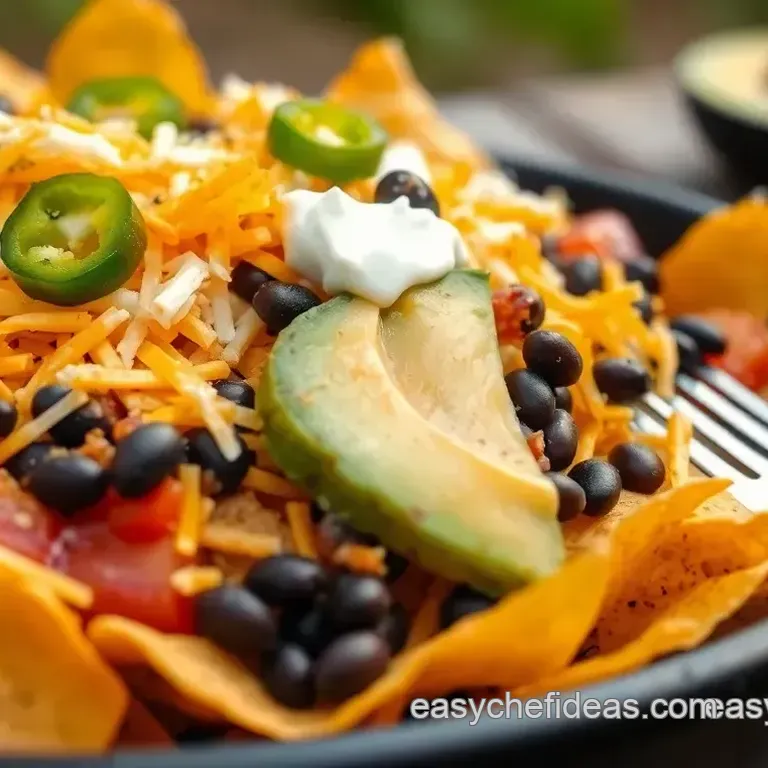
Perfect Presentation of Your Nachos

Now onto what every campfire gathering needs eye candy! Plating your Grill Smoky Nachos doesn’t just make you look like a culinary genius; it elevates your camping snacks .
Go big or go home: use a large serving platter or even a cast iron skillet if you’ve got one.
The more nachos you can fit, the better! you want everyone reaching for that gooey, cheesy goodness.
Garnish is key: a sprinkle of fresh cilantro and that creamy scoop of sour cream on top is not just for show.
It adds color and freshness. throw in some sliced limes for that zing!
Color Play: Mix up your toppings think bright red salsa, creamy green avocado, and that golden cheese. It’s all about making your nachos as inviting as they are delicious!
Storage & make-ahead Tips
Who doesn’t love a good make-ahead plan? Camping is busy, so prep whenever you can.
Storage: if you have any leftovers (which is rare, but it happens), let those nachos cool down, then pack them up in an airtight container.
They’ll be good for about 2 days in the fridge. just don’t expect the chips to stay crispy ain’t nobody perfect!
Reheating instructions: when you’re ready to dig in again, pop ‘em in the microwave or even better, back on the grill to revive that crispy texture.
Just keep an eye on it, since nobody wants to deal with burnt nachos twice!
Creative Variations
Bored of the same old nachos? Let’s get creative with some nacho variations !
Spice it Up: Feeling bold? Try a spicy BBQ chicken on top. It adds a smoky kick and turns your nachos into a full meal.
Get Seasonal: As fall rolls in, roasted butternut squash brings warmth and sweetness to your nacho game. Seriously, it’s a game changer!
Dietary Swaps: Getting vegan? No sweat! Swap the cheese for plant based alternatives and enjoy those smoky flavors guilt free.
Complete Nutrition Guide
Now, let’s get real about the munchies. Here’s a quick look at the nutrition for our nachos.
Calories and beyond: each hefty serving of grill smoky nachos comes in around 350 calories. a decent little snack to keep your energy up while hiking or telling ghost stories around the fire.
Health Perks: Black beans are your friend here packed with protein and fiber. Pair that with the freshness from your salsa recipes , and you’re golden!
Portion Guidance: Keep your portions flexible. If you’re sharing with friends, consider smaller bowls. This way, everyone munches happily without going overboard.
Wrapping It Up: Your Camping Culinary Adventure Awaits!
So there you have it a party ready version of your classic campfire recipes . With some thoughtful tips, creative variations, and a sprinkle of love, your Grill Smoky Nachos for Delicious Camping Fun will steal the show!
Don’t be afraid to experiment, share your creations, and savor the moments around the fire. this isn't just cooking; it’s creating fun memories with those you care about.
Now, go on and whip up some nachos that’ll make everyone rush over to your picnic table like bees to honey! enjoy your outdoor cooking adventures, and happy grilling!
Frequently Asked Questions
What ingredients do I need to make Grill Smoky Nachos for Delicious Camping Fun?
To make Grill Smoky Nachos, you'll need tortilla chips, shredded cheddar cheese, queso fresco, black beans, corn, jalapeños, and toppings like avocado, salsa, sour cream, and cilantro. Don’t forget the optional smoky seasoning for that extra flavor boost!
Can I prepare the toppings for Grill Smoky Nachos in advance?
Absolutely! You can dice the avocado, prepare the salsa, and store them in airtight containers. This will save you time when you are ready to grill and help you serve fresh toppings without any hassle.
How can I store leftovers from Grill Smoky Nachos?
Leftover Grill Smoky Nachos can be stored in an airtight container in the fridge for up to 2 days. To reheat, place them on a baking sheet in the oven at 350°F (175°C) until warmed through, as microwaving can make them soggy.
What are some variations I can try with Grill Smoky Nachos?
There are many fun variations! You can add shredded BBQ chicken for a smoky BBQ flavor, or switch out black beans for lentils for a vegetarian option. Try mixing different cheeses or adding fresh vegetables like diced tomatoes and green onions for extra taste and texture.
Is this nacho recipe healthy?
Grill Smoky Nachos can be a balanced snack depending on your toppings and portion size. They provide a good source of protein and fiber from beans and cheese but can be high in sodium and fat. Consider using whole grain chips or Greek yogurt instead of sour cream to make it healthier.
What tips do you have for grilling the nachos perfectly?
To achieve perfectly grilled nachos, preheat your grill to medium heat and keep a close eye on them as they cook. Layer the toppings evenly for a uniform melt, and consider using a grilling pan or aluminum foil to prevent spillage.
Remember, nachos can go from deliciously gooey to burnt quickly, so monitor them closely!
Grill Smoky Nachos For Delicious Camping Fun

Ingredients:
Instructions:
Nutrition Facts:
| Calories | 350 kcal |
|---|---|
| Fat | 18 g |
| Fiber | 5 g |
