Colorful Rainbow Ice Cream Sandwiches
- A Rainbow of Fun: Let's Bake Rainbow Ice Cream Sandwiches in 15 Min!
- Your Go-To Essential Ingredients Guide
- Whip Up Colorful Rainbow Ice Cream Sandwiches in Just 15 Minutes!
- Pro Tips & Secrets for Baking Rainbow Ice Cream Sandwiches
- Perfect Presentation
- Storage & Make-Ahead Tips
- Creative Variations
- Complete Nutrition Guide
- Frequently Asked Questions
- 📝 Recipe Card
A Rainbow of Fun: Let's Bake Rainbow Ice Cream Sandwiches in 15 Min!
Ever had one of those hot summer days where the sun is blazing, and all you want is something cold to cool you down? i remember one summer, my friends and i attempted to make our own ice cream sandwiches.
You know, the classic type nobody warned us it was going to take forever! but oh my gosh, bake rainbow ice cream sandwiches in 15 min totally flip the script! picture this: vibrant, colorful cookies hugging creamy ice cream, and you get a smile from everyone.
Seriously, they taste as good as they look!
The Sweet Backstory
Let’s take a little trip down memory lane. ice cream sandwiches have been a crowd favorite for ages, dating back to the early 1900s.
Back then, they were simply vanilla ice cream wedged between two chocolate cookies classic! fast forward to now, and we’ve got a rainbow twist, making it fit right into the whole rainbow desserts trend.
They’re not just delicious but also oh-so-pretty . in today’s world, nothing says summer like homemade ice cream treats with a bit “wow” factor.
Who wouldn't want a slice of that colorful joy for their next get-together, right?
In terms of what it takes to whip these up, it’s honestly super simple! prep usually takes about 15 minutes, and then you just pop them in the oven for about 8 minutes.
They’re easy peasy, even for novice bakers. plus, you end up with 12 delightful ice cream sandwiches , which are perfect for sharing or not!
The Perks of Rainbow Ice Cream Sandwiches
Alright, let’s get real about the perks of these easy baking recipes ! first off, they are not only fun to make, but they’re also a feast for the eyes (and taste buds)! rainbow colors in your food? yes, please!
kids love them, making them one of those fun desserts for kids that make a family gathering extra special.
But here’s the kicker: you can totally customize the filling. your favorite flavor? you got it! chocolate, mint chip, or even sorbet whatever floats your boat! plus, they’re not just for summer parties; these seasonal desserts can rock any occasion, from birthdays to holiday celebrations.
And let’s not forget that the cookies are easy enough to whip up in a pinch. why spend hours in the kitchen when you can stun your guests with these vibrant cookie sandwiches?
On the health side, while they’re definitely a treat, you can control the ingredients, making them as wholesome or indulgent as you want.
Want to tone down the sugar or use whole grains? go for it! they’re way better than those store-bought options loaded with preservatives.
Time to Gather Those Ingredients
Now that i’ve whetted your appetite for these colorful delights, let’s look at what you’ll need to set the stage.
You’re going to want some all-purpose flour, butter, sugar, and of course, the star of the show ice cream! oh, and don’t forget the colorful sprinkles for ice cream ; they really elevate the fun factor!
Ready to dive in? Let’s gather everything you need to bake up some rainbow magic !
Stay tuned for the ingredient list because you’re definitely going to want to make these stat. I promise, one bite and you'll be hooked!
Your Go-To Essential Ingredients Guide
Look into into the delightful world of baking with some essential ingredients ! knowing what to have on hand is your first step to whipping up tasty treats, like our soon-to-come bake rainbow ice cream sandwiches in 15 min .
Seriously, you’re gonna want these for summer parties or just a fun afternoon with the kids.
Premium Core Components
Before we tackle the rainbow goodness, let’s chat about some premium core components that make a difference in your baking.
When it comes to flour, you need 1 ½ cups (188 g) of all-purpose flour . for the adventurous bakers, whole wheat flour or even a gluten-free blend are good alternatives too.
Always look for a flour that’s fine, not clumpy. trust me; it’ll save you from a not-so-fun cookie texture later.
Another must have is unsalted butter . you want ½ cup (113 g) of that melt-in-your mouth goodness. check that it’s soft but not melted otherwise, your cookie dough might end up a bit too runny.
Butter can last in the fridge for about a month, but stick it in the freezer if you’re not gonna use it right away.
Just portion it out ahead of time so you’re never caught unprepared.
Signature Seasoning Blend
Okay, now, let’s get to the flavor part! signature seasoning blends can really jazz up your recipes. for our rainbow sandwiches, you won’t need much just 1 teaspoon of vanilla extract will do.
It's amazing how such a simple thing adds warmth and depth. grab a high-quality one; if it smells good in the bottle, it’s likely gonna taste great in the cookies.
And don’t forget that food coloring ! you can use gel or liquid; just keep in mind that a little goes a long way.
I suggest trying a few shades and having fun with it!
Smart Substitutions
Life happens, guys! and sometimes you find yourself without specific ingredients. smart substitutions will save your day! if you’re out of granulated sugar , brown sugar will bring a wonderful molasses vibe to your cookies.
And if you need to switch up the ice cream in your sandwich? go for yogurt! it’s a great lower calorie option and can still taste delightful.
Did you know you can also swap coconut oil for the butter if you’re going dairy-free? The beach vibes in your dessert will totally bring a new twist!
Kitchen Equipment Essentials
Now let’s talk tools. no need to break the bank, but having the right kitchen equipment essentials is important. a solid baking sheet and some parchment paper can make all the difference, especially when your cookies are fresh out of the oven.
Honestly, who wants to scrub off baked-on batter?
You might consider getting a silicone baking mat ; it can save your cookies from sticking while being super easy to clean.
Also, make sure you have a good spatula for transferring those colorful cookies onto a wire rack. because let's be real, nobody wants a cookie disaster!
Wrapping It Up
Alright, folks, this essential ingredients guide should give you the confidence to bake up some magic in your kitchen. from the basics to unique tweaks, it’s all about making cooking easier and so much fun.
And trust me, when you bake rainbow ice cream sandwiches in 15 min , you will feel like a pro!
Stay tuned for those fantastic instructions you won’t want to miss them! These easy baking recipes are just around the corner!
Whip Up Colorful Rainbow Ice Cream Sandwiches in Just 15 Minutes!
Alright, friends, if you’re after a fun, quick, and downright delightful treat, you’ve landed in the right place. let’s dive into making colorful rainbow ice cream sandwiches , a brilliant twist on the classic dessert that’s perfect for summer days or just when you need a little pick-me-up.
You can bake rainbow ice cream sandwiches in 15 min yes, you heard that right! it’s all about quick dessert ideas that pop with personality and taste.
Essential Preparation Steps
Before we unleash our baking magic, let’s get our ducks in a row with some essential prep work. first up is the mise en place , which is just a fancy way of saying you should measure out all your ingredients beforehand.
You don’t want to be scrambling for sugar when you’re elbow deep in cookie dough, trust me!
Time management is key here. have your oven preheated to 350° f ( 175° c) while you mix up your dough, so you're not waiting around at the end.
And don’t forget about organization ! keeping your workspace tidy will help reduce stress while you’re whipping up these colorful cookies .
Lastly, safety first! Always use oven mitts, and if you're dealing with sharp kitchen gadgets, be careful no one wants a cooking mishap.
step-by-step Process
Let’s get to the good stuff. Here’s your numbered guide to whip these up fast:
- Preheat that oven to 350° F ( 175° C) .
- Line a baking sheet with parchment paper.
- In a bowl, whisk together 1 ½ cups of all-purpose flour , ½ teaspoon of baking powder , ½ teaspoon of baking soda , and ¼ teaspoon of salt .
- In another bowl, cream ½ cup of softened butter with ¾ cup sugar until fluffy. It’ll take about 2- 3 minutes .
- Add 1 large egg and 1 teaspoon of vanilla extract to that mix. Beat it well!
- Gradually stir in your dry ingredients until just combined.
- Split your dough into four portions and dye them with different food colorings.
- Scoop those colorful dollops onto the prepared baking sheet, spaced about 2 inches apart .
- Bake for 8 minutes or until they’re just golden at the edges.
- Allow to cool completely on a wire rack.
To add that ice cream goodness, take your favorite ice cream (make sure it’s softened!) and assemble those sandwiches just before serving.
A good tip is to let the cookies chill in the fridge before you add ice cream; it keeps everything from getting too melty while you're making them.
Expert Techniques
Now, you might be wondering how to ensure your sandwiches turn out perfect. Here are a few expert tips:
- Temperature control is essential. Make sure your oven is fully preheated to 350° F ( 175° C) . Underbaking can lead to gooey cookies, and who wants that?
- Timing precision ! Always stick to that 8-minute bake time . If the edges look a little golden, they should be good to go.
- Watch for visual cues for doneness; the cookies should slightly rise and stay soft in the middle. They’ll firm up as they cool.
Success Strategies
Let’s chat about avoiding those classic kitchen blunders.
One common mistake is using ice cream that’s still rock hard softened ice cream makes spreading a breeze! trust me, you won’t be happy if your cookies break while you try to assemble them.
For quality assurance, give them a taste test after assembly if they’re smiling back at you, you know you've nailed it!
Lastly, these cookies are perfect to make-ahead. assemble them and keep them in the freezer for a fun, spontaneous dessert.
Imagine pulling these bad boys out at a summer bbq. total game changer!
Additional Information
Alright, before we wrap this up, just think of this dessert as your blank canvas. you can swap in different ice cream flavors or even mix in some candy bits in the cookie dough.
Get creative these homemade ice cream treats are just waiting for your personal touch!
Whether you’re entertaining friends, cooking with kids, or simply treating yourself, these colorful cookie sandwiches will definitely bring joy and excitement. Happy baking, my friends!
Pro Tips & Secrets for Baking Rainbow Ice Cream Sandwiches
Oh my gosh, let's just jump right into it! bake rainbow ice cream sandwiches in 15 min sounds wild, right? but once you dig into these, you’ll see it’s all about the fun and flavors.
So, i've got some pro tips for you to elevate your game.
First off, if you want that dough just right, keep your butter at room temperature and mix it with sugar until it’s fluffy you want that light and airy feel, trust me! time saving techniques? so simple! use a cookie scoop to get even portions and make those colorful cookies super consistent.
When it comes to flavor enhancement, don’t skip the vanilla extract. it adds a nice depth, and let’s be real, vanilla makes everything better! want to kick it up a notch? toss in some chocolate chips or chopped nuts right before you scoop the cookies onto your baking sheet.
Those little surprises will be a hit!
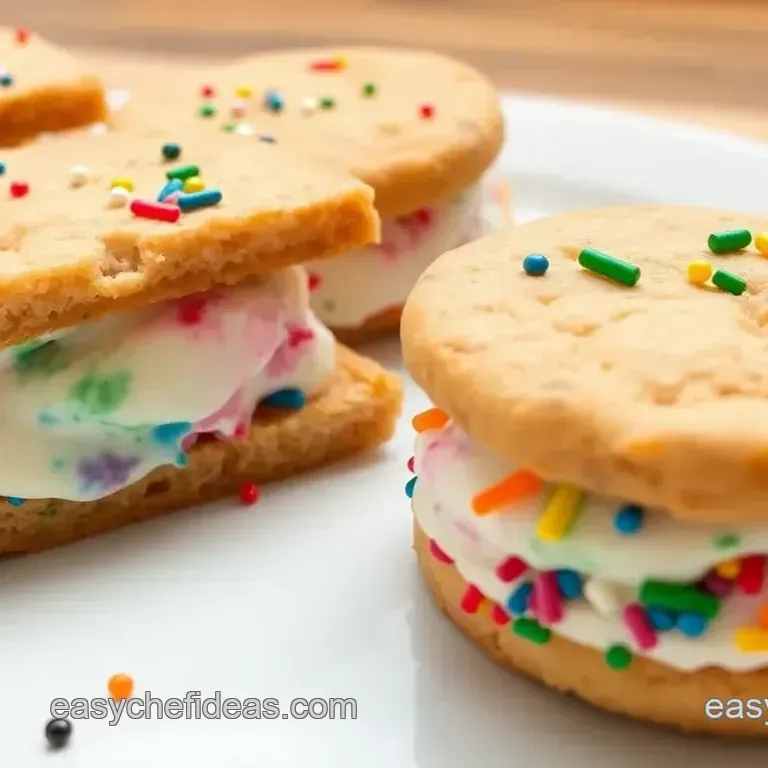
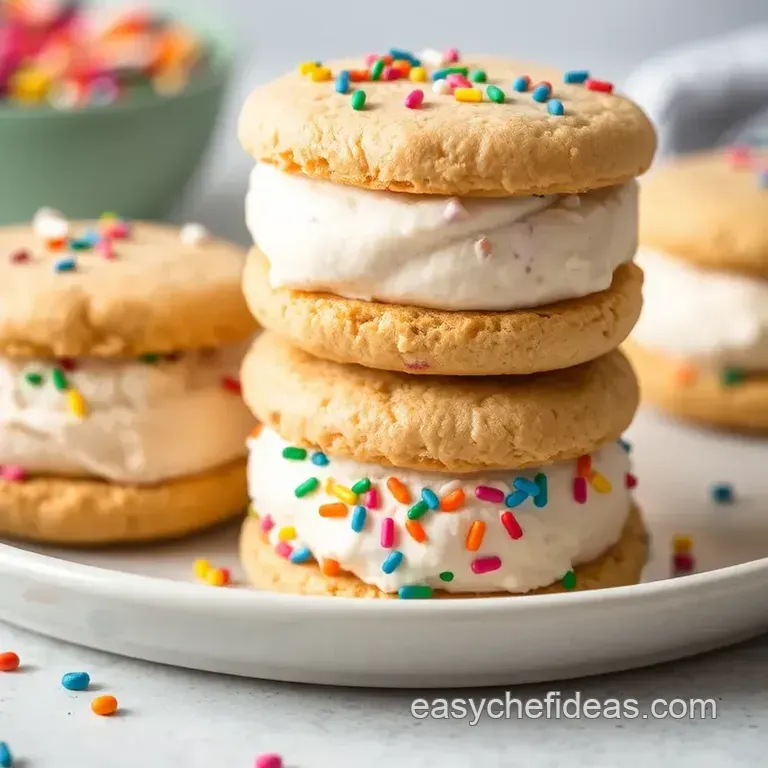
And let’s chat presentation. after baking, cool those cookies completely on a wire rack, then gently roll the edges of your ice cream sandwiches in colorful sprinkles.
It adds a fun pop and makes them look extra special for parties or just because. who said desserts can't be pretty?
Perfect Presentation
Speaking of presentation, plating these rainbow ice cream sandwiches might just be the most fun part! stack them on a colorful plate with a few fresh berries around.
Trust me, it’ll look like you’re serving up a dessert masterpiece !
Garnish ideas? how about a dollop of whipped cream on the side? maybe a sprinkle of edible glitter for that fairy tale vibe.
Remember, colors are your best friends here. use vibrant hues together to make everything pop. think rainbow colors! it’s a feast for the eyes and palate.
Storage & make-ahead Tips
Now, for storage. if you somehow have leftovers (doubtful, but hey!), wrap them tightly in plastic wrap and store in an airtight container in the freezer.
They should stay fresh for about a week . when you’re ready to indulge again, just let them sit out for a few minutes while you drool in anticipation.
Reheating? Nah! These bad boys are best enjoyed straight out of the freezer. They won’t survive long anyway, especially if you have kiddos in the house.
Creative Variations
Feeling adventurous? let’s dive into some creative variations . substitute plain vanilla ice cream for any flavor you fancy think mint chocolate chip or even pumpkin for those fall vibes.
Seasonal twists can really spice things up; imagine gingerbread cookies and cinnamon ice cream for a holiday treat. yum!
And if you're keeping it healthy, use whole wheat flour or sneak in some oats in the dough. you can also switch to dairy-free ice cream to cater to dietary needs.
The world is your oyster when it comes to customizing these colorful cookie sandwiches.
Complete Nutrition Guide
Curious about the nutritional side? each ice cream sandwich packs around 180 calories , with just a bit of protein and a good dose of sugar to satisfy that sweet tooth.
They’re not exactly health food, but hey, they're great for celebrating life’s little moments.
Sharing food is love, folks! Encourage portion control if you’re sharing them with little ones no judgement though if you end up eating two (or three).
These Rainbow Ice Cream Sandwiches are the perfect family friendly dessert , especially for warm summer days. You can whip them up in just over 15 minutes and create memories while baking!
So, there you have it! look into in, have fun with it, and most importantly, enjoy every bite ! you know what they say the best memories are often made around the dinner table, and these vibrant, easy-to-make treats are sure to take center stage.
Happy baking!
Frequently Asked Questions
How long does it take to Bake Rainbow Ice Cream Sandwiches in 15 Min?
The total time for this recipe is approximately 23 minutes, with 15 minutes dedicated to active prep. You’ll spend about 8 minutes baking the cookies, so you can enjoy these delightful treats in no time!
Can I customize the colors in my Rainbow Ice Cream Sandwiches?
Absolutely! You can choose any food coloring you like to create your own unique color combinations. Feel free to mix colors or even use natural food dyes for a more organic option!
What are some storage tips for these ice cream sandwiches?
Store the assembled Rainbow Ice Cream Sandwiches in an airtight container in the freezer. They will keep well for up to a week, but enjoy them sooner for the best taste and texture!
Can I make these rainbow cookies ahead of time?
Yes! You can prepare and bake the rainbow cookies in advance, and store them in an airtight container. Once you're ready to assemble the sandwiches, just soften your ice cream, fill, and freeze again for the best results!
What ice cream flavors work best for the filling?
Your favorite ice cream flavors will work best! Vanilla is classic, but feel free to experiment with chocolate, strawberry, or even sherbet for a fruity twist. The key is to choose a flavor that complements the sweet buttery cookies.
Are there any nutritional considerations I should keep in mind?
Each ice cream sandwich contains about 180 calories, so if you're watching your intake, consider moderation. For a healthier twist, use low-calorie or dairy-free ice cream options, and try to add in fresh fruits or nuts for added nutrition!
Bake Rainbow Ice Cream Sandwiches In 15 Min
Ingredients:
Instructions:
Nutrition Facts:
| Calories | 180 kcal |
|---|---|
| Protein | 2 g |
| Fat | 9 g |
| Carbs | 24 g |
| Fiber | 0.5 g |
| Sugar | 12 g |
| Sodium | 75 mg |
